Wednesday, October 27, 2010

thursday...

Can you believe that it is the last Thursday of October which means that this is my last sketch as a guest DT for Sketchy Thursdays and I must say that I have enjoyed working with them this close and will definitely continue to play along their weekly sketches.

Here's the last sketch of October (10.28):


and here's my take on it:


I rotated the pictures clockwise to fit my pictures. These pictures were taken last Christmas and they are of my dog with his Christmas present-a new bed! I glimmer misted the red cardstock using a Pazzles die cut to get the flourish in the corners. I then went and outlined it with stickles to give it an embossed finish. I love how subtle but elegant this technique looks! I distressed this layer and machine stitched it unto the water distressed Anna Gliffin paper which I mounted on a black cardstock. The flowers are Prima's and the green holly felt under the pictures is by Recollections. I handmade both the black and white flourishes. For the journaling, I printed the words on white cardstock and then I cut them into strips which I then later distressed using the edge of my scissors. My dog's name, Cubby, I cut using my Pazzles and then I stickled in red to give it a Christmas feel. I do love how this layout turned out!

Here are some more close ups of the finished layout:


Don't forget to stop by Sketchy Thursdays and play along! Have a wonderful day!

Monday, October 25, 2010

monday...

Happy Monday...NOT! I've been sick for the past 5 days now and I'm not feeling any better. I hope I get better soon! Well, sick or not, I did managed to work on a layout that I've been 'thinking' about for the past month.

I used the Creative Scrapper sketch (#127) linked below:


and here's what I came up with:


I'm also entering this layout in Swirlydoos Do it Yourself background contest as well as Wendy's Do it Yourself sb.com challenge and I must say, that this layout WAS a challenge!

So, the first thing I did was go online and order some Glimmer Mist. I bought 6!!!! Then, I made my own mask using my Pazzles and Prima's felt vines as my inspiration. I cut the template out of a transparency sheet and used Zig thick pen to make it sticky. I also cut a cricut flourish (using my Pazzles :)) to make another mask. I used 3 glimmer mists (Suede, Olive green, and Frost) as well as walnut ink for my background. I then water distressed this layer of paper and matted it with a brown cardstock and finally adhered it on a DCWV green cardstock. The original cardstock was white, as I'm sure you can see by the white 'vines' in the background. I stickled (Eucalyptus) the vines to add some bling to it. The smaller scalloped brown paper is actually the backing of a page stack that I've had for a while. I used my handmade masks and walnut ink to make this paper. I then went over the edges with Scribbles 3D paint (glittering crystal) for an embossed look. I stamped the butterflies (Martha Stewart) in the background with Perfect Medium (by Ranger) and then added perfect pearls to make them stand out.

Here's a picture of my finished background before I added the embellies:


and some close ups:


I edited the picture in Photoshop CS4 to give it a more soft and dreamy look using Lisa's tutorial. I can't believe how easy this was! The flowers are from the Fall flower section at Michaels that I bought a few weeks back when they were on sale. The leaves are a stamp and the butterflies were printed and stickled for a blingy look. The black flourish I did with 3D paint (Black) onto a transparency (not my usual way) just to try it out. I like how it came out but I'm not thrilled with the fact that you can see the transparency edges and it took a really long time to cut it up. I think that I like my way more but using a transparency can become useful for when the bling lands on layers of paper, as it is the case with this layout. The green netting in the bottom was a RAK that I received recently. For the title I used thickers that I received from sb.com on NSD.

Here are a few close ups of the layout:


Thanks for stopping by my blog today. I appreciate it!

Thursday, October 21, 2010

thursday...

Happy Thursday! Today is reveal day over at Sketchy Thursdays and I'm very exited about this sketch and layout!

Here's this week's sketch:


and here's my take:

I loved working with this sketch by Heidi. Instead of the paper behind the pictures, I opted for hand-cutting 16 2 in. circles from scrap papers. I hand stitched them and water distressed them to give them so depth. I also water distressed the background layer which I double matted in green and dark brown cardstock. The vine is a Prima vine that I've had for a while. I hadnmade the butterflies, and their trail freehand using 3D paint. The pictures are of my husband and I at the park laying on the grass. It was a beautiful fall day here in Miami (we don't get Fall here often) so we went for a walk and stayed there for a while. We even watched the sunset! Finally, the corner bling I received from a RAK and is by Prima's new line.

Here are a few close ups of this layout:


If you like this sketch, don't forget to stop by Sketchy Thursdays and play along! There are RAKs involved! :)

Have a wonderful rest of the week!

Sunday, October 17, 2010

Creative Resume

Hi! I want to welcome you into my little corner of the web and my scrapbooking resume. First, let me tell you a bit about myself. I have been scrapping since the summer of 2003, right after graduating from high school. I found myself home alone for the summer with boxes of mementos and pictures. I made my first purchase ($70 worth of scrapping supplies!) at a small scrapbooking store near my house and started scrapping. Now, my first layouts don't look anything like the ones I make now but it was a learning experience. I scrap to keep the memories. I'm big into journaling as well as taking that perfect portrait. I have had the pleasure to be on a few design teams and serve as a guest DT in several occasions. I'm pretty good with meeting deadlines and coming up with creative ways to showcase individual challenges given by any DT or challenge blog. I focus on layouts, usually in the 12"x12" format, but I have also done 8"x8" albums, cards, and I even list layouts for sale on eBay from time to time. I love making sketches too. I have a passion for this hobby and love to inspire others in any way I can.

Current Design Team
Our Daily Bread Designs - May-June 2015

Past Design Team
Swirlydoos Kit Club-October 2013-April 2014
Scrap & Music-April 2013-November 2013
SrapThat! Kit-June 2012-August 2013 (now closed temporarily)
Heartfelt Creations-Nov. 2011-April 2012, May 2012-October 2012, Nov. 2012-April 2013, May 2013-October 2013
A Walk Down Memory Lane-Feb.-July 2011, Sept. 2011-Feb. 2012, Feb. 2012-August 2012
Creative Scrappers-Feb.-May 2011, Nov. 2011- March 2012, April 2012-July 2012
Bits and Pieces Designs-Jan. 2012-April 2012  (now closed)
The {Paper} Trailmakers-Feb.-April 2011  (now closed)
Pages in Time- November 2009- June 2010 (now closed)

Publications

Scrapbook News and Review - January 2012-Curiosity, Together
Scrapbook News and Review - December 2011-Sawgrass Mills, Poor Wet Doggie
Scrapbook News and Review - January 2011-First Kiss, Animal Lover, My Cinderella Story, Life is not measured..., Lazy Tigger
Scrapbook News and Review - Decemeber 2010- Cubby, December Magic
Examiner.com - June 2010 - With This Ring...

Guest Appearances 

Birds of a Feather Kit CO - Guest Spot - September 2011, April 2012
Best Creations - Guest Spot - February 2011
Sketchy Thursdays - Guest Spot - October 2010
Sketches {by Tamara} - Guest Spot - July 2010

Other Featured Work 

National Scrapbook Day Challenge Winner May 2010
Featured Artist of the Month October 2010
Kaisercraft Sketch Challenge Runner up Winner July 2012
Prima BAP Layout Featured on Blog September 2012

Contact e-mail: amadrian8@yahoo.com

Thursday, October 14, 2010

thursday...

It's Thursday again and you know what that means? Yup! It's reveal day as a GDT over at Sketchy Thursdays! This week's wonderful sketch is by Diana and I just had so much fun with it!

Here's the sketch:


and here's my take:

I used pictures of me feeding the duckies at a park close by from earlier this year. I did my favorite technique, water distressing, on all the layers of paper that I used here. The hearts were cut with the cuttlebug, inked and glued over a piece of lace and everything was sewn together with my sewing machine. The brown flowers, as well as the small roses are handmade by me. I used one of Gabrielle's flower tutorials for the large brown flowers and the small roses I used a youTube tutorial, linked on my right sidebar. The white pearls are by Prima, which I've had for a while now.

Here are some close ups:


Thanks for stopping by!

Tuesday, October 12, 2010

tuesday...

Hi everyone! I had a wonderful weekend at Island of Adventure and Universal Studios! We got back on Sunday night and we rested on Monday because everyone got back sore from walking so much. Here are a few pics that we took during the trip:


We had a lot of fun!

Well, I don't have much energy after that trip so I settled down and worked on two cards instead. Teh first on is a birthday card for my aunt's birthday today. I had everything cut up and ready for it but hadn't glued it down yet because I was stil deciding if I liked it or not. I ended up liking it and leaving it as it was.


I used CRC #26 and their sketch too. I handmade the roses and added a butterfly and some flourishes in black. The sentiment is a banner made our of paper. I embossed both lighter papers using the cuttlebug.

The second card is based on a pagemaps sketch and it's a Christmas card.

I handmade the poinsettias using my own tutorial. The sentiment is a rub-on that I've had for years. I think it was a RAK.

Thanks for stopping by and please come back again for my Sketchy Thursdays reveal this Thursday!

Thursday, October 7, 2010

thursday...again!

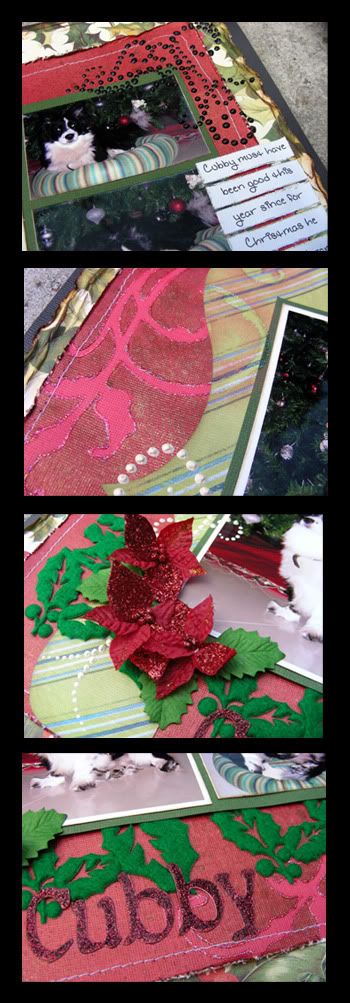
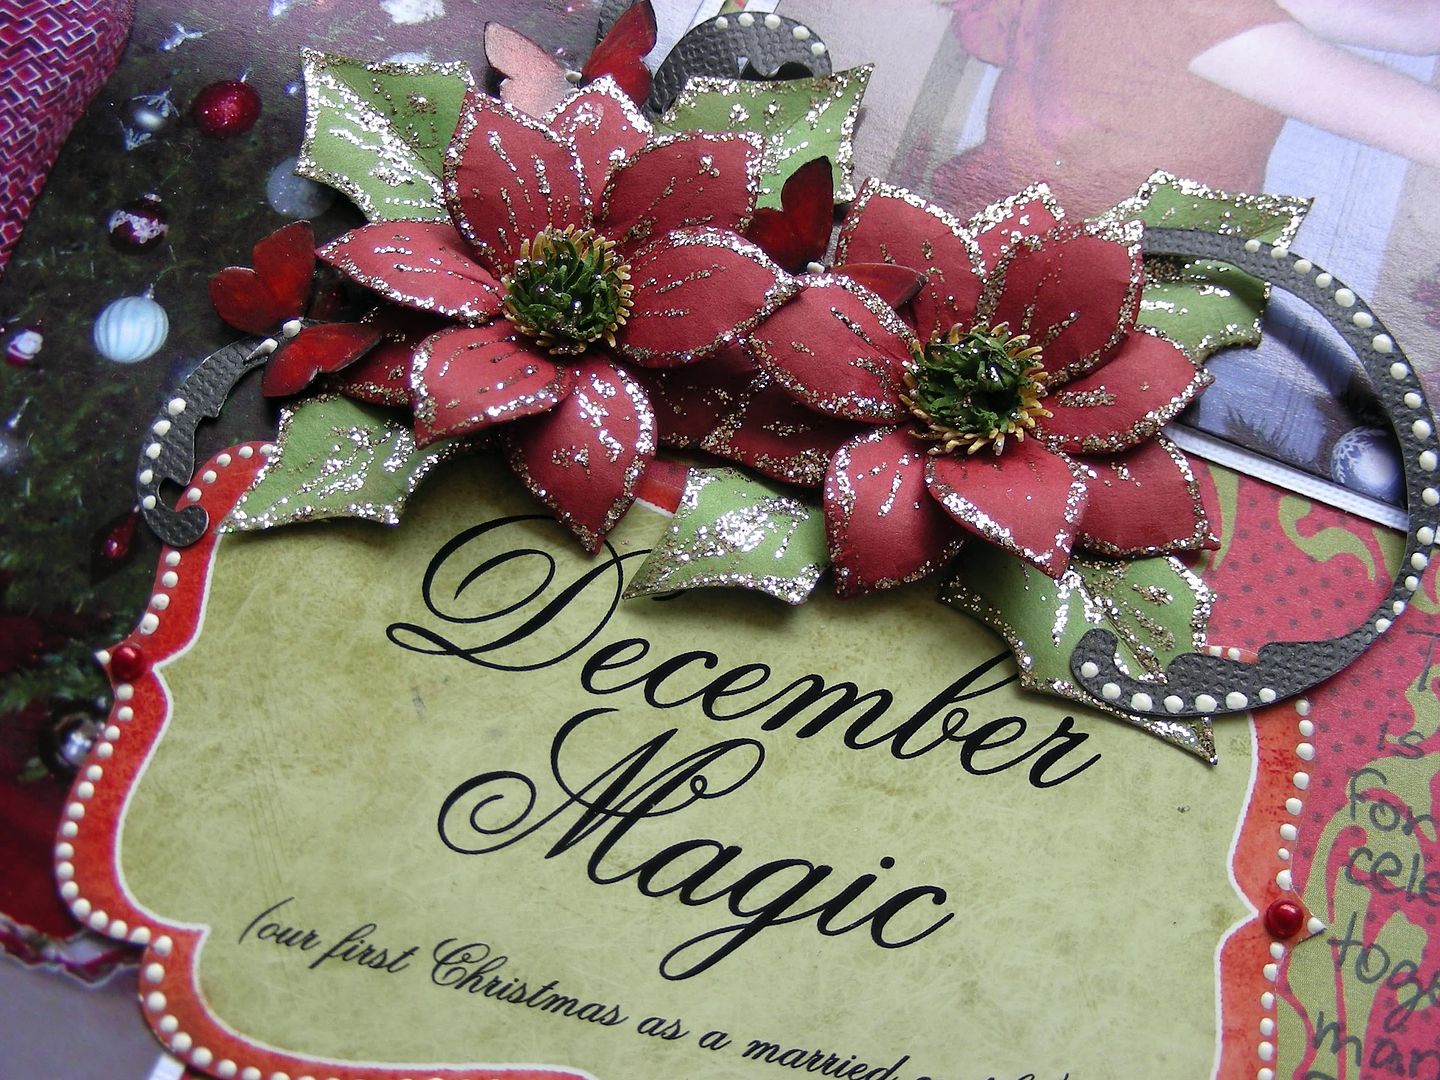
Ok, I'm back today with a brand new tutorial for the poinsettia flowers that I made for the Christmas Layout based off Sketchy Thursdays sketch this week.

This is what we will be making:


Step 1

You need to make three 4 tipped flowers similar to this one. I used a cuttlebug die cut that I've had for years. If you don't have a die cutting machine, you can download this shape that I made for you and hand cut it.

Step 2

Cut all the petals apart and bend them inwards, like the picture above. This will create a 3D look without it being too bulky.

Step 3

Cut or punch out 3 1" circles. These can be any color since you really wont see them. This will be the backbone of your flower.

Step 4

With a pencil, divide the circle in thirds.

Step 5

Cut out the thirds and you will end up with something like this. I believe that there is a punch similar to this shape. You can use it if you have but if you are like me and don't have it, this will do.

Step 6

Glue your petals to the base and you will end up with three 3-pointed flowers.

Step 7

Nest one inside the other, making sure that the petals are staggered. Use only a little bit of glue that way you can play with he petals and move them where you want them once it dries.

Step 8

For the center, you need four small sun punches, two in yellow and two in green. This is actually optional since you can use something else for the poinsettia center if you don't like these centers (scroll down to see more options for flower center).

Step 9

Using a pen and the back of your mouse pad, cusp each piece.

Step 10

Using a little bit of glue, layer them one inside the other, leaving the green ones for the inside and the yellow ones outside. At this point, you can ink the tips if you want. I did so because I like the finished look.

Step 11

This step it important and 'finishes' the flower. Stickle all the edges of the flower, leaves and flower center. I use Platinum stickles for this.

-For the leaves, I hand drew three jagged leaves. If you need a little inspiration, use the clipart below as a general pattern for your free-drawn leaves. You need three of these.


Step 12

Now, here's the fun part! make your bloom! Add the center with a little bit of glue and then add the glittery leaves and you are done! you can fold down the tip of the petals for a more 3D look. Play around until you get the desired look.

FLOWER CENTER ALTERNATIVE:
Now, if you don't want to go through the hassle of making the center, you can add colored rhinestones:


or you can add pearls:


I hope that I was able to inspire you to make some poinsettias for the holidays. I'm sure that they will look wonderful in scrapbook layouts and cards or even presents! Have fun making them and if you can, leave me a comment and a link to your project. I would love to stop by and see it!

Have a wonderful day and weekend!

thursday...

I'm so exited today as today is the first day as a guest Design Team member for Sketchy Thursdays! I've been following them since they started and their submissions every month were barely 20! I've watched them grown and spread the word about them and it has obviously paid off since their weekly submissions have since tripled!

Well, without further ado, here is this week awesome sketch by Heidi:


and my take on it:


As you can see, I'm still behind with my scrapping (scrapping Christmas 2009 in October 2010!?) but I absolutely love how this layout turned out! I combined the two squares on the left side to make it one big picture. Of course, I used red and green as the main colors with a little accent of white and black. I handmade my own poinsettias (working on a tutorial for them right now) and the title box is actually a digital journaling box that I printed and cut with my own title.


The corner flourish is a RAK and it's by Prima E line (Queens Crown) and the other green pearls in the other side are Keisercrafts Basics Pearls. The red and green paper is by Scenic Route. I greatly distressed this layer using water (the water distressing tutorial is on my sidebar) and inked it. I also water distressed and inked the green punched background layer. I love how punched and distressed paper looks! I matted all this with a darker green Bazzill Cardstock.

Here's another close up of the water distressing and Prima's Bling:


Thank you for stopping by and don't forget to check out Sketchy Thursdays and try out the sketch for a chance to win a RAK!

Wednesday, October 6, 2010

wednesday...again!

Hello, I'm re posting a tutorial that I had up for a while. It's my version of handmade flourishes using 3D paint and stickles. This is not original as there are many artists who do this but this is the way that I do it. :)


Making your own flourishes


Here we go. This is what we want to make:


Supplies
-Transparency
-Black Sharpie
-Needle (or pin)
-A flourish template(from prima, stamp, or your own)
-Stickles/3D paint/Liquid pearl

1. First you need a template.
-Photocopy a Prima flourish that you already have
-Use a flourish stamp
-Make your own pattern

2. Trace on the transparency the dots using the sharpie.

3. Using a needle (or pin), poke a little hole on the
transparency and unto the layout. Don’t apply too much
pressure or it will go through the page.


This is what you will see when you remove the transparency.


4. Use the dots as the template now to make your stickles
flourish.


Now you have a beautiful CUSTOM flourish!
(let dry overnight before you touch it)


OPTIONAL:
You can also apply the stickles directly on
the transparency and cut around it later but beware, the
stickles might come off after it dries. I also don't like this method because you can still see the transparency when you cut it and I don't like how it looks.

Try it with two colors and see how elegant it looks!