Wednesday, November 30, 2011

wednesday...double pager tip

I have a quick money saving tip for you tonight! Do you ever find yourself in a situation where you don't have enough pattern paper for a double pager? It happens to me a lot since I usually buy enough paper from a specific collection to make or one layout (and then buy some more if I really like the collection!) but sometimes I end up doing a double pager for those pictures and the paper is not enough. My solution? Cut everything in half and mat onto a cardstock!

This is what I did in my latest double pager using Bo Bunny Timepiece Collection:


Supplies-
cardstock: Bazzill;
patterned paper: Bo Bunny Press Timepiece Tick Tock, Stripes;
stickers: Bo Bunny Press Love is All Cardstock Stickers;
bling: Ranger Liquid Pearls White Opal, Ranger Icicle Stickles;
embellishments: Tim Holtz locket keys;
ink: Ranger Tim Holtz Distress Ink Vintage Photo, Walnut Stain, Embossing Distress Ink, American Crafts Embossing Powder Clear;
stamps: Prima Notary Stamp;
tools: Tim Holtz Tattered Florals dies, Cuttlebug machine, Sizzix decorative flourishes die set, Tim Holtz paper distresser, Fiskars Stylus, Martha Stweart Around the Page punch-Double Loops, Marvy Uchida heat embossing tool, Pazzles Inspiration Machine; 
other: sewing Machine, vellum paper, Epson printer, doily, lace

I wanted both pages to be symmetrical (pattern paper wise anyway) but only had one sheet of Tick Tock and one of Stripe pattern papers so I cut them in half and added a lace to cover up the division.


I hope this helps and stretches out your paper stash a bit more when working with double pagers or even with single page layouts!


***All the Products in BOLD can be purchased from A Walk Down Memory Lane online store.

wednesday...Heartfelt Creations

Happy Wednesday! I think that Wednesdays are my favorite days of the week since I get to share with you the projects that I made using Heartfelt Creations products!

Today I actually have a card to share with you that I made using the new Artistic Gatefold Collection. The new collection is amazing!

Supplies-
Heartfelt Creations : HCPC 3312 Uplifting Scriptures Precut Set
HCPC 3437 Carnation Florals 1 PreCut Set
HCPC 3439 Flirty Fleurs Precut Set
HCD 716 Layered Elegant Swirl Die
HCD 717 Layered Scalloped Posy Die Set
Spellbinders Carnation Creations
9brn Brown Gala Glitz
317430 Cuttlebug machine

Other: Tim Holtz Distress Inks (Vintage Photo, Wild Honey, Peeled Paint), StazOn Archival Ink (Jet Black), Ranger Liquid Pearls (White Opal), i-Rock tool

and here are two close ups of my card:


Here is the step by step write-up for this card:
Using the large half circle die from the Layered Scalloped Posy Die Set, make a base using brown cardstock for your round easel card (instructions can be found here). Die cut a green lacy circle using the lacy posy die from the Layered Scalloped Posy Die Set. Die cut 2 cream colored circles. Mat the lacy circle onto one of the cream colored circles and adhere to the front of the card. Using the i-Rock, add tiny rhinestones to the posies’ centers. Place the other cream colored circle inside the card. Stamp the flower bouquet from the Flirty Fleurs Precut Set with black archival ink on cream colored cardstock. Color with Wild Honey, Peeled Paint, and Vintage Photo distress inks and hand-cut. Stamp 3 medium leaves from the Carnation Florals 1 PreCut Set, color using the distress inks and hand-cut. Adhere the flower bouquet to the front of the card as shown, molding the leaves and flowers with your fingers to give them dimension. Place pop dots behind the larger flowers to raise them from the card. For the inside of the card, stamp, die cut, and color 4 carnation flowers. Mold them and glue them inside each other to form a fluffy carnation flower. Stamp the sentiment in the bottom center of the inside of the card and place the flower above it. Die cut two flourishes from the Layered Elegant Swirl Die Set, snip any remaining connecting pieces and place them on each side of the flower. Add Brown Gala Glitz to all the flowers’ centers and apply tiny liquid pearl dots around both the inside and outside edges of the circles as shown.

Thank you for visiting my blog today and don't forget to stop by the Heartfelt Creations blog and see all the amazing projects that the rest of the DT created! You will be blown away!

Tuesday, November 29, 2011

tuesday...AWDML November 15 Reveal-Maya Road (4/4)

Hi everyone! I hope that this week is a good one for you! I put up my baby Christmas tree yesterday-a 4 ft pre-lit tree. I told my hubby that even though we would be gone for most of December, I still needed a tree up in the apartment so he let me buy a small one. I love it!

Well, today is going to be a fast post since I'm still getting the house fixed/cleaned up after our vacation.

I want to share with you 2 cards that I made for A Walk Down Memory Lane using Maya Road products. Remember that this month (you only have 2 more days!) all Bo Bunny Press and Maya Road products are 25% off over at the AWDML store!

Here is my first card:


Supplies-
cardstock: Bazzill, Recollections; 
ink: Stazon Archival Ink-Jet Black, Ranger Tim Holtz Distress Ink-Vintage Photo
stamp: Maya Road Stamp Sheet Doilies, Basic Grey Happy Birthday Stamp Set; 
bling: Ranger liquid pearl, glimmer mist-Olive Vine, Suede, Ranger stickles-Black Diamond; 
tools: Cuttlebug machine, Martha Stewart Punch Around the Page-Cherish, Provocraft Textile Texture A2 Embossing Folder; 
dies: Heartfelt Creations-Decorative Butterfly/Border (HCD 702), Belle Rose (HCD 712); 
other: sewing machine; 

I used many layers for this card. I used the Maya Road doily stamps to make the black doily flower in the center by stamping two different size doilies, die cutting them and cutting a little slot between their petals and lifting them up.


For the kraft doily, I used the Martha Stewart Punch Around the Page-Cherish corner punch and punched around a circle. I then came back and stamped the doily over each scallop in brown distress ink.


Supplies-
cardstock: Recollections; 
ink: Ranger Tim Holtz Distress Ink-Vintage Photo, Antique Linen, Peeled Paint, Stormy Sky; 
stamp: Maya Road Stamp Sheet Doilies, Fiskars All Year Greetings stamps; 
pen: sharpie, white Signo; 
bling: Tattered Angels Glimmer Mist-Pearl; 
tools: Cuttlebug machine, Pazzles Inspiration, Heartfelt Creations-Decorative Butterfly/Border die (HCD 702), Martha Stewart Stamp and Punch classic Butterly; 
other: sewing machine

For this card, I used different color distress ink to randomly stamp different doily sizes to make my background paper.I finished my adding some Pearl glimmer mist over the whole sheet of paper for a finished and blingy look.


I punched different colored butterflies and layered them. I also die cut the larger more ornate butterfly using the Heartfelt Creations-Decorative Butterfly/Border die three times and layered them. I used rhinestones for all the butterflies centers and finished the card by stamping a sentiment on the left corner and adding faux stitching around the edges.


Thanks for stopping by my blog today!

***All the Products in BOLD can be purchased from A Walk Down Memory Lane online store.

Saturday, November 26, 2011

saturday...new flower tutorial

Today I have a tutorial using the new Artistic Gatefold Collection carnation flowers from the Heartfelt Creations Black Friday new release!

Name: Elegant Wild Roses
Supplies:
Tutorial by Amarilys
Step 1. Stamp 2 of each of the largest Carnation Florals 2 Precut Set flowers onto cream cardstock and die cut them using the Spellbinders Carnation Creations die.

Tutorial by Amarilys
Step 2. Ink all the edges using a Tim Holtz Ink Blending Tool and Vintage Photo distress ink.

Tutorial by Amarilys
Step 3a. Curl and fold each petal into a v shape like so.

Tutorial by Amarilys
Step 3b. Here is a shot of the back of the flower so you can see how it should look. Do this to the largest 2 flowers and one of the smaller ones.

Tutorial by Amarilys
Step 4. For the last smaller flower, curl the petals upwards. This is how your flowers should look up until here.

Tutorial by Amarilys
Step 5. Place each petal inside the other staggering the petals and make a bud with the last smaller flower and place in the center.

There you have it! These roses are so fun and easy to do! You can bling them up if you like or leave them as is.

Thanks again for stopping by my blog today. I hope that you enjoyed this tutorial. If you make some flowers, leave me a link so I can check out your creations!

Friday, November 25, 2011

friday...Heartfelt Creations Artistic Gatefold Collection Release

I hope that your Thanksgiving Day was great! Today is Black Friday, did you go shopping? If you didn't, it's not too late! You are just in time for Heartfelt Creations new release-The Artistic Gatefold Collection!

Heartfelt Creations is pleased to present the Artistic Gatefold Collection. This collection, in simple terms is "stunning and genius". It features  6 new precut stamp sets that coordinate with existing Spellbinders dies and 2 new exclusive dies. This is another must have collection.
Don’t feel guilty for splurging on yourself!

Heartfelt Creations will be donating 10% of all Black Friday sales towards ChildCry, a non-profit feeding organization founded by Times Square Church. ChildCry feeds over 4159 kids in 22 different countries, including the United States. Every penny donated to ChildCry is used to buy food for hungry children so go ahead...feed your hobby, and a hungry child! You can view all the details by following this link.

Leave a comment on the Heartfelt Creations blog by Novenber 29 for a chance to win the entire release valued at $150. The winner will be announced on the HC blog on November 30.

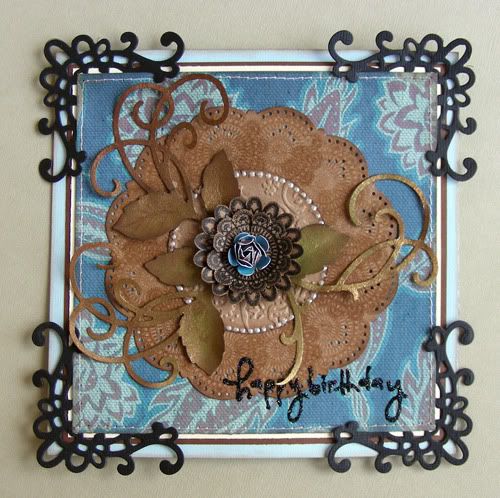
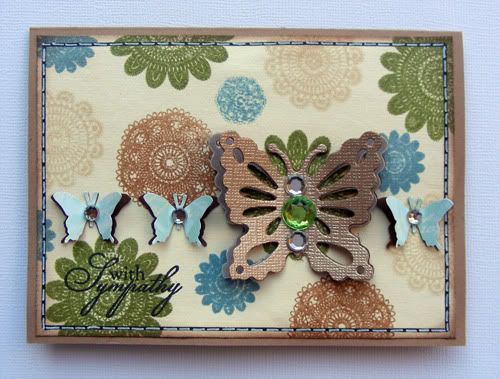
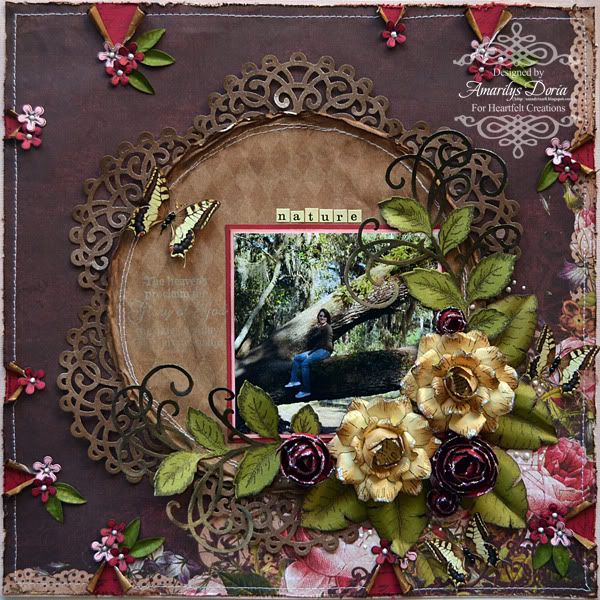
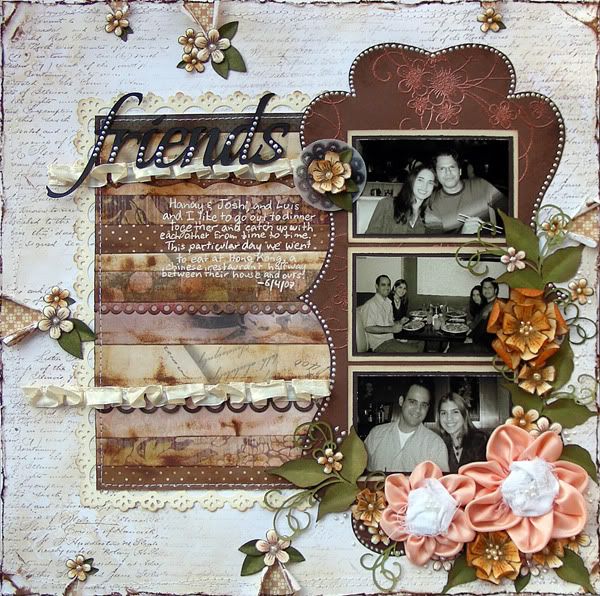
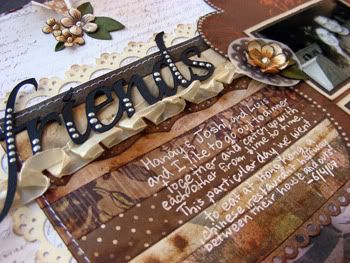
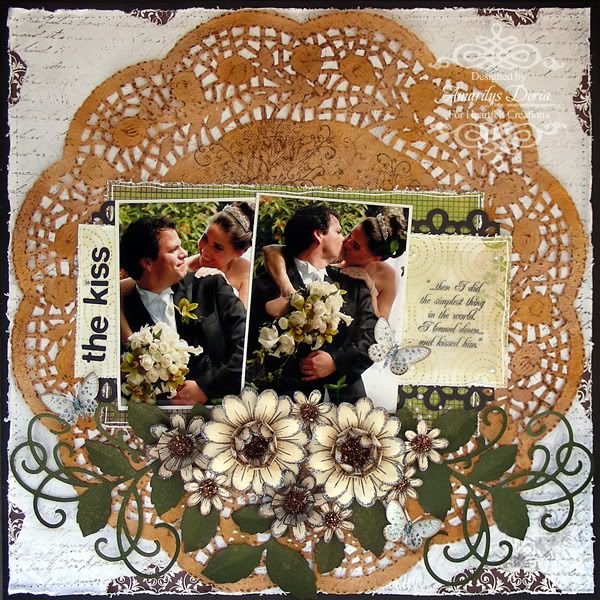
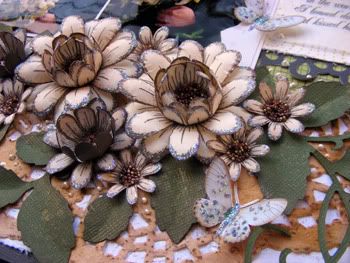
Here is a layout that I made with The Artistic Gatefold Collection:

Supplies-
HCD 712 Belle Rose

Other:
Kaisercraft, Tim Holtz Distress Inks (Vintage Photo), Ranger Stickles (Diamond), Ranger Liquid Peals (White Opal), Tattered Angels Glimmer Mist (Olive Vine, Pearl), StazOn Archival Ink (Timber Brown, Jet Black), Ranger Tim Holtz Paper Distresser, Ranger Perfect Pearls, Want to Scrap black pearls, sewing machine

I absolutely loved working with this collection and I know it will become one of my favorite ones since it is complete with flowers, leaves and doilies!


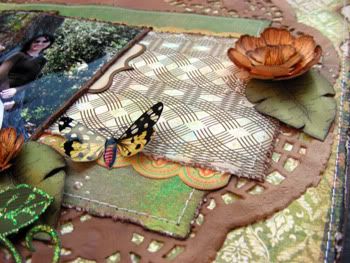
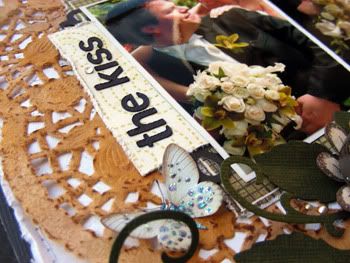
I distressed the Kaisercraft paper and randomly tore a few areas and rolled the paper back. I stamped using the Vintage Life Background stamp onto red cardstock and placed it behind the pattern paper for a peek a boo effect. I finished it off with a few stamped and die cut Flirty Fleurs flowers and leaves cluster to accent these random tears.


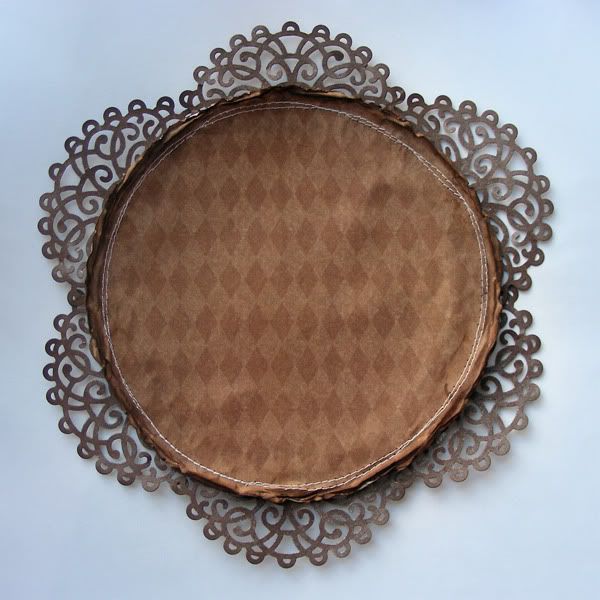
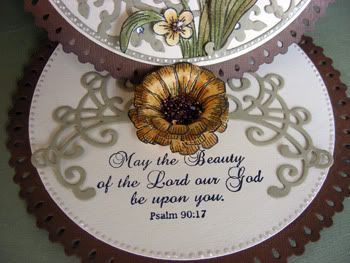
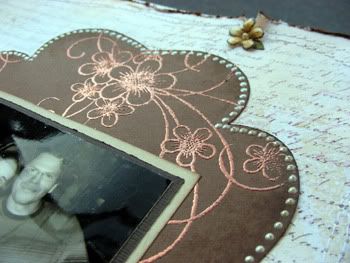
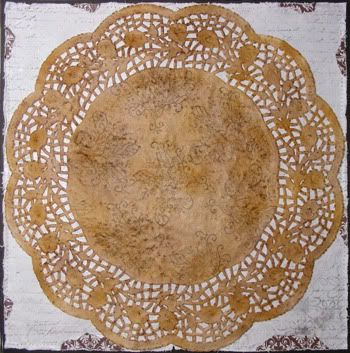
The half doily die is one of my favorite item in this collection. It's so versatile! I die cut 6 half doilies and layered them behind a 9" distressed and machine stitched circle like shown in the picture to make a larger scallop circle.

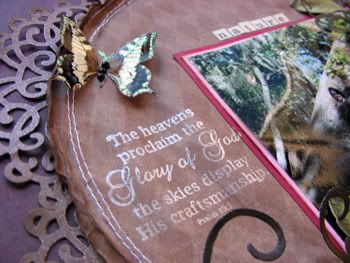
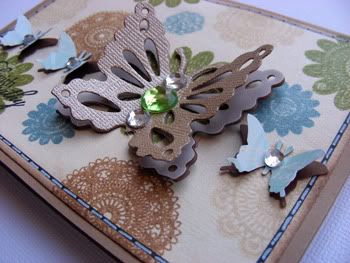
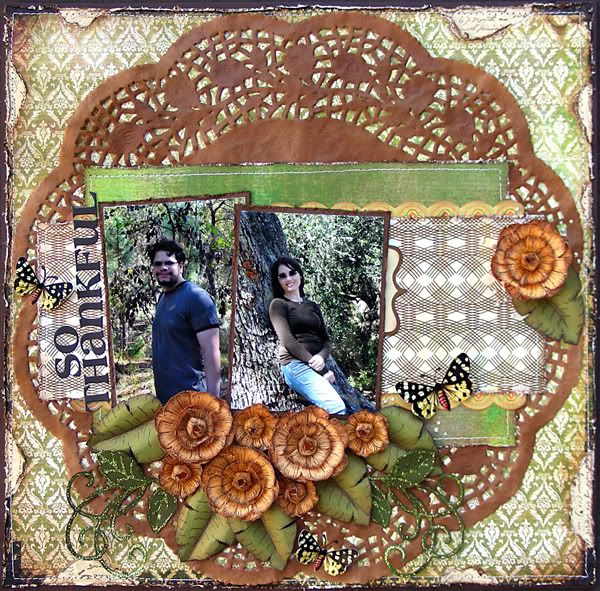
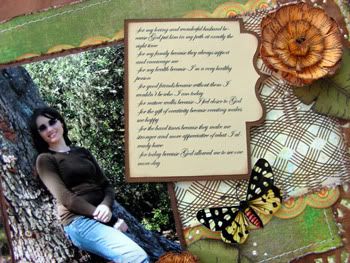
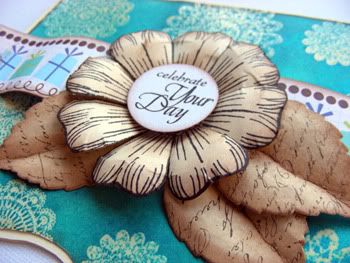
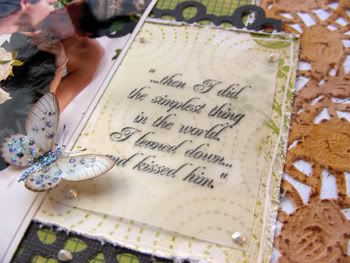
You can see a better close up here of the scallop circle. I stamped the sentiment directly onto the circle and used perfect pears on it to make it show through.

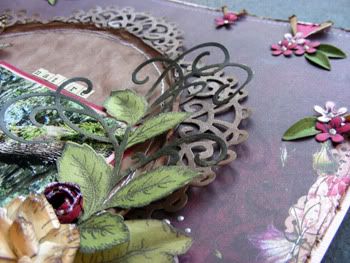
Here is another shot from a different angle of the scallop circle. You can see how dimensional it looks on the layout.


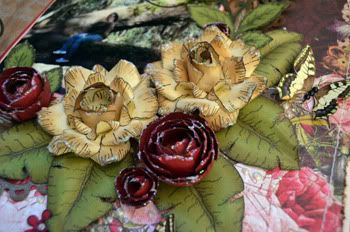
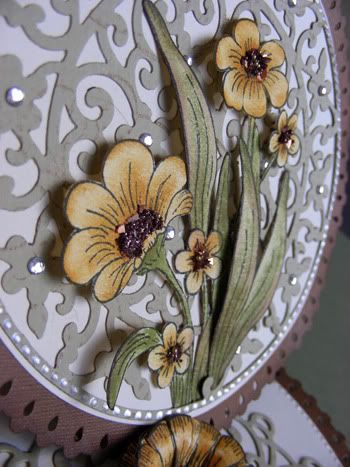
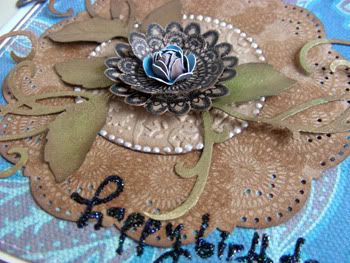
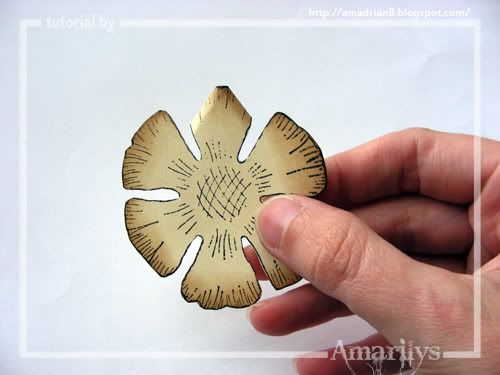
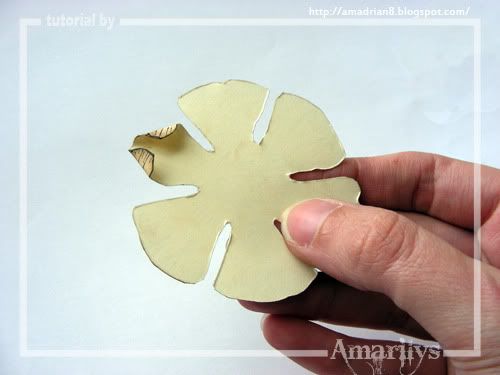
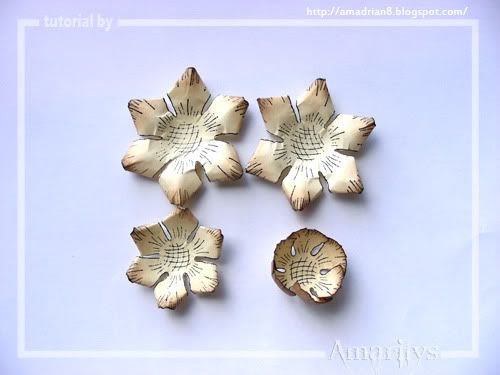
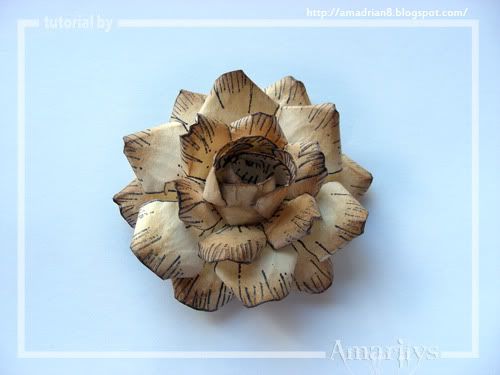
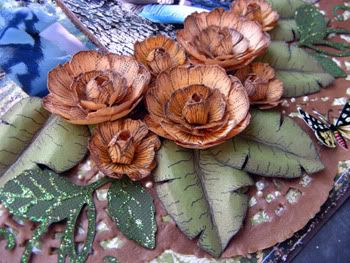
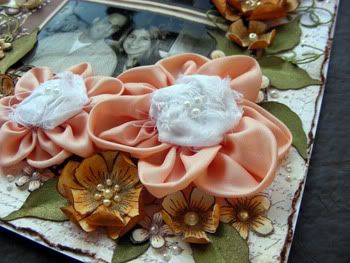
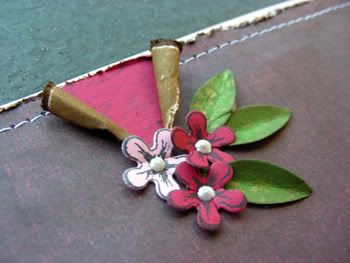
Of course, my favorite things to make are the flowers so I left these for last! The carnation stamps and dies are amazing! I will have a tutorial on how to make the cream colored roses up on my blog tomorrow. For the red larger buds, stamp 3-5 of the second largest stamp in brown. Using a stylus, mold all the petals upwards and layer the flowers to make a bud. For the smaller buds do the same as above but use the smallest flower stamp.

Here is the step by step write-up for this layout:
Cut down a sheet of pattern paper to fit inside a pink 12x12 cardstock. Using Tim Holtz paper distresser, distress all the edges and randomly make small breaks on the paper. Using your fingers, roll the torn edges away from each other to achieve a peek a boo area. Ink all edges with Vintage Photo distress ink.  Stamp a red cardstock with the Vintage Life Background stamp and adhere behind the pattern paper. Adhere the background unto the pink cardstock and machine stitch everything together. Using the large scalloped edge die from the Layered Scalloped Posy die set, cut 6 half circles from brown cardstock and glimmer mist them with Pearl glimmer mist. Cut a 7.5” circle out of pattern paper, distress the edges and machine stitch around the edges. Adhere the semicircles behind the large circle as shown to make a scallop circle and add to the center of the layout. Trim your picture to 4”x4” and double mat it with pink and red cardstock. Adhere the picture a little off centered on top of the scallop circle. Stamp the sentiment using Ranger Perfect Medium on the left side of the picture and use a white Perfect Pearl powder on it to make it show through. For the large cream colored flowers, stamp the 2 largest flowers from the Carnation Florals 2 PreCut Set 2 times each using archival ink. Color the edges using Vintage Photo Distress Ink and die cut them.  Mold the petals by slightly folding each petal to form a v shape. For the center, mold the petals to face inward into a bud. Glue the different die cut flowers (two large in the bottom and two smaller ones on top for each flower) to make the layered rose. For the red larger buds, stamp 3-5 of the second largest stamp in brown.  Using a stylus, mold all the petals upwards and layer the flowers to make a bud. For the smaller buds do the same as above but use the smallest flower stamp.  Add flower cluster to the right side of the layout as shown. For the leaves, stamp 2 Bella Rose Leaves flourishes and a few medium size leaves from the Distressed Leaves Set. Die cut them, use Olive Vine glimmer mist to color them, mold them with your fingers and add to the cluster. Stamp on pink and red cardstock, and die cut some tiny flowers from the Flirty Fleurs Set. Using the Perfect Petals smallest die, die cut a few leaves. Add the tiny flowers and leaves around the torn areas around the page. Add a title and add Diamond stickles to all the larger flowers. Finish by randomly placing butterflies and liquid pearl dots around the cluster.

Thank you for stopping by my blog today and for your kind comments! During this holidays, pamper and treat  yourself to the new The Artistic Gatefold Collection from Heartfelt Collections-you wont be dissapointed! Don't forget to leave a comment on the Heartfelt Creations blog by Novenber 29 for a chance to win the entire release valued at $150. The winner will be announced on the HC blog on November 30.

Thursday, November 24, 2011

thursday...Happy Thanksgiving! (and a layout)

Happy Thanksgiving everyone! Today I want to share a Thankful layout with you because despite all the hard times there is always something to be thankful for.

For my family, this has been a very stressful year. My hubby and I moved on our own after being married for 2 yrs and living with my mom. Not only did we moved on our own but we moved to a new city, 4 hrs away from our family and friends. It was very hard in the beginning but now that we have been in Kissimmee, FL for almost 7 months we love it! Also, this year my hubby graduated from Pharmacy School so we also moved from students to working class status. It has been a long and hard year for us but we are still thankful for everything that happened!

Here is my layout:


Supplies-
cardstock: Bazzill;
patterned paper: Basic Grey Curio Collection;
letter stickers: Basic Grey Curio Collection;
bling: Ranger Stickles-Icicle, Eucalyptus, Tattered Angels Glimmer Mist-Olive Vine; Ranger Liquid Pearls-White Opal;
ink: Tim Holtz Distress Ink-Wild Honey, Vintage Photo, StazOn Jet Black Archival ink, Tim Holtz Vintage Photo reinker;
stamp: Heartfelt Creations Flora Grande 2 precut Set, Distressed Leaves precut set, Prima Notary Stamp;
pens: American Craft Precision Pen-Black;
tools: Heartfelt Creations Belle Rose dies, Tim Holtz Tattered Florals dies, Pazzles Inspiration machine, Cuttlebug machine;
other: sewing machine,

One of our favorite things to do in this new city is to go hiking so I used pictures that we took in one of our most recent hiking adventures. I used the Basic Grey Curio Collection which happens to go really well with my pictures! This layout is based on my sketch #282 for Creative Scrappers.

Here is a close ups of my layout:


I handmade all the flowers and greenery. The butterlies are actually part of the papers but they were too big for my layout so I scanned them and re printed them at about 1.5".


I used the sticker letters that come in the collection for my title.


Another close up of my layers. I hid my journaling behind the photograph because it was a bit personal.


Here is my hidden journaling. I cut the shape with my Pazzles Inspiration and printed the journaling onto the cardstock so that everything would fit.

If you are interested in it, here it is:
-for my loving and wonderful husband because God put him in my path at exactly the right time
-for my family because they always support and encourage me
-for my health because I’m a very healthy person
-for good friends because without them I wouldn't be who I am today
-for nature walks because I feel closer to God
-for the gift of creativity because creating makes me happy
-for the hard times because they make me stronger and more appreciative of what I already have
-for today because God allowed me to see one more day

I hope that you are having a very Happy Thanksgiving with your families and loved ones! Remember to take a little bit of time and thank God for the good things in your life today.

Thanks for stopping by my blog today! I really appreciate all of your comments.

***All the Products in BOLD can be purchased from A Walk Down Memory Lane online store.

Wednesday, November 23, 2011

wednesday...Heartfelt Creations

Happy Wednesday! Today, I don't have a full post for Heartfelt Creations since we are debuting a new Collection on Black Friday but I thought I'd do a small sneak peek and direct you to the Heartfelt Creations blog where you can see more sneak peeks for this GORGEOUS new collection-The Artistic Gatefold Collection!


Come back here on Friday and stop by the Heartfelt Creations blog to see the new release. It is gorgeous and elegant and you will want it all!

Monday, November 21, 2011

monday...AWDML November 15 Reveal-Maya Road (3/4)

Happy Monday everyone! My hubby and I got back to Kissimmee, FL yesterday at 5 pm and we were exhausted from our trip but we sure had a lot of fun up in GA visiting my uncle and the family! We got to see Fall for the first time and it was amazing! I told my hubby that I felt like I was in a movie when we went hiking through the mountains! It was absolutely breath-taking! We also checked out Lenox Mall in Atlanta and the Aquarium. It was definitely an awesome mini-vacation despite the 8 hr drive each way! I'm sure that these pictures will soon start showing up in my upcoming scrapbook layouts.

This month seems to be flying by and I can't believe that today is Nov. 21st already! In a few more days it will be Thanksgiving!

If you haven't already, you can still take advantage of this month's featured manufacturers at A Walk Down Memory Lane which are Bo Bunny Press and Maya Road. This means that this whole month Bo Bunny Press and Maya Road products are 25% off over at the AWDML store!

Today I want to share another layout that I made using Maya Roads doily stamps and the Maya Road Ribbon Satin Pleat Edging:


Supplies-
cardstock: Bazzill, Recollections;
ribbon: Maya Road Ribbon Satin Pleat Edging Cream;
ink: Stazon Archival Ink-Jet Black, Ranger Tim Holtz Distress Ink-Vintage Photo, Antique Linen, Wild Honey, Embossing Distress Ink, Ranger Embossing Powder-Copper;
stamp: Prima Notary stamp, Maya Road Stamp Sheet Doilies, Heartfelt Creations Posy Patch;
pens: Signo white pen;
bling: Ranger liquid pearl, Tattered Angels glimmer Mist-Olive Vine;
tools: Tim Holtz paper ditresser, Pazzles Inspiration, Martha Stewart punch-Cherish, Double Loop, Scallop 3 Dot, Vintage Flower;
other: handmade fabric flowers, sewing machine


I had a lot of fun working on this layout since I made all of the pattern papers that I used here.


For the white background paper, I just stamped the scrip Prima Notary Stamp in brown over the white cardstock. I used a bit of Antique Linen distress ink over it to give it a vintagy feel to it and randomly made small tears on the edges and rolled the  paper back. I embossed a copper Heartfelt Creations swirly flower onto brown cardstock and added small liquid pearls dots around the edges.


For the stripes pattern paper, I simply used left over papers in brown/cream color and randomly adhered them to a 8x8 white piece of cardstock. I finished by inking the edges and some of the raised areas directly with my Vintage Photo distress ink. I also directly wrote my journaling on this paper using my white Signo pen. I added a few pieces of Maya Road Ribbon Satin Pleat Edging in cream and added my Pazzles Inspiration cut title on top. I added a Maya Road doily stamp over the side of the op picture that I stamped on vellum and finished that embellished area with a matching stamped flower by Heartfelt Creations.


Of course I handmade all the blooms and leaves on this layout. The bigger flowers are made out of peach fabric and the smaller flowers are a Heartfelt Creations stamp. I finished by randomly adding liquid pearls dots around the cluster.


Thanks for stopping by my blog today! I really appreciate all of your comments.

***All the Products in BOLD can be purchased from A Walk Down Memory Lane online store.

Saturday, November 19, 2011

saturday...AWDML November 15 Reveal-Maya Road (2/4)

Happy Saturday! I'm blogging from Gainesville, GA today! My hubby and I decided to visit my uncle and his family since we haven't seen them in a while and now that we moved to Kissimmee, we are only 8 hrs away from them (it used to be 12 so yes, I'm saying it is closer but not close!). :)

Anyway, yesterday was my little cousin's birthday and to honor her 11th birthday I'm going to share with you a card that I made for her using Maya Road products!

Here is the card:

Supplies-
cardstock: Recollections; 
paper: Jillibean Soup
ink: Stazon Archival Ink-Jet Black, Ranger Tim Holtz Distress Ink-Vintage Photo, Embossing Distress Ink, Ranger Embossing Powder Clear; 
stamp: Maya Road Stamp Sheet Doilies, Prima Notary Stamp, Heartfelt Creations Flora Grande 2 precut Set (HCPC 3374); 
bling: Maya Road Mist-Blue Agave; 
tools: Cuttlebug machine, Pazzles Inspiration; 
other: sewing machine

It is a very simple but elegant design. I made the blue paper using my tutorial and misted over it with Maya Road Blue Agave mist which I absolutely love! It's so shiny and has a great color pigment!

here is a close up of the embellies:


This card is based on my brand new sketch that i made for this past Friday's newsletter for A Walk Down Memory Lane. If you don't receive it yet, you can sign up or view it here. It is amazing and it comes every Friday filled with awesome tips/techniques, step by step, tutorials, sketches and inspiration!

Here is the sketch:


Thanks for stopping by my blog today. If you like this sketch, use it on a card and share with us over at the AWDML blog or Facebook page. We would love to see your creations!

Wednesday, November 16, 2011

wednesday...Heartfelt Creations

Happy Wednesday bloggers! Today I'm back to share another Hearfelt Creations project and this time I combined this week's layout with this week's sketch  from Creative Scrappers which happens to be the one that I designed!

Here is my layout:

Supplies-
Heartfelt Creations:

Other:
Jillibean Soup, Basic Grey, Tim Holtz Distress Inks (Vintage Photo, Wild Honey), Ranger Stickles (Diamond), Ranger Liquid Peals-white opal, Tattered Angels Gimmer Mist (Olive Vine, Pearl), StazOn Archival Ink (Timber Brown, Jet Black), Ranger Clear embossing powder, Ranger Vintage Photo Reinker, Ranger Embossing Distress Ink, Tim Holtz Blending tool, Cuttlebug machine, Marvy Uchida 2500 heat embossing tool, Brown Gala Glitz, White Signo pen, white doily, sewing machine, Pazzles Inspiration (for title)

and here is this week's sketch over at Creative Scrappers:


I loved working on this layout because 1) I love this sketch that i made (I might have to use it again very soon!) and 2) I love working with my wedding pictures. For this layout I actually handmade my own pattern paper (see tutorial here).


For the background, I started out with a white 12x12 piece of cardstock. I used the Daisy Patch Background Precut Set to clear emboss and the Large Elegant Word Background Precut Set stamp to stamp over the embossing with brown ink. I randomly tore a few areas around the edge of the paper and added a brown pattern paper under the peek a boo areas. I machine stitched everything. The doily was actually white when I started but I wanted more of a worn or old look to it so I mixed a bit or Vintage Photo Reinker and water in a mini mister and misted until I achieved the desired color. I went over it with a blending tool and added some Vintage Photo and Wild Honey distress ink to random areas. Finally, I randomly stamped the Bella Rose Rosebud largest swirly stamp onto the doily to add some pattern. I finished the background by glimmer misting everything with Pearl glimmer mist to add some shine and machine stitching around the edges.


I handmade all the flowers using the Daisy Patch Flower PreCut set stamps. For the flowers, stamp using brown archival ink a few different sized flowers from the Daisy Patch Flower set, cut them using the matching die and cusp all the petals. Build your flowers as shown-2 large flowers in the bottom and 2 smaller ones curled upwards on top. Add Brown Gala Glitz to the flower centers and Diamond stickles to their edges. Finish the cluster by adding some greenery, a few butterflies and randomly placed liquid pearl dots.


For the title I just cut it with my Pazzles Inspiration and added a small rhinestone to dot the i.


I added a computer generated quote that i printed on vellum. Printing on vellum always takes forever to dry so I added clear embossing powder to right after printing it and embossed it. Looks pretty and I can keep working on the layout right away!

Here is the step by step write-up for this layout:
Clear emboss a white cardstock using the Daisy Patch Background stamp. Stamp the Large Elegant Word  Background stamp randomly over it. Trim to fit inside a 12x12 black cardstock. Distress the edges and randomly tear pieces from the sides. Insert small pieces of pattern paper behind the torn white cardstock. Adhere to black cardstock and machine stitch around the edges. In a mini mister, mix water with a little Vintage Photo Reiner, mix and mist a white doily. Randomly stamp the Bella Rose Rosebud largest swirly stamp onto the background. Using a blending tool add some Wild Honey and Vintage Photo ink to the doily. Mat the pictures with white cardstock. Adhere the layers and pictures as shown. For the flowers, stamp using brown archival ink a few different sized flowers from the Daisy Patch Flower set, cut them using the matching die and cusp all the petals. Build your flowers as shown, add Brown Gala Glitz to the flower centers and Diamond stickles to their edges. Cut 3 Belle Rose leaves and glimmer mist them with Olive Vine glimmer mist. Arrange the flower/leaves cluster as shown. Randomly add some butterflies to the cluster. Finish by adding a title to the left side and a quote to the right side of the pictures. Layout based on my own sketch.

Thank you for visiting my blog today and don't forget to stop by the Heartfelt Creations blog and see all the amazing projects that the rest of the DT created! Also, do come back next week since we will be releasing a brand new stamp set and let me tell you, it's amazing!