Friday, September 30, 2011

friday...AWDML color challenge

Happy Friday everyone! It was my turn to post in the AWDML blog today and I have a very fun challenge for you-a color challenge! Color challenges are my favorite since it helps me try out new color combos that I normally wouldn't even think of trying!

Here is the color combination that I have for you today:


and here is my take on it:

Remember to share your take with us and enter to win a $5 gift card to the AWDML store! Just post your creation to our Facebook Wall and you’ll automatically be entered in our monthly drawing! I can't wait to see your creations!

Wednesday, September 28, 2011

wednesday...Counterfeit Kit Challenge Blog Hop!

Welcome to the September Counterfeit Kit Challenge Blog Hop! If you came from Ali Thomas's blog then you are on track but if you stumbled here, please go back to the Counterfeit Kit Challenge blog to start the blog hop!

This blog hop is all about stamping techniques and I have a fun tutorial for all of you to try!

Here is my finished layout:


I'm going to show you how I made the three larger circles that I used as embellies in this layout.

Supplies:
-Script stamp (Prima)
-StazOn black ink
-distress ink (Vintage Photo by Tim Holtz)
-embossing ink (Tim Holtz)
-Ultra Thick Embossing Enamel
-embossing tool

Tutorial by Amarilys
Step 1. Cut three 3" circles and stamp with a script stamp (I used a Prima stamp on mine) and archival solvent ink (I use StazOn).

Tutorial by Amarilys
Step 2. With a distress ink (I used Tim Holtz Vintage Photo), lightly ink the edges and over the circles to give it an aged look..

Tutorial by Amarilys
Step 3. Cover your circle with embossing ink (I use Tim Holtz) by using your pad right over the circle. Cover the circle now with UTEE (Ultra Thick Embossing Enamel).

Tutorial by Amarilys
Step 4. Heat it up using your embossing tool and enjoy your handmade leather-like circles!

Here are a few close up of my layout:

You can see how cool the circles look on the finished layout! They are glossy and thick and leather-like. It gives a lot of texture to masculine layouts!


I hadnmade my own flowers using the same pattern paper as the circles so that it matches my layout. I finished it off with a liquid pearl in the center.


This is my handwritten journaling. I handmade the little banner in the bottom.

Thank you for taking the time to read through my quick tutorial. I hope you enjoyed it! To keep on hopping, please go to Helen's blog!

Have a wonderful rest of the week!

Monday, September 26, 2011

monday...AWDML September 15 Reveal- The Greeting Farm (3/3)

Today I have 3 cards to share with you, all using the same The Greeting Farm stamp. Remember that you only have a few days left of this month to take advantage and stock up on American Crafts and The Greeting Farm products which are 25% off at AWDML!

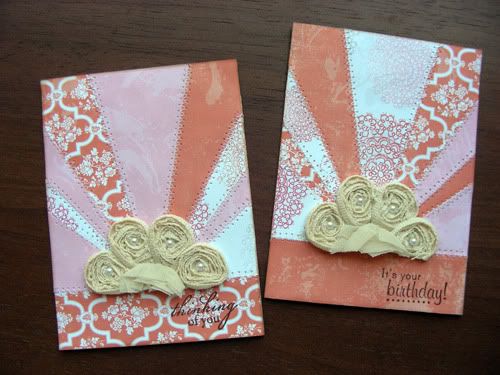
Here is my first card:
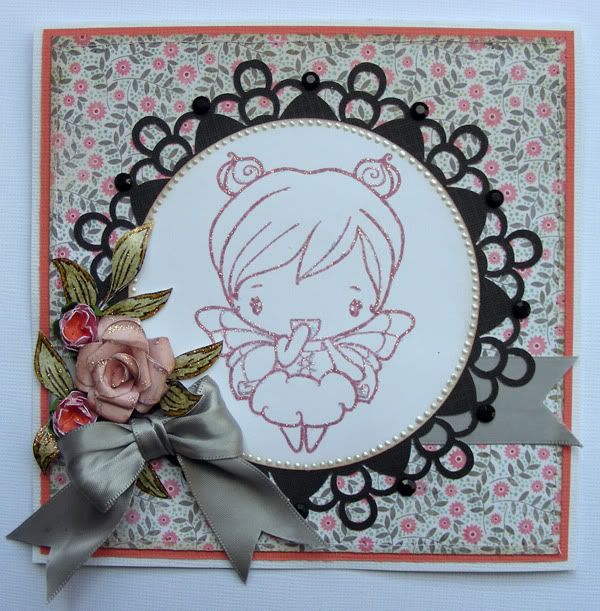
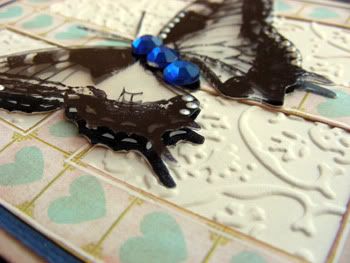
Supplies-
cardstock: Bazzill, DCWV;
patterned paper: My Mind's Eye Stella and Rose Hazel 6x6 Paper Pads;
stamp: The Greeting Farm Anya Flutter;
rhinestones: Kaisercrafts Rhinestone Swirl Black;
bling: Ranger Stickles "Diamond";
ink: Ranger Tim Holtz Distressed Ink Pad Victorian Velvet;
tools: Martha Stewart Punch;
other: Epson Printer, grey ribbon, sewing machine, 3D paint

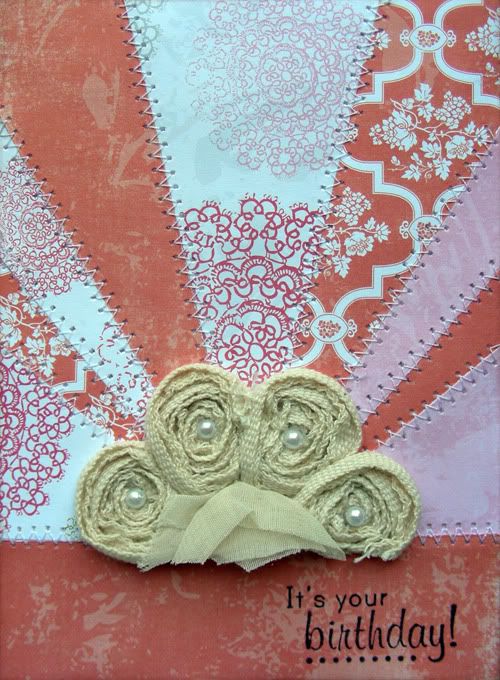
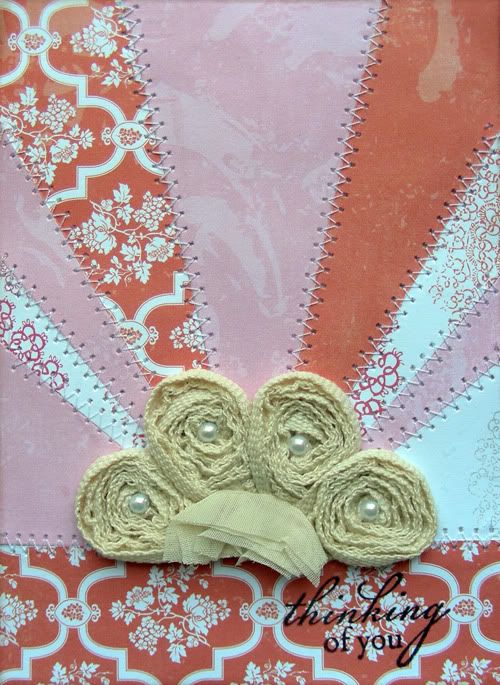
This card measures 5.5"x5.5" and I used my My Mind's Eye Stella and Rose Hazel 6x6 Paper Pads, which are perfect for cards! I matted the pattern paper onto a pink Bazzill cardstock and stitched it to the base of the card. The black circle frame I made using a corner punch by Martha Stewart.


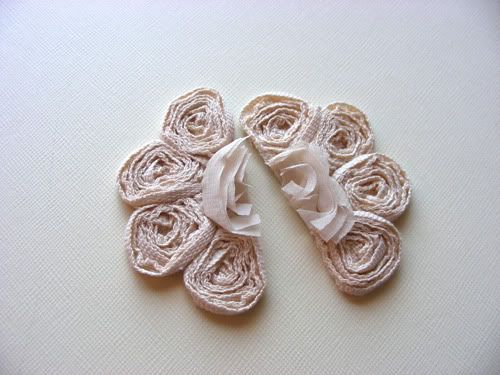
For the stamped image, I used my Tim Holtz Distressed Ink Pad in Victorian Velvet and left it as is. I just used the outline of the stamp to make the card. I did go over it and stickled the edges to make it stand out more. For the flower cluster, I used my tutorial to make the larger rose and this uTube video to make the smaller roses. This is definitely one of my fav cards that I've made so far!

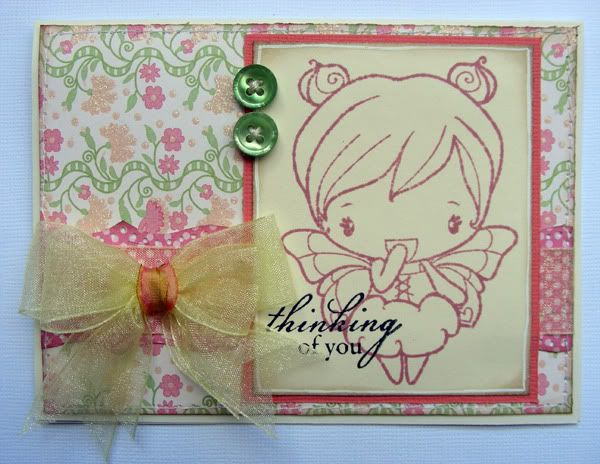
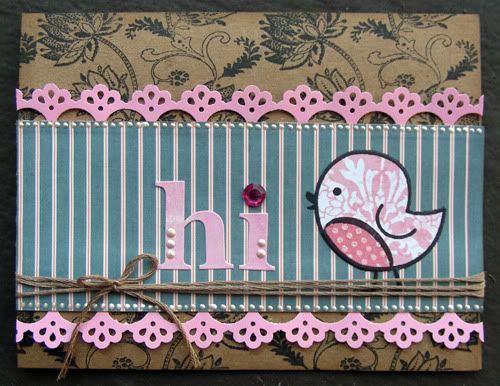
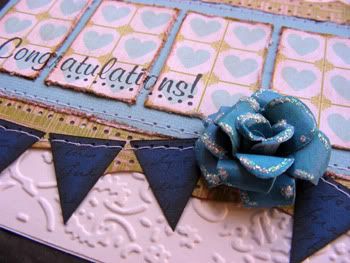
Here is another card that I made with the same image and technique as the previous card:
Supplies-
cardstock: Bazzill;
patterned paper: DCWV Nana's Nursery;
stamp: Fiskars Acrylic Stamps All Year Greetings, The Greeting Farm Anya Flutter;
ink: Ranger Tim Holtz Distressed Ink Pad Victorian Velvet;
tools: Martha Stewart Punch;
other: yellow sheer ribbon, sewing machine,

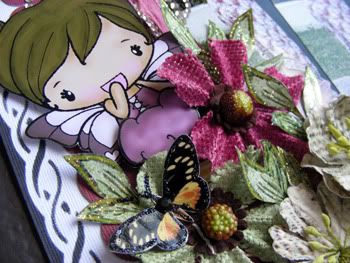
For this card, I didn't use stickles on the image and just left it as is. Instead, I used my Fiskars Acrylic Stamps All Year Greetings and stamped my sentiment right over part of the image. I used a piece of Nana's Nursery paper that I still had and made this card soft and pretty using light yellows, pinks and greens.

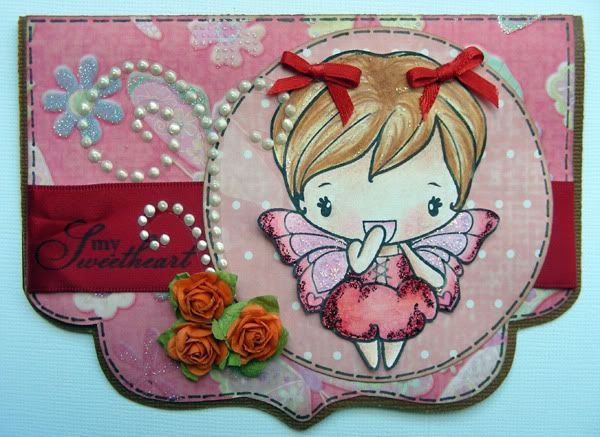
Finally, for my last card, I colored in my image with Prismacolor Pencils:
Supplies-
cardstock: Bazzill;
patterned paper: Best Creations;
stamp: Fiskars Acrylic Stamps All Year Greetings, The Greeting Farm Anya Flutter;
flower: Recollections small orange roses;
bling: Ranger Stickles "Burgundy, Diamond";
ink: Memento Dew Drops Dye Inkpad Tuxedo Black;
other:red ribbon, sewing machine, Primasmacolor pencils, 3D paint

I shaped my card to give it some dimension and doodled stitches on the edge of the Best Creations pattern papers. I stamped my sentiment directly on the red ribbon.


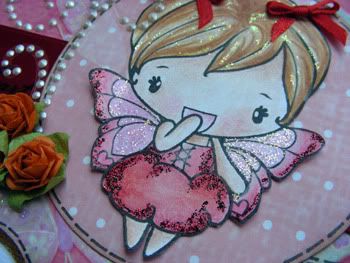
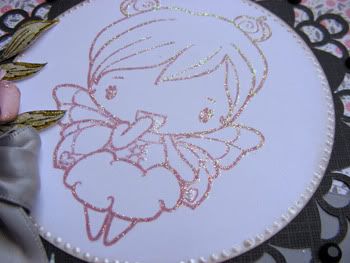
For my little fairy stamp, I used my Memento Inkpad in Tuxeto Black. I love how clean and crisp the stamped image comes out with this ink! I then colored in my image with my Prismacolor Pencils. I added some stickles to the wings, dress and hair. For this card, I wanted to change the image a bit so I cut off the ponytails on the little fairy and instead, gave her tiny red bows.

Thanks for stopping by my blog today! I hope that i have inspired you to try your hand at different coloring techniques for your stamps!

Saturday, September 24, 2011

saturday...3 cards using stamps

Morning everyone and happy Saturday! I hope that you are enjoying your weekend!

I have 3 cards to share with you  today. I made these three cards for the Counterfeit Challenge #3 which is to make your own embellies and alter them using stamps or alter store bought embellies with stamps.


For this card, I handmade my backrgound by stamping onto kraft paper. I also made the little bird (which is a stamp) by stamping her 3 times, one in the background blue stripped paper, one in the lighter pink and white pattern paper and another time in the darker polka dot paper. I then cut it out and pieced the chick together over the background. I  just love how sweet she looks!

here is a close up of her:


Here is the second card that I made:

I had a lot of fun making this card! I used a cream colored cardstock for the background. Using the heart paper, I used the grid to cut using my X-acto knife small rectangles to mimic a window. For the butterfly, I stamped her twice, once on acetate and once on a light blue pattern paper from my stash. I cut out both images and layer them on top of each other, only gluing the center. i added some blue rhinestones for the body.

Here is a better view of the butterfly. You can see that her wings are raised:


Finally, my third card was king of fun in the sense that I used up a lot of the smaller pieces of pattern paper that I had after making my layout and cards:


For this card, I embossed the background cream cardstock to give it some depth. I used the leftover rectangles from the previous card and line them up on this one. I used one of the smaller handmade roses that I has included on my kit and stickled the edges. I made a tiny banner and altered it by stamping it with brown ink and machine stitching it to the card.

Here is a better view of the banner and rose:


Thanks for stopping by my blog today and I hope that I've inspired you to use those stamps!

Friday, September 23, 2011

friday...layout inspired by Birds of a Feather/The (paper) Trailmakers using my Sept. Counterfeit Kit

Happy Friday bloggers! Today I want to share with you a layout that I made using my September Counterfeit Kit and the best thing about this challenge is that I didn't have to spend a dime! I had everything in my stash so I just went stash shopping.  :)

Here is my layout:


I actually made my own background for this layout. I stared with my light blue/green pattern paper that looks like cardstock from the Sassafrass Indie Girl collection and embossed it with clear embossing powder using my Prima script stamp and a small swirly and flower stamp that I've had for a while. I then lightly inked some areas so you could see the embossing (I'm working on a tutorial on how to do this).

Here is a picture of my finished sheet of 12x12 paper:

(click to enlarge)

I used my brand new Cherish stamp by Martha Stewart and punched around the edges of my 12x12 paper. I just LOVE this stamp and has definitely become my favorite! I just love how it lets you create your own die cut paper in minutes!

Here is a quick close up of one of my corner:

Isn't that embossing just beautiful???? (Again, I'm working on a tutorial on how to do this so come back again very soon!)


I handmade my own paper flowers using scraps of cardstock that I had in blue and white. I stickled the edges with some Diamond stickles (my favorite!) and formed an embellishment  cluster in the left side of my pictures. I designed and cut my title from the blue cardstock that I used to mat my smaller die cut paper (also cut with my Pazzles). I finished that area with a handmade bling flourish using liquid pearls in white.

This layout was inspired by Birds of a Feather September Challenge which is to photograph and journal about your city. I just recently moved to Kissimmee, FL 15 mins away from Disney World so I knew I had to make a layout with all 4 parks in it. Behind each 2x3" picture there is a small tag that I made and wrote small facts about each park. Here is a close up:


This layout was also inspired by The (paper) Trailmakers inspiration picture #2. I was drawn to the brown, teal and white of the second inspiration picture found here.

I also made a brand new sketch for this layout and here it is for all of you to enjoy!
Sketch by Amarilys
Thanks for stopping by my blog today! I really do appreciate it as well as the comments that you leave me! :)

Thursday, September 22, 2011

thursday...wedding picture turned into a canvas (Easy Canvas Prints)

Ok, I have something AWESOME to share with all of you today! As most of you know, I got married about 2.5 yrs ago and because we had a budget wedding, my hubby and I decided not to get any large pictures of the wedding so I settled for a 300 (4"x6") photos album. However, I always wanted to turn one of our wedding pictures into a canvas and today, my wish came true!

Here is my 16"x20" canvas:

I ordered it from Easy Canvas Prints and arrived in about a week! Easy Canvas Prints will turn your photos to canvas for a very economical price! The quality is outstanding as the canvas material that Easy Canvas Prints uses is top notch and archival quality. The colors are bright, sharp and true to the original picture. If you are using your own photo (like I did!), Easy Canvas Prints offers a variety of enhancements including B/W and sepia conversion, retouching, and photo collages for you to choose from. They also have different canvas wrap depths (I ordered mine .75") as well as border options (mine is an image wrap). Their website is really easy to use too!

With the holiday season on us, these would make personal and affordable gifts for everyone in your list!
Check them out right now and order your canvas today!
Check out these awesome canvas pictures!

Tuesday, September 20, 2011

tuesday...September Counterfeit Kit-My version

Well, it has been a while since I've participated in the Counterfeit Challenge so I checked them out yesterday to see the kit that they were counterfeiting this month and to my delight, they are counterfeiting Sweet Peach Crop Shop September Kit. The best thing about it is that I have those same pattern papers sitting around waiting to be used so I decided to give it a go.

Here is the kit that we are counterfeiting this month:

and here is my much smaller version:


I can't wait to start working with my kit! :)
Thanks for stopping by today!

tuesday...Birds of a feather Kit CO GDT last post and a tutorial!

Hi everyone! Today I have a fun tutorial to make not one, but TWO layered cards! Your recipient will surely think that you spent hours making them!

For this tutorial, I'll show you how to make two beautiful cards using two pieces of 4.25"x5.5" papers and the beautiful Petaloo flower Trim from the September Kit.


Step 1. You need two double sided 4.25"x5.5" pattern papers to make these 2 cards.


Step 2. Cut out one of the blooms from the Petaloo fabric trims and cut it in half.

Photobucket
Step 3. Use the above diagram to mark one of the sheets of paper. Pretty much you will be drawing a symmetrical pattern so that you can move the pieces around so that you can mix and match to make you cards.


Step 4. Mix and match your pattern papers until you are happy with the results. Glue them down to the base of your card (mine is 4.25"x5.5"). At this point, you may stitch the pieces together for a more polished look.

Photobucket
Step 5. Add your half bloom to your card to mimic a sun. Add pearls to the petals. Finally, add a sentiment in the bottom right hand side and you are done!

here is a close up of my cards:


This is my last post for my GDT spot for Birds of a Feather Kit. I enjoyed working with Amy and her kit for this past month. Thanks Amy for the opportunity! If you haven't yet, check out the September Kit and get yours today before it's too late!

Monday, September 19, 2011

monday...AWDML September 15 Reveal- The Greeting Farm (2/3)

Hope that everyone is doing well today!  Today, I'll be sharing with you another layout that I made using a The Greeting Farm stamp. Remember that for the entire month  American Crafts and The Greeting Farm products are 25% off over at AWDML! Time to stock up on Thickers and Stamps!

Here is my layout using one of the very popular stamps by The Greeting Farm, Flutter from the Anya Collection. Like I mentioned earlier, I'll showing you projects using this stamp and different ways of coloring her.


Supplies
cardstock: DCWV;
patterned paper: Basic Grey Hello Luscious "Blissful, Simply Grand";
bling: Ranger Stickles "Black Diamond, Diamond";
other: Photoshop CS4, Epson Printer

Now, I know that I always say this about every layout that I make but I really love this one! I was looking through my older pictures and found this one of hubby and me a few months after we got married. I printed the picture twice and layered them on top of each other like so. I got to play with the Basic Grey Hello Luscious collection and all I can say is WOW! These pattern papers are absolutely gorgeous in person and I can't wait to get more! :)


I colored the stamp the same way I did on my last post; I stamped the image onto white cardstock, scanned it and then colored it using Photoshop CS4 and printed it on photo paper. I hand cut it and stickled her before adding her to my layout. I just love how flawless the finished image looks! I added some Recollection and Prima blooms along with some computer generated leaves and butterflies that I handcut and stickled.


For the title, I used some Basic Grey Micro Mono Alpha Stickers along with some Thickers. I finished it off by adding a little butterfly on it!

Thanks for stopping by! I appreciate it!