Saturday, December 31, 2011

saturday...Top 10 layouts of 2011!

2011-what a year it has been! My hubby finally graduated from Pharmacy school, we moved away from our home town because of his job (from Miami, FL to Orlando, FL), we got our own apartment together 2 yrs after getting married, and I have served in a few AMAZING design teams! It has been a hard year financially and emotionally but we have always had God by our side and I thank God for these hardships because without them we can't appreciate the good times.

Today is the last day of 2011 and although to me it was just yesterday that I was saying this about 2010, a whole year has gone by. I want to take a few minutes to share with you my favorite 10 layouts that I made during this past year in no particular order.

10. Into the Game


09. Feeding the Geese
 

08. this is me
 

07. Breathtaking


06. Romance


05. True Beauty


04. the kiss


03. fall
 

02. nature


01. nature's majesty
 

As I look through my 92 layouts completed (2011 LOs gallery), I can definitely see a defined style, color palette preference and something that defines me as "me". I love to hand make my own flowers and embellies. I love the whole process! This year, I've also made over 50 cards, which I'm very happy about since after this year I cannot say that I'm not a cardmaker anymore  :)

I want to thank EVERY ONE of you who follows, comments and supports my blog. Without you, this blog wouldn't exist. Here is to another year of scrapping, blogging and SHARING with you! Happy New Year everyone!

Friday, December 30, 2011

friday...gift card holder tutorial

Hi everyone! Welcome back to my blog! Today I have a fast and easy gift card holder tutorial for you.


Supplies-
cardstock: Recollections;
patterned paper: Bella Blvd Hello Beautiful Cute Cuts, Bella Blvd Midterm Physics;
bling: Ranger Stickles (Icicle);
ink: Tim Holtz Distress Ink (Vintage Photo);
pens: American Crafts Percision Pen (Black), Ranger Opaque White pen;
stamp: Fiskars Acrylic Stamps All Year Greetings;
tools: Martha Stewart Punch Around the Page (Cherish);
other: fasteners


Step 1. Cut a cream color cardstock to 4"x7". Fold inwards at 2.5" and 5.5". Punch using your Cherish Martha Stewart Punch on the top and bottom as shown.


Step 2. Cut out of pattern paper the following dimensions: 3.75"x1.75" (front), 3.75"x2.75" (x2-1 inside, 1 back), 3.75x1.0" (bottom). Ink and add faux stitching to all the edges. Adhere corresponding pattern paper to the right side. One of the 3.75"x2.75" pieces if for the back panel.


Step 3. Using just a little bit of glue on each side, adhere the bottom panel.


Step 4. Stamp a sentiment on the inside top panel and add a fastener to the middle of the gift card holder.


Step 5. Now, for the outside, fuzzy cut the blue cake from the Bella Blvd Hello Beautiful Cute Cuts pattern paper. Ink the edges, pop dot the die cut shape and adhere to the front of the gift card holder as shown.


Step 6. Add stickles to the edges, sprinkes and heart shape and you are done!


Step 6b. Here is what the gift card holder looks like with an actual gift card inside.

I hope that you enjoyed this tutorial and next time that you need a gift card holder for birthdays or any other occasion, you can make it instead of buying one!


***All the Products in BOLD can be purchased from A Walk Down Memory Lane online store.

Wednesday, December 28, 2011

wednesday...Heartfelt Creations

I hope that you had a wonderful Christmas with your family and loved one! I sure did! (layouts featuring these pictures to follow...). Today is Wednesday which means I get to share with you another Heartfelt Craetions projects and today, I have a Christmas/Winter card.

Remember that this month Heartfelt Creations will be featuring projects using stamps that will be retiring by the end of this year. Click here to see a list of all the stamps that will be retiring by the end of the year. If you like any of these stamps, order them NOW before they are gone forever!


Supplies-
Heartfelt Creations:

Other:
Cloud 9 Design, Tattered Angels Glimmer Mist (Burnt Red), Ranger Stickles (Gold), Ranger Tim Holtz Distress Inks (Vintage Photo), Ranger Tim Holtz Paper Distresser, StazOn Archival Ink (Jet Black), sewing machine, red ribbon

I used the Aztec Gold Sunflowers 2 Precut Set flowers stamps and turned them into Christmas flowers. These  'sunflowers' are so versatile! I just stamped the flowers on red cardstock and added gold stickles to the edges. I cut in between the petals a little but and folded each petal upwards to make them 3D.


Here is the step by step write-up for this layout:
Cut red cardstock base to 6”x12”, score at 6” and fold. Cut a 5”x5” panel from pattern paper, distress and ink the edges, and mat it with green cardstock and adhere in the center of the red card base. Stitch around the edges. Stamp the Magnificent Spruce Trees Precut Set 3 times on cream cardstock, overlapping them. Die cut, emboss and ink the embossed areas for dimension the Decorative Oval Window and place over the trees image. Trim the image to fit inside the frame and adhere in the center of the pattern paper. Stamp the smallest Book Frame 2 Precut Set and a sentiment inside it on cream cardstock. Fuzzy cut it, ink the edges and bend the sides of the book to make it more 3D. Stamp 2 small and 1 larger size flowers on red cardstock. Glimmer mist them to add shine, fuzzy cut them and layer 2 of them to make the larger bloom. Add gold stickles to all the edges and center of the flowers. Adhere them to the bottom left side of the image and place the book sentiment right above them. Stamp a few different size leaves from the Distressed Leaves Preset on green cardstock and fuzzy cut them. Shape them with your fingers and add to the cluster. Make a red bow and add to the right bottom corner.


Thank you for visiting my blog today and don't forget to stop by the Heartfelt Creations blog and see all the amazing projects that the rest of the DT created!

Sunday, December 25, 2011

sunday...Merry Christmas!

Just a quick post today to wish everyone a Merry Christmas! I'll leave you with my Christmas cards this year. I just love how they all turned out!


(click picture to enlarge)

I used my tutorial to make these cards but used two pattern papers and made 18 cards-in less than 2 days! I was actually really pressed for time since my hubby and I are taking a long vacation this Christmas. We are spending almost 2 weeks with our family and friends down in Miami so I had to get everything done between Thanksgiving and the 15th done!

Hope you can use this tutorial sometime too! you can make birthday cards or mix and match and have different sentiments for a nice handmade set that match! Merry Christmas!

Friday, December 23, 2011

friday...AWDML December 1 Reveal- Bella BLVD (4/4)

Happy Friday! I can't believe that tomorrow is Christmas Eve! Does your family gets together on Christmas Eve or Christmas Day? My side of the family gets together the 24th and my hubby's gets together on the 25th so it works out perfectly for us! We spend the 24th with my family, open presents early the next day, and come over to my in-laws to open some more presents and have dinner later that day.

Anyway, if you are still working on those last minute gifts, here is a very easy solution. Buy gift cards and hand-make the gift card holders for a handmade touch!


Supplies-
cardstock: Recollections;
patterned paper: Bella Blvd Christmas Wishes (Trees for Sale, North Pole, Borders);
bling: Ranger Stickles (Icicle);
pens: Ranger Opaque White pen;
other: fasteners, ribbon

I found this awesome tutorial over at 3peas that is just genius and so easy to do! It took me less than 10 minutes to make these two gift card holders! I used Bella BLVD Christmas Wishes Collection for these gift card holders.

I'm working on an even easier way of making these! Come back next Friday and I will show you how to make my version of these really cute gift card holders!

Remember that this month's featured manufacturers are Bella BLVD and Stamping Scrapping (a stamping company whose stamps that match the Spellbinders Nestabilities!). This means that this whole month these two manufactures' products are 25% off over at the AWDML store!

***All the Products in BOLD can be purchased from A Walk Down Memory Lane online store.

Wednesday, December 21, 2011

wednesday...Heartfelt Creations

Welcome back bloggers! Today I have another Heartfelt Creations layout to share with you featuring the Leafy Swirls Precut Set and Aztec Gold Sunflowers 2 Precut Set limited edition stamps. Remember that if you like any of the stamps from the limited edition list, you better order them before the end of the year because they will be retiring then.

Here is my layout for today:

Supplies-
Heartfelt Creations:

Other:
Kaisercraft, Tattered Angels Glimmer Mist (Olive Vine, Pearl), Inkadinkado Blending Chalks, Zva Creative Swirls, Kaisercraft Pearl Brads, Ranger Stickles (Diamond), Ranger Tim Holtz Distress Inks (Vintage Photo), Ranger Tim Holtz Paper Distresser, StazOn Archival Ink (Jet Black), White Signo pen, Basic Grey Mini Mono Sticker (Olivia), sewing machine, rhinestones

I just love how this layout turned out! I used a gorgeous 5"x7" picture of Ellen, Linda (Heartfelt Craetions owner)'s daughter for this layout. I water distressed and machine stitched the background's borders and ripped a piece right off it from the top right side.

I used a stamped piece of cardstock using the Bella Rose Vintage Background Precut Set stamp behind this area and highlighted the words with stickles and layered a butterfly to make it my title. I then hand stitched the area to make it look broken and stitched back together.

Photobucket
Of course, I handmade my flowers, this time in pink. I used chalk first to give them color (I stamp everything in either white or cream cardstock) and then I glimmer misted them with Pearl Glimmer Mist to give them some shine. I used a pearl brad for the center and then I added some Diamond Stickles around it to finish off the centers.


I finished it off by adding Ellen's name to the right of the photo and adding a die cut butterfly, stickled to make it shine.

Here is the step by step write-up for this layout:
Water distress your pattern paper and ink the edges. On the top right side of the background paper, gently tear a piece out of the pattern paper. Stamp the Bella Rose Vintage Background Precut Set onto cream cardstock and place it under the tear in the top left side making sure that you can see the “you are so beautiful to me” sentiment from the stamped image. Adhere all the background layers onto a brown cardstock and machine stitch around the edges. Hand-stitch straight stitches over the torn pattern paper as shown. Chalk the stamped butterfly in a pink color and stickle the sentiment using Diamond stickles. Punch a border on another pattern paper using the Martha Stewart Deco Shells punch and doodle using a white pen around the edges. Use another strip of pattern paper and machine stitch this one. Using yet another pattern paper in a darker color, die cut a shaped border. Lightly ink all borders using Tim Holtz Vintage Photo distress ink and adhere to the background paper as shown. Mat the 5”x7” photograph on pink cardstock; distress and ink the edges. Place over all the layers of pattern paper. For the flowers, stamp different size flowers from the Aztec Gold Sunflowers 2 Precut Set. Fuzzy cut them and add color by using pink chalk. Glimmer mist them with Pearl glimmer mist to give it a shiny finish. Shape your petals and build your flowers by layering a few of them on top of each other. Add a pink brad, some rhinestones and stickles to the center to finish them. For the leaves, stamp a few leaves from the Leafy Swirls Precut Set. Glimmer mist them with Olive Vine to give them color and fuzzy cut them. Add your flowers and leaves to the bottom left side of the photo and build your flower cluster as shown. Stamp the Bella Rose Vintage Background Precut Set a few times. Chalk the butterflies and fuzzy cut them. Ink their edges and add sparingly to the cluster and one over the title butterfly. Add a black pearl to their bodies and add stickles around the edges and body. Finish the layout by die cutting a butterfly from the Decorative Butterfly/Border, adding stickles and black pearls to the body and a Zva creative swirl as the trail. Add a title on the right side of the photo.

Thank you for visiting my blog today and don't forget to stop by the Heartfelt Creations blog and see all the amazing projects that the rest of the DT created!

Thursday, December 15, 2011

thursday...Nature's Majesty layout

Hi everyone! I'm getting very exited since there is only 10 days till Christmas! Not only that, but tomorrow my hubby and I will be coming down to Miami for Christmas vacation and we will be staying there for almost 2 weeks! We are very exited!

Today I want to share with you a layout that I made based on My Creative Scrapbook's Dec. Sketch. They are holding a Fall Contest and I just found out about a few days ago so now I'm playing catch up :)
Here is the sketch:


and here is my layout:

Supplies-
cardstock: Bazzill;
patterned paper: Basic Grey Curio;
letter stickers: Basic Grey Hello Luscious;
flowers: Recollections;
rhinestones: Kaisercraft;
bling: Tattered Angels Glimmer Mist (Burnt Red), Ranger Stickles (Diamond);
ink: Tim Holtz Distress Ink (Vintage Photo, Wild Honey);
stamps: Heartfelt Creations Vintage Life Background Precut Set Stamp (HCPC 3367), Heartfelt Creations Leafy Swirls Precut Set Stamp (HCPC 2254);
tools: Martha Stewart Punch Around the Page-Cherish, Tim Holtz Paper Distresser;
other: sewing machine

I played around with the sketch until it fit my scrappy style and number of photos that I wanted to use and this is what I came up with! I've been dying to make an orange-y layout since I purchased the Tim Holtz distressed ink pad 'Wild Honey" and I finally got to it with this layout using the peach colored Basic Grey papers from the Curio collection (that I've been hoarding).


I made most of my flowers. For the large red/orange flower, I used my Elegant Wild Roses tutorial and colored  my flower with Burnt Red Glimmer Mist and touched it up Wild Honey distress ink to brighten it up a bit. The smaller peach flowers were done with the same dies (Spellbinders Carnation Creation). The leaves are a Heartfelt Creations stamp (which will be retiring 12/31/2011 so if you like it, go now befor ethey are retired and gone forever!). The script flowers are Recollections and I just added a few drops of diluted Vintage Photo reinker to the centers to give them some color.


I used one of my favorite Martha Stewart punches (Cherish) for the pattern paper where I placed my title. I added another smaller flower cluster here too.


I used a few layers of paper for my background and distressed/inked them. I finished the edges by adding some machine stitching. I printed  a few butterflies and added them through the layout as a finishing touch.

Thanks for stopping by my blog today! Have a wonderful weekend!

Wednesday, December 14, 2011

wednesday...Heartfelt Creations

Welcome to my Heartfelt Creations Wednesday post-my favorite post of the week! This month Heartfelt Creations will be featuring projects using stamps that will be retiring by the end of this year so you will be seeing a lot of Leafy Swirls Precut Set and Aztec Gold Sunflowers 2 Precut Set in my projects this month! Click here to see a list of all the stamps that will be retiring by the end of the year. If you like any of these stamps, you better order them before they are gone forever! On another news, Heartfelt Creations will be having an awesome giveaway on the blog next Wednesday! Below is more info on it.

Heartfelt Creations Christmas Gift Certificate Giveaway: As a thank you to all our loyal HC customers, Heartfelt Creations will be giving away 50 - $50 Dollar Gift Certificates on December 21st at 9PM EST. On December 21st we will be providing you with the direct link to the giveaway page on our blog, Facebook and email. Once the page goes live you submit your information and a $50 gift certificate will automatically be emailed. Once the 50 gift certificate limit has been reached it will be indicated on the page. Mark your calenders and make sure you are available at that time, they will be snatched up quickly!

Ok, time to share my layout with you:


Supplies-
Heartfelt Creations:

Other:
GCD Studios Ella Blue Collection, My Mind’s Eye Bohemia, Ranger Liquid Peals-White Opal, Tattered Angels Glimmer Mist (Olive Vine, Maya Road Mist (Blue Agave), Ranger Stickles (Diamond), Ranger Tim Holtz Paper Distresser, StazOn Archival Ink (Jet Black), White doily, White Signo pen, Sharpie pen, Basic Grey Mini Mono Sticker (Hello Luscious), Martha Stewart Punch Around the Page (Cherish, Scallop 3 Dot)

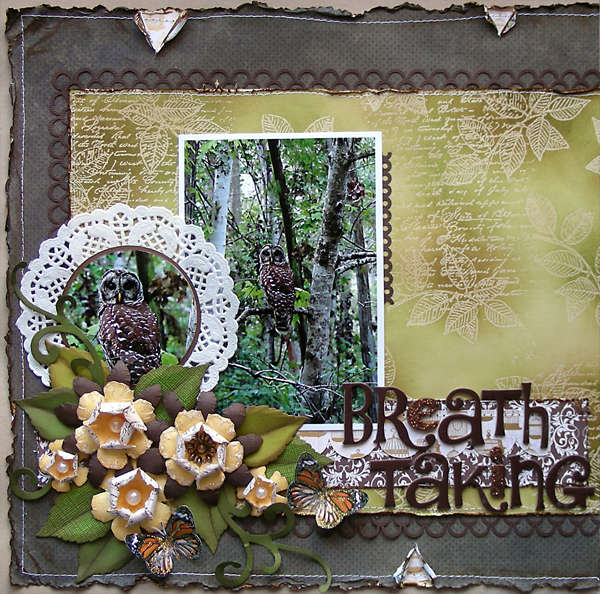
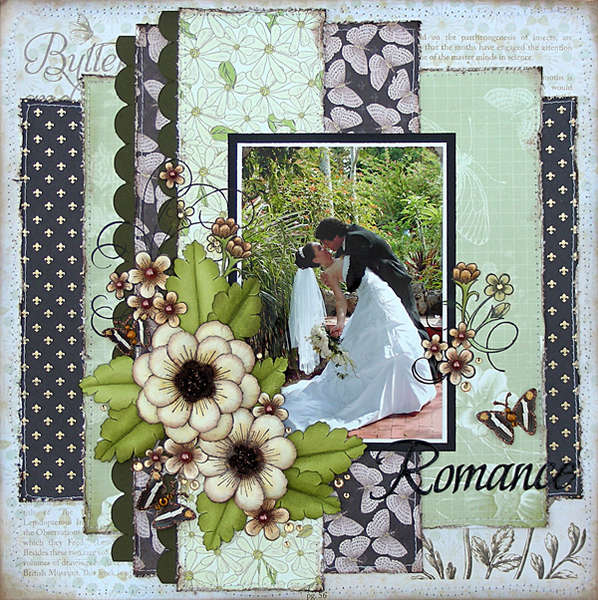
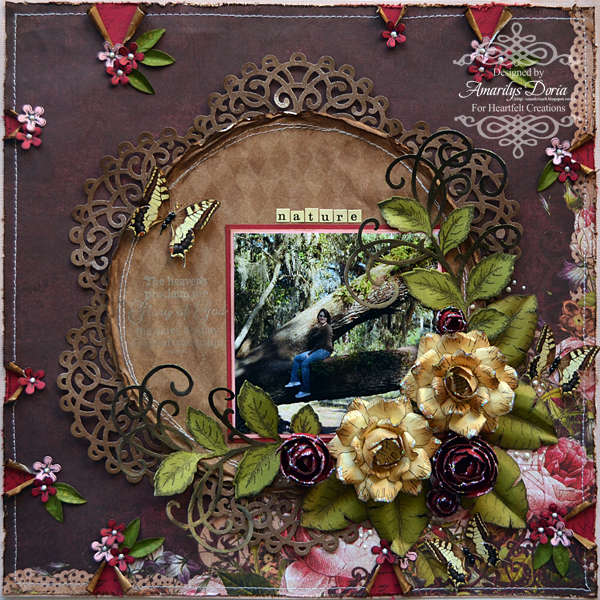
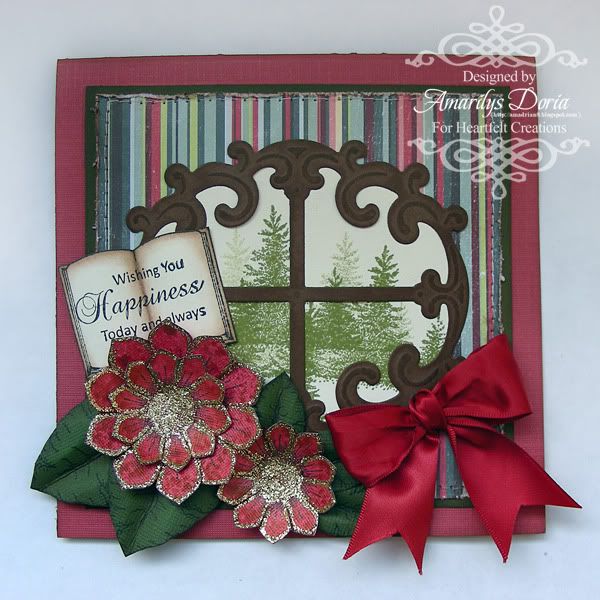
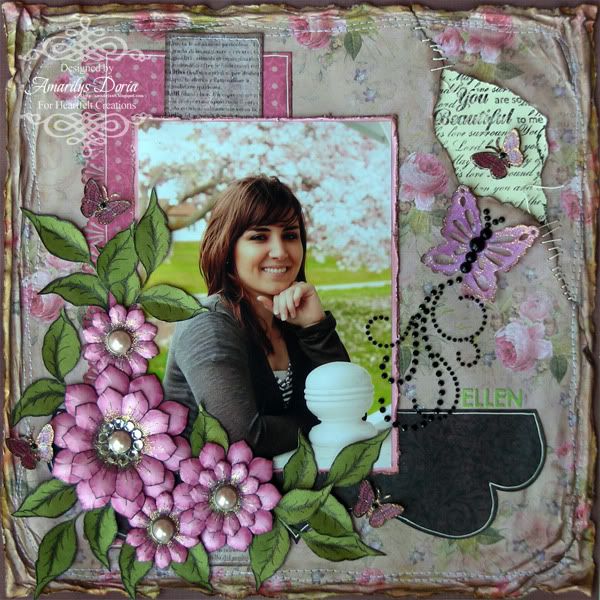
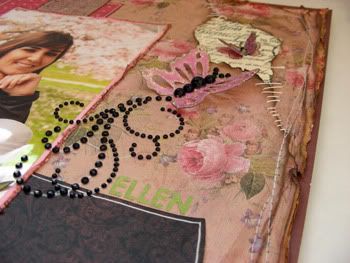
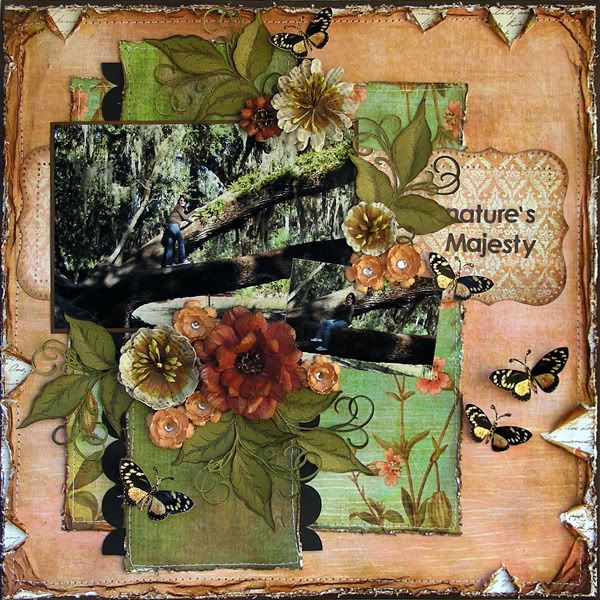
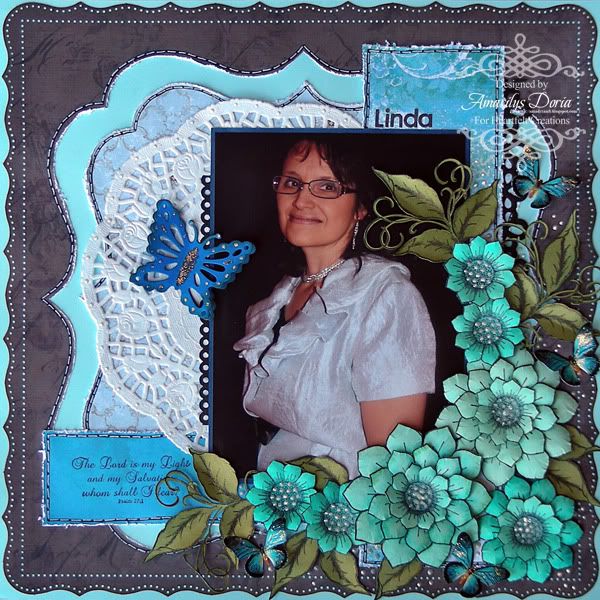
I used Linda's (Heartfelt Creations owner) photo for this layout. I wanted to go with an elegant layout since she looks so beautiful in her picture! I used a die cut shape for the background and added a few layers and a doily. 

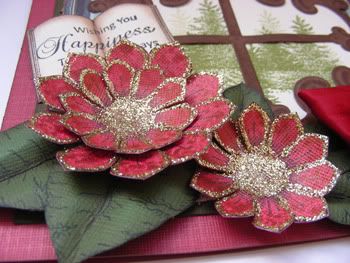
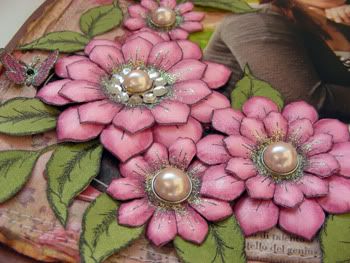
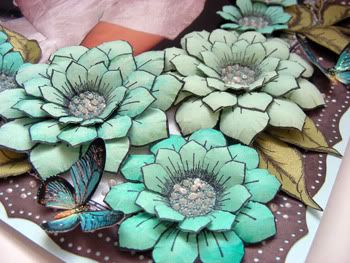
For the flowers, I stamped and glimmer misted them with Maya Road Agave Blue mist diluted with water to get different shades of blue. I shaped and layered the stamped images and added liquid pearl dots to the center.


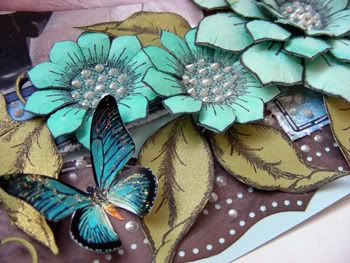
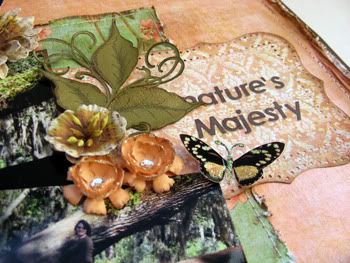
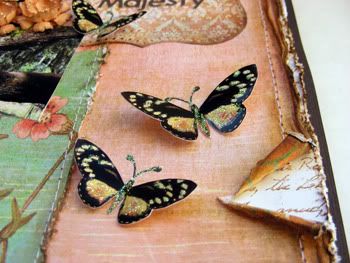
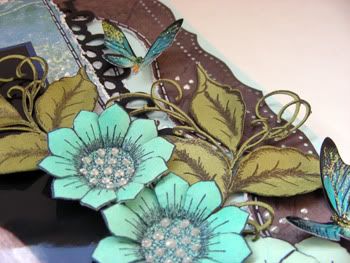
I used my all time favorite leaf stamps to fill in my flower clusters. I added glimmer mist (Olive Vine) to the leaves for a it of a shine. I printed and fuzzy cut a few butterfly images and added them throughout the flower cluster.

Here is another view of these gorgeous leaves!


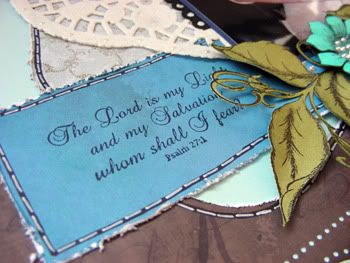
I finished by adding faux stitching to all the edges and stamping a sentiment to the left of the photo.

Here is the step by step write-up for this layout:
Punch around the page using Martha Stewart Punch Around the Page Cherish. Cut out a die cut shape within the background paper. Distress all the edges of the die cut paper and add faux stitching around the edges. Adhere everything onto a light blue cardstock for support.  Distress two more strips of paper, add faux stitching and layer them onto the background as shown. Mat your 5”x7” picture onto dark blue cardstock and add a small Scallop 3 Dot punched border on the left side of the picture. Add a white doily behind the picture and adhere to background. Stamp the sentiment on the strip of paper to the left side of the picture. For the flowers stamp different size flowers from the Aztec Gold Sunflowers 2 Precut Set. Cut them out and add color by misting them with, Maya Road Mist Blue Agave. To get the different shades of blue I mixed a little bit of the Agave Blue with water in a mini mister and sprayed some flowers. Shape your petals and build your flowers by layering a few of them. Add small Liquid Pearls dots to the center to finish them. For the leaves, stamp a few leaves from the Leafy Swirls Precut Set. Glimmer mist them with Olive Vine to give them color and fuzzy cut them. Add your flowers and leaves to the bottom right side of the photo as shown to build your flower cluster. Print, cut and stickle a few butterflies and add them randomly to the cluster. Die cut two butterflies from the Decorative Butterfly/Border set and layer them on top of each other. Fold the top butterfly’s wings up and add some stickles. Finally, randomly add Liquid Pearl dots around the cluster and add a title to the top right side of the photo.

Thank you for visiting my blog today and don't forget to stop by the Heartfelt Creations blog and see all the amazing projects that the rest of the DT created!

Tuesday, December 13, 2011

tuesday...AWDML December 1 Reveal- Bella BLVD (3/4)

Hello Bloggers! How is everyone doing? Today I have two quick Christmas cards using Bella BLVD products to share with you.

Remember that this month's featured manufacturers are Bella BLVD and Stamping Scrapping (a stamping company whose stamps that match the Spellbinders Nestabilities!). This means that this whole month these two manufactures' products are 25% off over at the AWDML store.


Supplies-
cardstock: Bazzill, Recollection;
patterned paper: Bella Blvd Christmas Wishes (Borders), Bella Blvd December Details (Bits a Bella);
pens: American Crafts Percision Pen (Black);
bling: Ranger Stickers (Icicle);
tools: Cuttlebug Machine, Provo Craft Victoria A2 Embossing Folder, Martha Stewart Punch Around the Page (Double Loop), Martha Stewart Oak Leaf Punch;
other: rhinestone


This card was really simple to do. I cut out a few trees from the Bella BLVD Christmas Wishes Borders, doodled around them and matted them onto a punched border. I then added this border on a green embossed cardstock. I added a sentiment and a few oak leaves to mimic mistletoe and machine sticthed around the edges.


Supplies-
cardstock: Bazzill, Recollection;
patterned paper: Bella Blvd Christmas Wishes (Borders);
ink: Tim Holtz Distress Ink (Vintage Photo);
pens: American Crafts Percision Pen (Black);
bling: Tattered Angels Glimmer Mist (Pearl);
tools: Cuttlebug Machine, Provo Craft Swiss Dots Embossing Folder, Martha Stewart Punch Around the Page (Scallop 3 Dots);
other: black brads, computer generated sentiment


This card was also very easy to make. I embossed a white cardstock and added a few strips from the Bella BLVD Christmas Wishes Borders pattern paper as well. I doddled around the edges to mimic stitching. I punched a green square and added it to the right side. I hand-pieced a snowman and added him over the green square. I made the sentiment on my computer.

Thanks for stopping by today! :)

***All the Products in BOLD can be purchased from A Walk Down Memory Lane online store.