Wednesday, February 29, 2012

wednesday...Heartfelt Creations

Welcome to another Heartfelt Creations Wednesday!
Today I'm going to be sharing a layout that I made using one of my wedding pictures (I can't believe that it will be 3 years this May already!) and my latest sketch for Creative Scrappers!
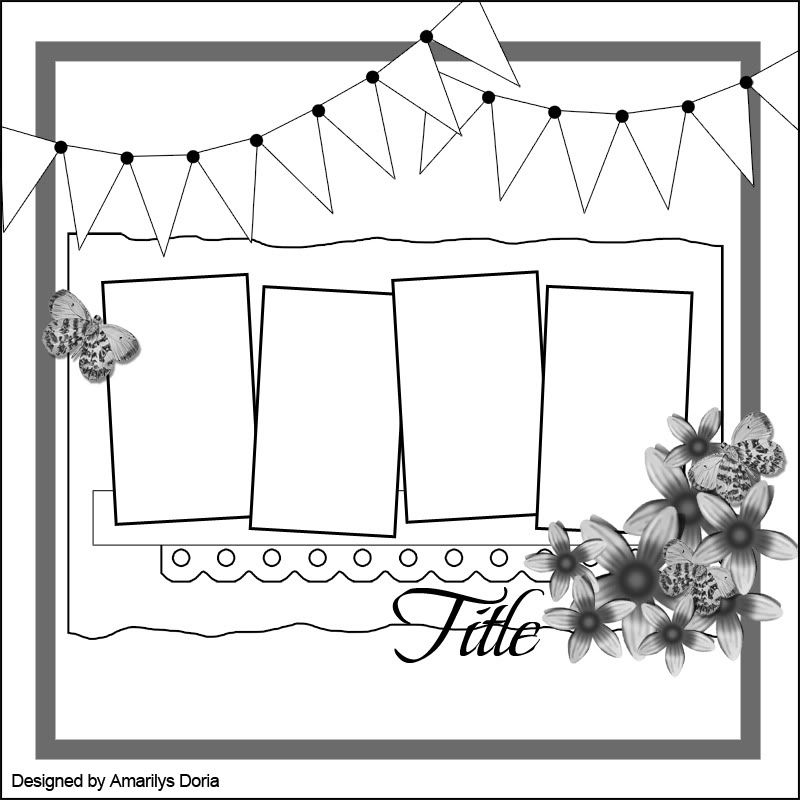
Here's the sketch:


and here's my take on it:
Photobucket
Supplies-
Heartfelt Creations:
HCPC 3406 Botanical Floral 1 Precut Set
HCPC 3407 Botanical Floral 2 Precut Set
HCPC 3435 Feather Grass Flourish Precut Set
HCPC 3439 Flirty Fleurs Precut Set
HCD 701 Posy Patch Die
HCD 713 Decorative Lace Border
HCD 719 Cross and Lilies Die
Foliage Shapeabilities
Labels 9 Shapeabilities

Rose Creations Shapeabilities
317430 Cuttlebug machine

Other: BoBunny Vicky B, Kaisercraft pattern paper, Bazzill cardstock, Kaisercraft Pearl Brads, Want to Scrap Nestabling (Scalloped Hearts), Tim Holtz Distress Inks (Vintage Photo), Ranger Stickles (Diamond), Ranger Liquid Pearls (White Opal), StazOn Archival Ink (Timber Brown, Jet Black), Martha Stewart Punch Around the Page (Wild Flowers), Inkadinkado Blending Chalks , Diamond Glaze , doily, white ribbon


I used a lot of layers on this layout and chose a pink/brown color combo. I used a vertical picture instead of a horizontal picture like my sketch calls for but that's the beauty of sketches, you can make it your own and mix and match elements to fit your style and pictures!


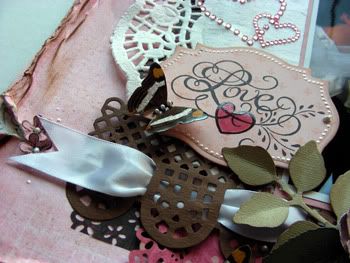
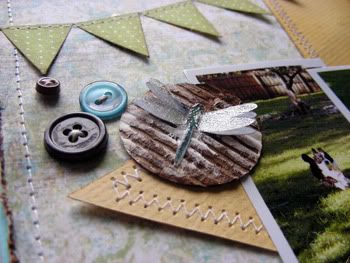
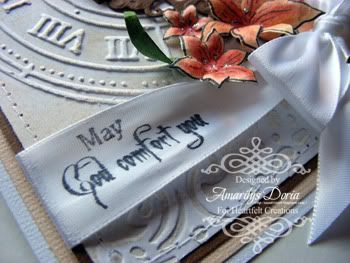
For the title, I stamped the sentiment and colored the heart shape with pink chalk. I then added Diamond Glaze ofver it to make it shiny and give it texture. You can see all the layers here-doily, lace border, water distressed background and two pink/brow layers.
.

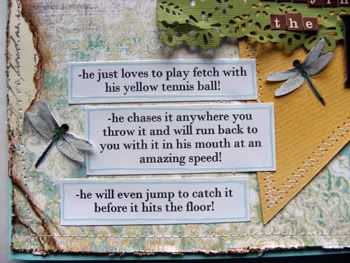
Here's another view of the layers. I added a few butterflies and randomly placed liquid pearl dots around the cluster.


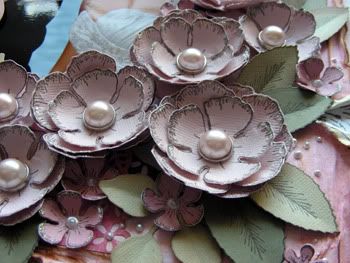
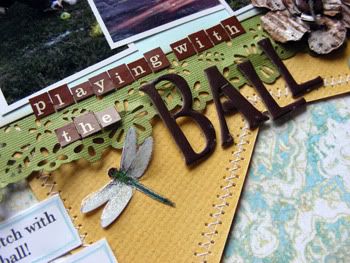
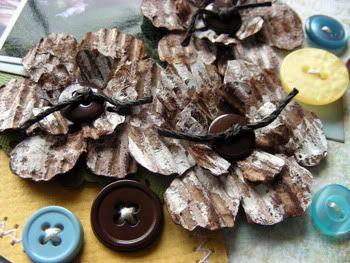
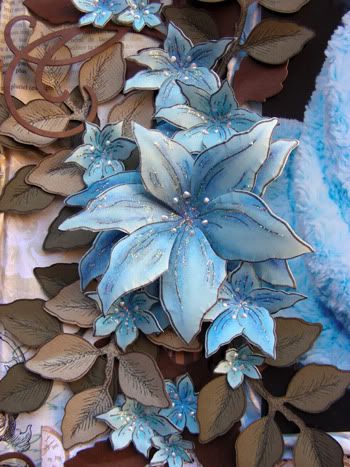
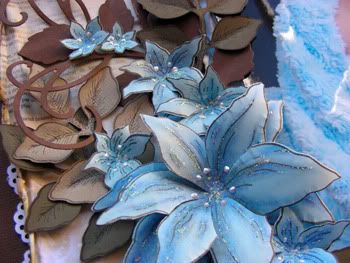
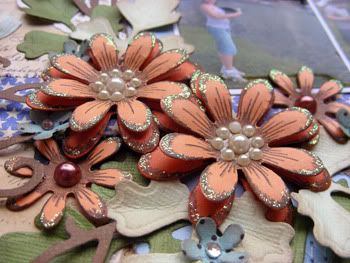
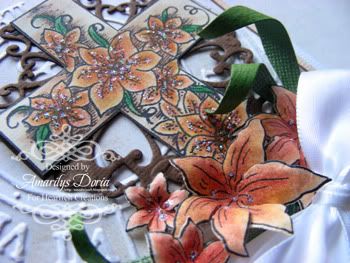
Finally, here are the flowers that I made for this layout. I stamped 2 of the second largest flowers and 1 of the next size down to make the larger flowers. I curled the petals up and added a pink pearl brad as a center. I finished the flowers by adding stickles to the edges. OF course, I added a few leaves, butterflies and liquid pearl dots to finish it off.


Here is the step by step write-up for this layout:
Water distress the background pink pattern paper and make random tears. Place a coordinating piece of pattern paper behind these tears to make peek a boo areas of interest. Adhere onto a pink cardstock. Using the Martha Stewart Wild Flowers punch, punch the edges of two pattern papers, one pink and one brown and adhere them to the center of the background as shown. Using your fingers, lift some areas to give it dimension. Place a white doily off center and mat your picture and place it over the right side of the doily as s shown. Die cut the Decorative Lace Border in brown, string a white ribbon through it and place under the picture. Stamp the love sentiment from the Feather Grass Flourish Precut Set on pink pattern paper using black ink and chalk the heart with pink chalk. Use diamond glaze over it to give it a shiny finish. Die cut the title using the second largest Labels 9 and emboss. Adhere on the left side of the picture and add a butterfly on the left corner. Place two bling hearts over the white doily and above the title. For the flowers, stamp a few of the two largest flowers from the Botanical Floral 1 Precut Set and the smallest from the Botanical Floral 2 Precut Set on pink cardstock. Die cut using the matching die and layer them to form the flowers using a pink brad for the center. The larger flowers use two of the largest stamped flowers and one medium, the medium flowers use two medium stamped flowers and finally the smaller flowers are only 1 layer of the smallest stamps with a liquid pearl drop as a center. Add stickles to the edges to finish them off. For the leaves stamp the two largest leaves from the Botanical Floral 2 Precut Set on two different shades of green cardstock and die cut them using the coordinating dies. Fold them in half to give them dimension. Die cut three leaves from the Spellbinders Shapeabilities Foliage and fold them in half also. Add the leaves and flowers on the right bottom corner of the page. Stamp and die cut a few of the tiny flowers from the Flirty Fleurs Precut Set, add a liquid pearl drop in the center and add to the peek a boo areas as shown. To finish, randomly add a few butterflies and liquid pearl drops around the cluster.
Thank you for stopping by my blog today! I really appreciate all of your comments! Don't forget to stop by the Heartfelt Creations blog today to see all the wonderful creations by the DT!

Monday, February 27, 2012

monday...sharing a layout

It's Monday again! Can you believe it? This weekend was so much fun but it flew by way too fast!

Today I'm actually sharing a layout I made for a few challenges and not for any of my DTs! I can't remember the last time I did one of these!

Here's my layout:


First of all, this layout is based on my sketch below:


I was also inspired by this week's Case File No. 8 over at CSI. CSI is a brand new challenge ning site that not only provides a color challenge but also gets you to tell the store behind the picture(s). If you haven't checked them out yet, stop by and do!

Here is this week's case:


I just loved the masculine colors in this week's challenge and decided to use these colors in a layout about my dog playing with his tennis ball.


EVIDENCE 
Use stars : I made a large star die cut shape and used it as my background
Use glass or transparent elements: I used a transparency sheet to maky the dragonflies’ wings (Here’s a tutorial)
Use liquid mediums: I used Glossy Accents on my journaling strips, paint on my flowers, glimmer mist on the star die cut shape, and ink everywhere! :)

TESTIMONY
Tell three quirky factoids about your subject

Below are some close ups:


I'm also entering this layout in Flying Unicorn's Feb Pet challenge.

Thanks for stopping by my blog today! I really appreciate it! :)

Sunday, February 26, 2012

sunday...Creative Scrappers sketch reveal

Happy Sunday everyone! Today my sketch is up on the Creative Scrappers' blog!


If you use this sketch , remember to link it inLinkz at the Creative Scrappers blog to be eligible to win a price from their sponsor this month. You just need to complete at least one layout from sketches 193-194-195-196 to be eligible for the monthly price. The deadline to submit your layout is February 29 at midnight.


Thanks for stopping by and have a wonderful week!

Friday, February 24, 2012

friday...AWDML February 15 Reveal-Inky Antics (3/3)

TGIF! I'm actually a bit exited about today since we are going camping with a few friends overnight! I haven't done that since I was 7! We'll see how it goes! :)

Today I want to share with you an altered frame that I made for one of my wedding pictures. Remember that this month's featured manufacturers at A Walk Down Memory Lane are Nikki Sivils and Inky Antics. This means that this whole month Nikki Sivils and Inky Antics products are 25% off over at the AWDML store! You only have a few more days to take advantage of this deal!

I used the Inky Antics HoneyPop Turtle Stamp for this project to show you how you can use stamps in your projects other than cards!

Photobucket
Supplies-cardstock: Recolections;
paper: Inky Antics Honeycomb Pad Brown;
letter stickers: Cosmo Cricket Tiny Type CS Alpha Cream;
flower: Prima Vine;
bling: Ranger Stickles (Icicle);
ink: Stazon Jet Black;
stamp: Inky Antics HoneyPop Stamp Turtle;
coloring: Prismacolors pencils, OMS;
other: black frame


I forgot to photograph the frame before but it was just a black frame. I added turtally in to make a play with words and the turtle in the bottom right corner. I stamped, colored and added some little birdies on the word love.Finally, I made a little turtle complete with the pop up body and added it to the right corner of the frame. I finished it off with an old Prima vine that I still had in my stash.

Thanks for stopping by today! Have a great weekend!

Wednesday, February 22, 2012

wednesday...Heartfelt Creations

Happy Wednesday!

Today, I want to share with you a layout that I made for Heartfelt Creations using their latest collection (again!)-The Floral Cross Collection! I just love this collection!


Supplies-
HCPC 3405 Leaf Medley Precut Set
HCPC 3452 Pristine Lilies Precut Set
HCPC 3455 Butterfly and Lilies Precut Set
HCD 712 Bella Rose Die
HCD 713 Decorative Lace Border
HCD 719 Cross and Lilies Die
472123 Foliage Shapeabilities
317430 Cuttlebug machine


Other:
BoBunny Gabrielle Collection-Dot, BoBunny Timepiece Collection-Dot, Couture Creations Embossing Folder (Renaissance), Tim Holtz Distress Inks (Vintage Photo), Ranger Stickles (Diamond), Ranger Liquid Pearls (White Opal), StazOn Archival Ink (Timber Brown), Want to Scrap Say it In Pearls (Black), Prismacolor Pencils (PC903, PC908, PC933, PC945, PC1034), Mona Lisa OMS, Spellbinders Shapeabilities Labels Four, Rangers Tim Holtz Paper Distresser, Martha Stewart Punch Around the Page (Cherish, Doily Lace) 

I combined pattern papers from BoBunny's Timepiece and Gabrielle collection and I just love the effect! I did some water distressing on the background layer and inked the raised edges to give it a worn and masculine look. At the same time, i wanted the layout to look soft so I added a scalloped white border between the pattern paper and background cardstock.


I made and used quite a few blue lilies to make the cluster. I think they are just gorgeous, specially in blue!


Here's another look at the cluster. I also added a lot of foliage in different shades of green and brown to keep the layout masculine enough.


For the title, I designed it on Photoshop, printed it, die cut it and embossed it. I added some flourishes on opposite sides and pop dotted it over an embossed clock.


You can see all the dimensions on this side of the layout here.


Here is the step by step write-up for this layout:
Water distress the pattern paper and layer over a white cardstock whose edges have been punched with Martha Stewart Doily Lace punch. Make small peek a boo areas with your fingers so that the white cardstock shows through in random areas. Adhere these two layers unto a brown cardstock base. Slightly ink the raised edges with Vintage Photo distress ink. Add two strips of coordinating pattern paper on the left side of the layout and two punched (Cherish punch) strips on the bottom side, as shown. Water distress a blue pattern paper to fit a 5”x7” photograph. Ink the raised edges with Vintage Photo distress ink, adhere picture, and place in center of layout. Emboss and cut around the clock from the Couture Creations Embossing Folder. Ink raised edges and place under the photo’s right bottom corner. Print the title on white cardstock and die cut/emboss using Spellbinders Labels 4. Die cut two corner flourishes in brown from the Decorative Lace Border die set and place on opposite corners to make a frame. Adhere over the embossed clock. Place a black pearl over each corner and three larger pearls on the right side of the photo as shown. Stamp the scroll and butterfly image from the Butterfly and Lilies Precut Set on white cardstock and color using Prismacolor pencils and OMS. Cut them out and adhere around the title as shown. Die cut two leaves swirls from the Belle Rose die set in brown and add to the left side of the picture. To make the cluster, stamp, die cut and color with Prismacolor Pencils and OMS some different size lilies. Give them dimension with your fingers or a stylus and place on the left side of the picture. Add stickles highlight on them and a few liquid pearl dots over the lily’s stamped stamens. Stamp and die cut some leaves from the Leaf Medley Precut Set and fill in the cluster as shown.


Thank you for stopping by my blog today! I really appreciate all of your comments! :)

Tuesday, February 21, 2012

tuesday...dragonfly tutorial

Here's the dragonfly tutorial that I promised!

Supplies:
  • transparency
  • clear embossing powder
  • heat embossing tool
  • printer
  • photo paper
  • rhinestones (optional)

Step 1. Print THIS file on a 4"x6" photo paper as well as a transparency sheet (acetate). Let the photo paper dry (a few minutes, depending on your paper/printer). As soon as you print on the transparency sheet, sprinkle some clear embossing powder and melt it with an embossing heat gun.
BEWARE: Do not over heat it (or keep it too close to the heat gun) as it will also melt the transparency sheet!


Step 2. Cut out a dragonfly from each media-one from the photo paper and one from the acetate.


Step 3. Layer the transparency dragonfly over the photo paper dragonfly and there you have it! A super fast, super easy embellie to add to your layout!


Step 4. (OPTIONAL) Now, you can take it a step further and embellish your dragonfly by adding two (or more) rhinestones in the body like I did.

I hope that you enjoyed this very fast tutorial. You can definitely apply this concept to butterflies and other embellies to give them dimension and texture!

Here's a close up of a dragonfly that I used on my layout:


Thanks for stopping by! Let me know what you think of the tutorial. I'd love some feedback! :)

tuesday...AWDML February 15 Reveal-Inky Antics (2/3)

Good morning everyone! Today I have a layout I want to share with you. It is actually a lift of my good friend Lisa Wilkinson (you can find her layout here).

This month's featured manufacturers at A Walk Down Memory Lane are Nikki Sivils and Inky Antics. This means that this whole month Nikki Sivils and Inky Antics products are 25% off over at the AWDML store!

I used the Inky Antics HoneyPop Turtle Stamp for this layout to show you how you can use stamps in your layouts too! This sweet Turtle Stamp comes with three little birds and I thought they were perfect for my Day at the Park layout.


Supplies-
cardstock: Bazzill, DCWV;
patterned paper: Authentique Gathering 6x6 Paper Pads, Nikki Sivils We Are Family Cut Ups/Sun Room;
letter stickers: Cosmo Cricket Tiny Type CS Alpha Brown, Nikki Sivils We Are Family CS Stickers;
stickers: Nikki Sivils We Are Family CS Stickers;
pearls: Jenni Bowlin Pearl Flowers Cream Cheese, Kaiser Crafts Pearl Swirl (Copper);
ink: Stazon Jet Black, Tim Holtz Distress Ink (Antique Linen, Vintage Photo), Ranger Embossing Distress Ink, Ranger Embossing Powder Clear;
stamp: Inky Antics HoneyPop Stamp Turtle, Prima Notary script, Heartfelt Creations Daisy Patch Flowers Precut Set, Inkadinkado Dot Flourishes Stamps;
tools: Marvy Uchida 2500 heat embossing tool, Martha Stewart Punch (Scallop Dot), Cuttlebug Machine, Tim Holtz paper distresser, Fiskars Stylus, Heartfelt Creations Dies (Daisy Patch, Posy Patch, Belle Rose), Spellbinders Shapeabilities (Foliage);
other: doily, sewing machine, clear rhinestones, transparency


This was definitely a fun layout to do! I handmade my own pattern paper using Inkadinkado Dot Flourishes Stamps and Prima Notary script stamp. I inked, distressed, tore and re assembled to make that background.


Here's a close up of the top right corner. You can see my little birdies. How sweet are these!?


Here's another close up of the same corner. Come back later today and I'll show you how to make these sweet little dragonflies!


Finally, I build a cluster of handmade flowers/leaves on the bottom left side of the pictures. I used Heartfelt Creations Daisy stamps to make them and finished them off with a pearl in the center.

Thanks for stopping by my blog today! I'll have the dragonfly tutorial on my blog later today and don't forget to stop by tomorrow for a Heartfelt Creations post. It's going to be amazing! :)

Thursday, February 16, 2012

thursday...AWDML February 15 Reveal-Inky Antics (1/3)

Hi everyone!

I had a great day yesterday spending some time with my hubby, celebrating Valentine's Day since he had to work on the 14th until really late. Because I was spending time with my hubby yesterday I didn't blog yesterday about AWDML's second manufacturer for this month.

This month's featured manufacturers at A Walk Down Memory Lane are Nikki Sivils and Inky Antics. This means that this whole month Nikki Sivils and Inky Antics products are 25% off over at the AWDML store! Today, I want to share with you four cards that I made using Inky Antics HoneyPop Turtle Stamp.

First of all, I made this little boy birthday card set:

Supplies-
cardstock: DCWV;
patterned paper: Nikki Sivils It's Raining, It's Pouring Wellies / Slicker, Nikki Sivils We Are Family Border Strips/Family Album;
bling: Ranger Stickles (Icicle);
ink: Stazon Jet Black;
stamp: Inky Antics HoneyPop Stamp Turtle;
coloring: Prismacolors pencils, OMS;
tools: Cuttlebug Machine, Spellbinders Shapeabilities (Labels 9);
other: sewing machine


Here's the inside of the cards:


and here are some close ups:


I love this stamp set because is so versatile and work wonderfully to make little boy cards (which I needed to make). I also love how they thought of the inside of the cards when they made the set.

Here's another card that I made:

Supplies-
cardstock: Bazzill, Recolections;
paper: Inky Antics Honeycomb Pad Brown;
bling: Ranger Stickles (Icicle, Cinnamon);
ink: Stazon Jet Black;
stamp: Inky Antics HoneyPop Stamp Turtle;
coloring: Prismacolors pencils, OMS;
pens: American Crafts Precision Pen (Black), Ranger Opaque White pen;
tools: Cuttlebug Machine, Spellbinders Shapeabilities (Labels 4);


and here's the inside


Don't you just love how sweet this little turtle looks? I think this will make a great boy card!

Finally, I have a simpler card to share and show you that this set can be used for a feminine card::


Supplies-
cardstock: Recolections;
bling: Ranger Stickles (Icicle);
pearls: Kaiser Crafts Pearl Swirl (Copper);
ink: Stazon Jet Black;
stamp: Inky Antics HoneyPop Stamp Turtle Paper Smooches Acrylic Stamp Alphadot;
coloring: Prismacolors pencils, OMS;
tools: Cuttlebug Machine, Cuttlebug Textile Texture A2 Embossing Folder, Heartfelt Creations Die (Posy Patch, Decorative Chateau Gate Die);


I used Heartfelt Creations window die and popped the little turtle and bird through. I then used my alpha stamps to spell out a simple hi. I embossed the background cardstock with my Cuttlebug Textile Texture embossing folder and added the window and stamped image in the center.

Here's a close up of this simple but elegant card:


Thanks for stopping by today! :)

Wednesday, February 15, 2012

wednesday...Heartfelt Creations

Happy Wednesday everyone!
Today I have a card to share with you that I made using Heartfelt Creations latest collection-The Floral Cross Collection!


Supplies-
Heartfelt Creations:
HCPC 3450 Cross and Lilies Precut Set
HCPC 3452 Pristine Lilies Precut Set
HCD 719 Cross and Lilies Die
Carnation Creations Shapeabilities
317430 Cuttlebug Machine


Other: Couture Creations Embossing Folder (Renaissance), Tim Holtz Distress Inks (Antique Linen, Vintage Photo), Ranger Stickles (Diamond), StazOn Archival Ink (Jet Black), Prismacolor Pencils (PC1034, PC1003, PC945, PC922, PC908), Mona Lisa OMS, sewing machine, white ribbon

First I have to say that I just love how this card turned out! I used Couture Creations Renaissance Embossing folder. To make the background, I inked the embossing folder itself, specifically, the side with the company logo, with Antique Linen distress ink. I then embossed a 4.25”x5.25” white cardstock in the folder and embossed. I just learned this technique and I love it already!


I made a whole bunch of flowers and colored them in orange with Prismacolor pencils. I die cut a cross and added it to the cluster too.


For the sentiment, I stamped the sentiment directly unto the white ribbon with archival ink and added a bow to the right side of it.


Here is the step by step write-up for this layout:

(5”x6” card) 
Cut a white cardstock base 12”x5” and fold in half. To make the background embossed paper, Ink the side with the company logo with Antique Linen distress ink, place a 4.25”x5.25” white cardstock in the folder and emboss. Double mat this layer with brown and cream cardstock, machine stitch around the edges and adhere to the white card base. Stamp the cross from the Cross and Lilies Precut Set on cream cardstock, color with Prismacolor pencils and add small Diamond stickles dots to the center. Stamp a few of the smaller 3 sizes of flowers from the Pristine Lilies Precut Set, color with Prismacolors and OMS and die cut them using the matching Heartfelt Creations die. Die cut the large cross from the Cross and Lilies Die set. Hand cut and adhere unto the die cut cross the stamped lilies cross and adhere to the background as shown. Also die cut a few leaves from the Spellbinders Shapeabilities Carnation Creation, curl them around a thin paintbrush and add to the cluster. Stamp the sentiment directly unto the white ribbon and add to the card. Make a bow and add it to the right side of the card. Finish the card by randomly placing the rest of the flowers around the bow.

Thank you for stopping by my blog today! Also, Heartfelt Creations is holding a DT call. You can find more information here.

Tuesday, February 14, 2012

tuesday...AWDML February 1 Reveal-Nikki Sivils (3/3)

Happy Valentine's Day everyone! I hope that you are having a special day with your loved one (s). My husband is working today until late so we decided to celebrate Valentine's Day tomorrow instead. :)

Well, today I do have one layout to share with you.

Remember that this month's featured manufacturers at A Walk Down Memory Lane are Nikki Sivils and Inky Antics. This means that this whole month Nikki Sivils and Inky Antics products are 25% off over at the AWDML store!


Supplies-
cardstock: Bazzill;
patterned paper: Nikki Sivils It's Raining, It's Pouring Wellies, Nikki Sivils We Are Family Family Picture Diecut, Nikki Sivils We Are Family Border Strips;
letter stickers: Cosmo Cricket Tiny Type CS Alpha Brown, Nikki Sivils We Are Family CS Stickers;
ink: Tim Holtz Distress Ink (Vintage Photo);
pens: American Crafts Percision Pen (Black), Ranger Opaque White pen;
tools: Martha Stewart Punch Around the Page (Scallop 3 Dot);
other:sewing machine

For this layout, I used Nikki Sivils We are Family Picture Die Cut paper. These pictures were taken in 2010 at Comic Con, Miami and I've been looking for the perfect papers for them and the die cut paper was perfect!


I made a few paper rosettes (come back on the 24th and I'll share step by step how I made the whole layout!) using Nikki Sivils pattern paper and embellie stickers. I also had a Spiderman pack of flat stickers with white borders (yeah, remember those?) which I hand cut the white out and used a few to embellish the layout.


To liven it up, I made a banner and tugged it between the rosette and red die cut paper to add some layers and depth.


I had fun with he title! I spelled Miami with Nikki Sivils Blue alphas and then used smaller Cosmo Cricket Tiny Alphas to spell comic con right over it! I left the space to the left of the pictures black so that my hubby can journal on it since we went to Comic Con mostly for him. :)

Thanks for stopping by my blog today! :)