
Welcome to A Walk Down Memory Lane’s first ever Blog Hop!
Summer is here and so is our reveal of July’s featured manufacturer- My Mind’s Eye. We are so happy to have our 1st Blog Hop with MME and giving away a beautiful collection.
There are TWO ways you can win!
1. Leave a comment on all of the blogs included in the hop (including this one!).
2. “Like” our Facebook page and leave us a comment there telling us what’s your favorite line from My Mind’s Eye.
Blog Hop Order:
AWDML Blog
Tifany
Amy (you are here!)
Lisa
Gina
Cindy
Lucy
AWDML on Facebook
You will be entered into the prize drawing for each of the blogs you comment on by random drawing. You will have until midnight on July 4th and winners will be posted on the DT and AWDML blogs and on our Facebook page on July 6th.
The winner will receive My Mind’s Eye Life’s Story Collection
Just hop to each blog and check out some of the projects that our design team has put together for you. Now don’t forget to leave some loving so you have chance to win.
Thanks so much for playing along!
Good luck!
Here are my projects that I created with some of MME’s line from AWDML Store:
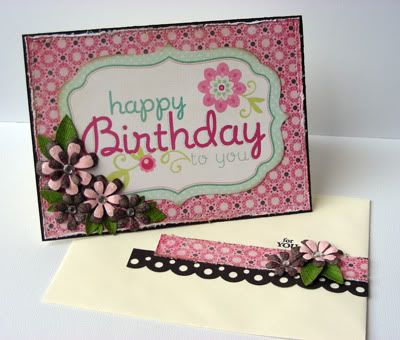
Supplies-cardstock: Bazzill; patterned paper: My Mind's Eye (Stella & Rose-Hazel Papers 6x6 Pad); die cut: My Mind's Eye (Quite Contrary Mary Mary Happy Birthday Title), My Favorite Things Die-namics (Flower & Leaf Trio); bling: Kaisercraft Rhinestones, Stickles (Diamond); ink: Tim Holtz (Vintage Photo); tools: Cuttlebug; Tim Holtz Paper Distresser;
I made this simple but pretty Birthday card set using the new MME Stella & Rose Hazel papers. I love the colors and patterns on this stack! For the sentiment, I used one of the many title die cuts that MME has, this one is from their Quite Contrary line.
Here is another look at the card alone:

My next project is a bit more whimsy and it's the introduction page to my newborn nephew's scrapbook.
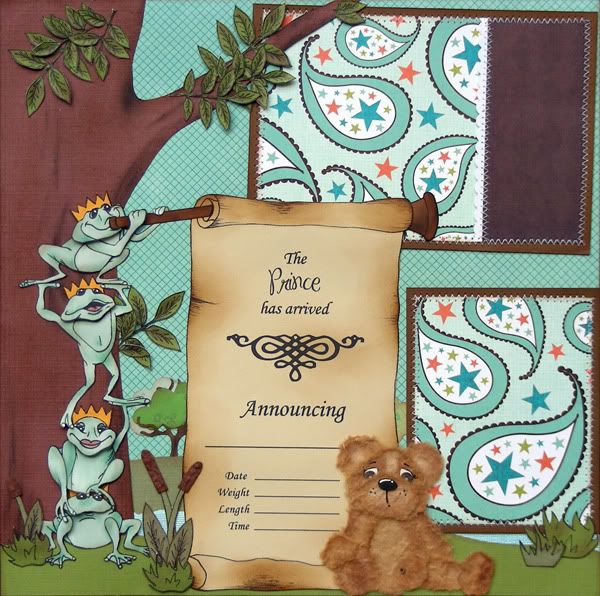
Supplies- cardstock: Bazzill; patterned paper: My Mind's Eye (Just Dreamy 2-No Girls Allowed, Paisley Power); ink: Tim Holtz (Vintage Photo); tools: Pazzles Inspiration, Tim Holtz Paper Distressor; pen: sharpie, Signo white pen; other: mulberry paper, chalk, sewing machine
For this layout I used MME's Just Dreamy 2 papers because I just love the blues, browns and oranges in this collection. I made a forest scene with a tree, leaves and even frogs. I cut all these critters using my Pazzles, paper pieced them, and then shaded them with chalk. I designed the scroll on Photoshop and then distressed the edges with Tim Holtz ink. I made a little tear bear, fluffed him up and sat him by the scroll. I finished it off by adding two photomats that I machine stitched around the edges.
Here are a few close ups of the layout:


My last layout is actually a step by step so you can actually duplicate it if you want!
Here is the finished layout:
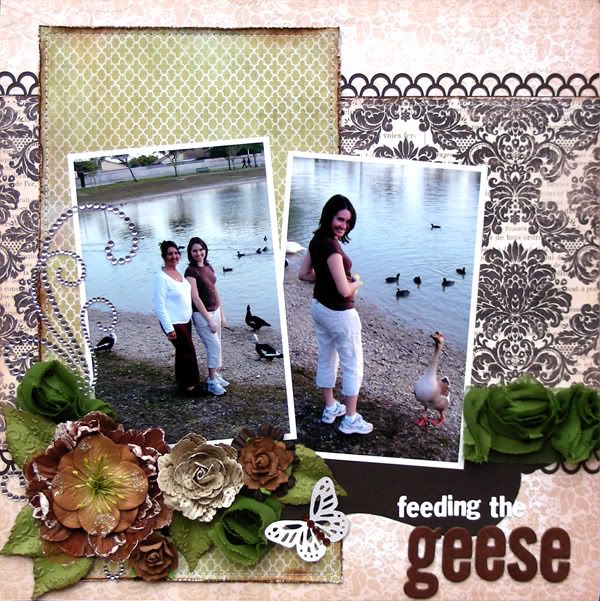
Supplies-
cardstock: Bazzill;
patterned paper: My Mind's Eye (Lost & Found Union Square Perfect Damask), My Mind's Eye (Hazel 6x6 Paper Pads);
letter stickers: Basic Grey Basics (Cream);
chipboard: My Mind's Eye (Lush Brown Chipboard Alphabet);
flowers: Recollections, Prima (Sugar Plum Roses Cinnamon), Zva Creative (3" Frosty Flowers Chestnut & Scarlet);
ribbon: Webster's Pages Fabric Bloomers Green;
ink: Tim Holtz (Vintage Photo);
bling: Zva Creative Flourish, Kaiser Crafts Rhinestone Swirl Brown;
tools: Cuttlebug, Martha Stewart Around the page Punch Double Loop, Martha Stewart Monarch Butterfly Punch, Tim Holtz Paper Distresser;
So now that you have seen the finished layout and the supplies list, let's start:

Step 1. Cut a 7" piece from the double sided MME paper (2" from the top and 3" from the bottom). Flip over to show the other side of the double sided paper and distress the edges.

Step 2. Punch out two 12" borders using your favorite punch (I used Martha Stewart Double Loop punch). Layer them between the two sheets of paper. Glue everything down on another cardstock for support and sew along the edges of the middle piece of paper.

Step 3. Pull out two 6x6 sheets from the MME Stella & Rose Hazel paper stack. Distress and ink all the edges but the top on.

Step 4. Using a shaped die cut paper, trace the bottom part unto a brown cardstock. Cut it out.

Step 5. Assemble your background like so. Don't worry about being able to see the line where the two 6x6 papers meet or the little hole. We will cover this up in a few steps. :)

Step 6. Print out 2 vertical pictures and either mat them in white or you can do what I did and print them out with a white border. This saves paper!

Step 7. Gather your embellies for your layout. I'm using a few brown flowers, a Zva bling flourish, Websters bloomers, a few die cut leaves and a handmade butterfly.

Step 8. Add your photos to your background paper at an angle. Then arrange the flowers, leaves and bloomers to your liking. Finally, add your Zva bling so that the bling covers up the line where the two 6x6 papers meet. Continue to add your butterfly and then your title int he lower right hand side.
Here are a few close ups of my finished layout:


I hope that you have enjoyed the Step by Step. Now, hop on to Lisa's blog to see her projects featuring My Mind's Eye products!
Don't forget to leave me a comment for a chance to win and if you like, follow my blog too!

I just discovered your blog through this hop & love your work!
ReplyDeleteGreat projects!!!
ReplyDeleteJust discovered your Blog and I WILL be adding it to my Google Reader! Love your work...
ReplyDeleteBeautiful work!
ReplyDeleteBeautiful projects!
ReplyDeletethe colors are beautiful in Feeding the Geese
ReplyDeleteBeautiful ! I love your layout.
ReplyDeleteLOOOOVE the card, especially...soooo pretty!!
ReplyDeleteThe geese LO is gorgeous!! What die cut did you use for the leaves????
ReplyDeletegot some cute stuff here!!!
ReplyDeleteLOve all the items, but the frog announcements was really awesome!
ReplyDeletesuper cute!
ReplyDeletejeana
write 2 me always at hotmail . com
Wow this is a great tutorial Amy and so beautiful...thank you for the chance to win some awesome paper!!!
ReplyDeleteLove your work! The card is just so pretty! I love the both the scrapbook pages.
ReplyDeleteso cute! thanks! prhmangel@gmail.comso cute! thanks! prhmangel@gmail.com
ReplyDeleteGreat projects! Love the last layout especially!
ReplyDeleteWow! You have some great projects there! I love the LO for your nephew! I have a 6X6 of the Quite Contrary, and I love the little die cuts. Thank you for showing us your fun projects!
ReplyDeletewow! your lo's are amazing! I love the step by step how to, really gets my creativity flowing, so thank you!
ReplyDeleteLisa
Just a quick note to let you know that a link to this post will be placed on CraftCrave today [02 Jul 01:00am GMT]. Thanks, Maria
ReplyDeleteGreat work!
ReplyDeleteOh my! This is my first time at your blog but I WILL be back (daily)! I LOVE your work and style! Your intro page for your nephews scrapbook is absolutely amazing! His mom must be thrilled that you made this for him.
ReplyDeleteVery pretty! I especially like the card with the matching envelope!
ReplyDeleteAmarylis-congrats on your recent marriage! I love being married and I hope you enjoy all of your days together. I really enjoyed peeking at your layouts (you are very diverse) in your styles. Great use of the embellishments on the Geese layout! Also, I liked the dimension you added to the froggy's heads & how you made the teddy bear fuzzy! So cute. I think I need to purchase some MME now :)
ReplyDeleteAmarily,
ReplyDeleteLove all your projects, but I will try the geese
layout. It is my favorite. Thanks for the
directions...
Great stop on the hop! THX for the ideas.
ReplyDeleteGreat projects! Love the card and matching envelope. The layouts are just precious. Thanks for the instructions on that last one.
ReplyDeleteWhat a great prize! Love what you did with all the pp's! Keep up the good work!
ReplyDeleteBeautiful layouts! Thanks for sharing your step by step; gives a little insight on how someone else goes about their layouts.
ReplyDeleteApril
nginerd at gmail dot com
http://ajoy2scrap.blogspot.com
I absolutely love the birthday card. Very cute!
ReplyDeleteWho would have thought that feeding geese could make such a gorgeous layout!
ReplyDeleteWhat beautiful projects! Thanks for the step by step on your lovely layout!
ReplyDeleteBeautiful projects, but I think my favorite is the birth announcement!
ReplyDeleteI love the dimension and fuzzy bear on your LO--super cute! The card sentiment is perfect, and I love that you finished the envelope, too. Thanks for the tutorial!
ReplyDeleteBeautiful work! I love that last LO!
ReplyDelete