

Supplies:
Double Dots 100pc. -3D Foam Circles, DDOTSLuggage and Tags Die, HCD1-745
Crystal Ultrafine Transparent Glitter, 85-glitter
Water Lily Cling Stamp Set, HCPC-3725
Water Lily Die, HCD1-790
Botanic Orchid Cling Stamp Set, HCPC-3741
Regal Hummingbird Cling Stamp Set, HCPC-3742
Botanic Orchid Wishes Cling Stamp Set, HCPC-3744
Botanic Orchid Die, HCD1-7101
Regal Hummingbird Die, HCD1-7102
Botanic Orchid Bouquet Die, HCD1-7103
Botanic Orchid Paper Collection, HCDP1-267
Other Materials:
Cuttlebug Die Cutting Machine, Silhouette cameo, StazOn Archival Ink (Jet Black), Prismacolor Pencils ( PC995, PC932, PC929, PC924, PC1003, PC901, PC904, PC908, PC912), Odorless Mineral Spirits, Tim Holtz distresser, embossing tool, floss, liquid pearls

I used a few of the tags to embellish the layout and made small flower clusters using the new Botanic Orchid Cling Stamp Set to make the orchids and colored them with Prismacolor Pencils to match the color of the flowers in the pictures.
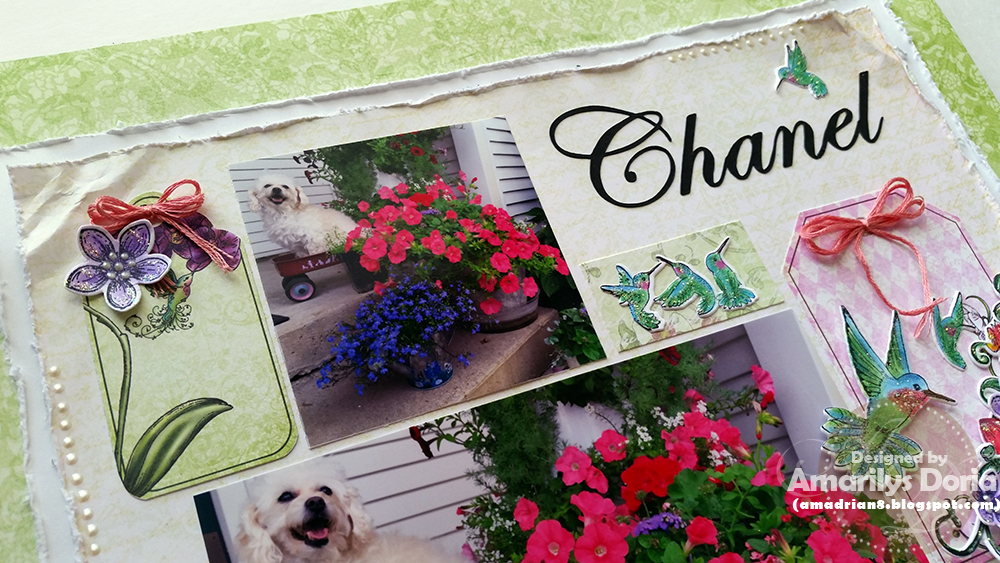
I also used the Water Lily Cling Stamp Set to make the purple flowers and my electronic die cutter to make the name.

Here's a close up of one of the flower clusters.
Here is the step by step write-up for this project:
Trim a pattern paper from the Botanical Orchid Collection to 10"x10" and a white cardstock to 10.5"x10.5". Distress all the edges with the Tim Holtz distresser and add over a coordinating pattern paper from the same collection. Add liquid pearls randomly along the edges and put aside to dry. Die cut the tags from the pattern paper using the Luggage and Tags Die. Add to background paper along with your three photos measuring 6"x3" and two 3"x3" to make the design. Stamp and color two medium orchids and one small one from the Botanic Orchid Cling Stamp Set. Die cut and assemble your orchids. Stamp the smaller flowers from the Water Lily Cling Stamp Set and color using the Prismacolor Pencils and blend with OMS. Stamp and color a few flourishes and hummingbirds from the Regal Hummingbird Cling Stamp Set and the Botanic Orchid Wishes Stamp Set. Die cut all these elements, add glitter and/or liquid pearl drops and set aside to dry. Add the flowers to the tags as shown. Add pink floss bows to the tags. Finally, die cut using your electric cutter a title and add over the top right side of the layout.
Thanks for stopping by! Remember to go to the Heartfelt Creations BLOG and check out what the other designers made with this week! Have a great rest of the week!

Absolutely gorgeous!
ReplyDeleteAbsolutely beautiful!
ReplyDeleteWhat a beautiful layout for sweet little Chanel. She is one adorable pup! Your flowers are stunning girl!
ReplyDeletelove the distressed edge, lovely project life layout idea and beautiful flowers too.
ReplyDeleteHi, I like the use of the tags. Great flowers. A LO using 3 photos...always a good thing...like it! Hugs
ReplyDelete