Most of the products used on this layout are from the main kit, including the chipboard title, background pattern paper and most flowers.
For the chipboard title, I painted it white and added crackle paint, from my stash, and used the Lindy's Magical Shaker Yodeling Yellow from the Mixed Media Kit together with the 13@rts Plastic Microspheres to add texture to the sun. I just love how it turned out! The pink ribbon is from the Embellishment Bonus Kit.
The yellow flowers are included in the main kit as well as sone of the white ones. I made some yellow flowers using the Foamiran in the Embellishment Bonus Kit. It was my first time working with Foamiran and I have to say, that I love it! I loved it so much that I decided to make a quick flower tutorial for you!
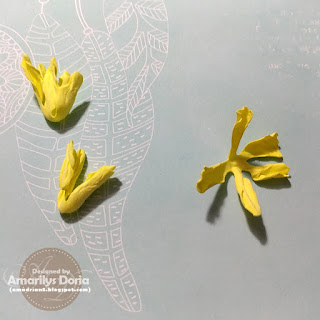
Here's a quick tutorial on how to make the foamiran yellow flowers.
You will need:
yellow foamiran from the Garden Embellishment Bonus Kit
flower diecut of your choice (mine is from Heartfelt Creations-HCD1-7110 Classic Rose Die)
heating tool
embossing tool
green ink (optional)
Step 1. Die cut 3x your flowers. I'm only using the small diecut flowers for this tutorial.
Step 2. Heat it up til the petals start to curl up.
Step 3. Twist the petals between your fingers to look like the left side petals in my picture. Open them up with your fingers gently (the right side of my picture).
Step 4. Gently, spread the over an embossing tool using your fingers like so. Be careful you do not break the petals!
Step 5. Cut a strip of the foamiran to 3/4"x6" and cut tiny strips into in but don't go all the way through.
Step 6. Ink them if you prefer (I used green ink for mine) and curl them like so to form the stamen. Add glue to secure it. Heat it up and twist the stamen like you did for the petals (not pictured).
Step 7. Layer the three flowers without overlapping the petals and add the stamen to the petals to finish your flower.
Here are a few I made using the same die. The one on the left is made using only 3 larger die cut flowers, the smaller one is using the 3 smaller flowers from this tutorial and the top right is using the 3 small and 3 large flowers all together! The one on the left has been colored with Lindy's Magical Shaker Yodeling Yellow.


Other Products:
white acrylic paint
Tim Holtz Distress Crackle Paint Clear Rock Candy
Tim Holtz Distress Ink-Peeled Paint
Nuvo Crystal Drops-Bubblegum Blush
If you don't have your kit yet, go to The International Scrapbook Garden right now and get yours today!


No comments:
Post a Comment
Thank you for taking your time to comment on my blog!