
As you all probably know by now, this month's featured manufacturers at A Walk Down Memory Lane are Bo Bunny Press and Maya Road. This means that this whole month Bo Bunny Press and Maya Road products are 25% off over at the AWDML store!
For this layout I used the gorgeous Bo Bunny Zoology Collection and Gabrielle Pollaco's (an awesome Bo Bunny designer!) sketch below from the Bo Bunny blog:

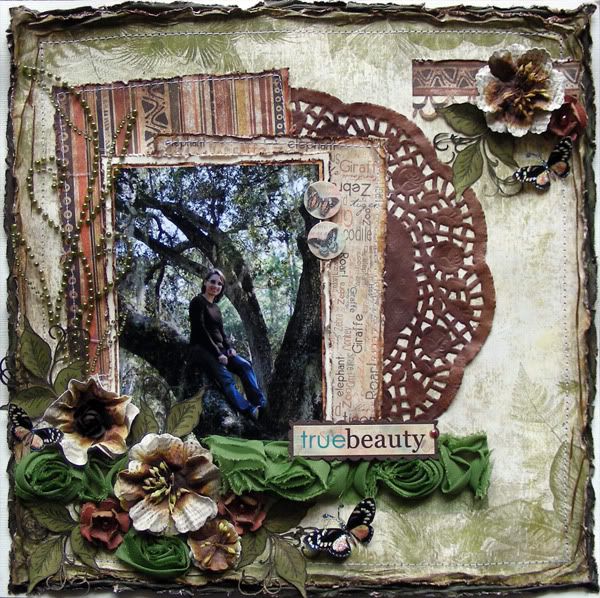
and here is my take on it:
Supplies-
cardstock: Bazzill;
patterned paper: BoBunny Zoology Collection Wild Thing, BoBunny Zoology Collection Stripe, BoBunny Zoology Collection 6x6 Paper Pad;
stickers: Bo Bunny Gabrielle Collection Cardstock Stickers Gabrielle Combo;
embellishments: Websters Trims;
bling: Zva Creative green leaves swirl, Ranger Glimmer mist-Olive Vine;
flowers: Recollection;
pearls: Kaisercraft Peals-Copper;
ink: Tim Holtz Vintage Photo ink pad, Tim Holtz Vintage Photo reinker;
pen: sharpie;
tools: Pazzles inspiration, sewing machine, Tim Holtz Tattered Florals die, Tim Holtz paper distresser;
other: doily
My hubby took this picture of me sitting on top of an oak tree at a regional park here in Central Fla. I actually turned this layout in a step-by-step tutorial so I hope that you enjoy it!

Step 1. For the background, distress the Bo Bunny Wild Thing and Stripe papers making sure that one fits inside the other. Ink the edges using Tim Holtz Vintage Photo ink pad. Adhere onto a cream colored Bazzill cardtock and machine stitch around the edges.

Step 2. From the BoBunny Zoology Collection 6x6 Paper Pad, cut a Stripe and Word papers to 4.5"x6". Distress the edges using the Tim Holtz paper distresser and machine stitch the edges. Mist half a doily with water and Vintage photo Reinker to make it brown.

Step 3. Double mat your photo using cream colored Bazzill cardtock. Distress the edges and ink them.

Step 4. Gather your embellies. Use a little bit of reinker on the center of the flowers to give them a brown center. Mist with just a bit of water to make the ink run and let it air dry. Hand make the orange flowers using Tim Holtz tattered Florals die.

Step 5. Adhere all layers (two rectangles and doily) and picture as shown. Add your flowers, trim, bling and butterflies on the bottom left side of the layout like shown. Add a title and another smaller cluster on the top right side of the layout and your page is complete!
I hope that you enjoyed this tutorial and I'd love to see you try it! Remember that this month Bo Bunny Press and Maya Road products are 25% off in the A Walk Down Memory Lane store!
Thanks for stopping by my blog. I really appreciate all of your comments. Have a wonderful weekend!
***All the Products in BOLD can be purchased from A Walk Down Memory Lane online store.

so lush and gorgeous!
ReplyDeleteThis is wonderful!
ReplyDeleteThis is absolutely gorgeous! Lovin those flowers!
ReplyDeleteLOVE it!!!
ReplyDelete