Friday, December 31, 2010

saturday...

Today, as I woke up, I realize that it's the last day of 2010. Where did this year go? This year was an emotional one for my family. We lost our home and had to move to a rental house but God is good to us and has helped up along the way.

Today I want to share my top 5 layouts for 2010. Here they are, in no particular order:

#1 "With this ring, I thee wed"


#2 New glasses


#3 Memories


#4 Hanging out


#5 Animal Lover


Now I want to thank you, my blog readers. Thanks for a wonderful year and for supporting me by reading and commenting in my blog posts. Hopefully the new year will be even better! Have a Happy New Year!

Tuesday, December 21, 2010

tuesday...

Only 4 days away from Christmas and now is when I finished my Christmas 2010 cards but I must confess, I absolutely LOVE them this year!

I saw a tealight candle about 2 weeks ago while browsing the web (I forgot to bookmark it and now I can't find it!) and completely fell in love with it! I knew that I wanted to make these as presents for my hubby and my family members this year. We never give out presents because we are students and we do not work and everyone understands that but I felt a little bad last Christmas when everyone were handing out a present to us and all we could say was thank you because we didn't have anything to give out in return. With the help of a fellow scrapper, I came up with a cute little poem for the inside of the cards. It reads:

"Families are a gift of the heart,
there for us right from the start.
May the light of Jesus be present
in your lives throughout the year,
for He is the reason for all this Christmas cheer!"


Here are this years' Christmas cards (minus three because I already gave them away before photographing them):


My mom's card. I made sure it was extra special :)


My grandma's card. I also made sure that this one was special as well. This will be her first real Christmas. The title is actually a shaker box (remember those?) made with two vellum circles glued together on the sides. Inside is the left overs from using the Martha Stewart doily punch. Looks just like snow!


My mother in law's card. This one is one of my favorite, if not my favorite of these cards.


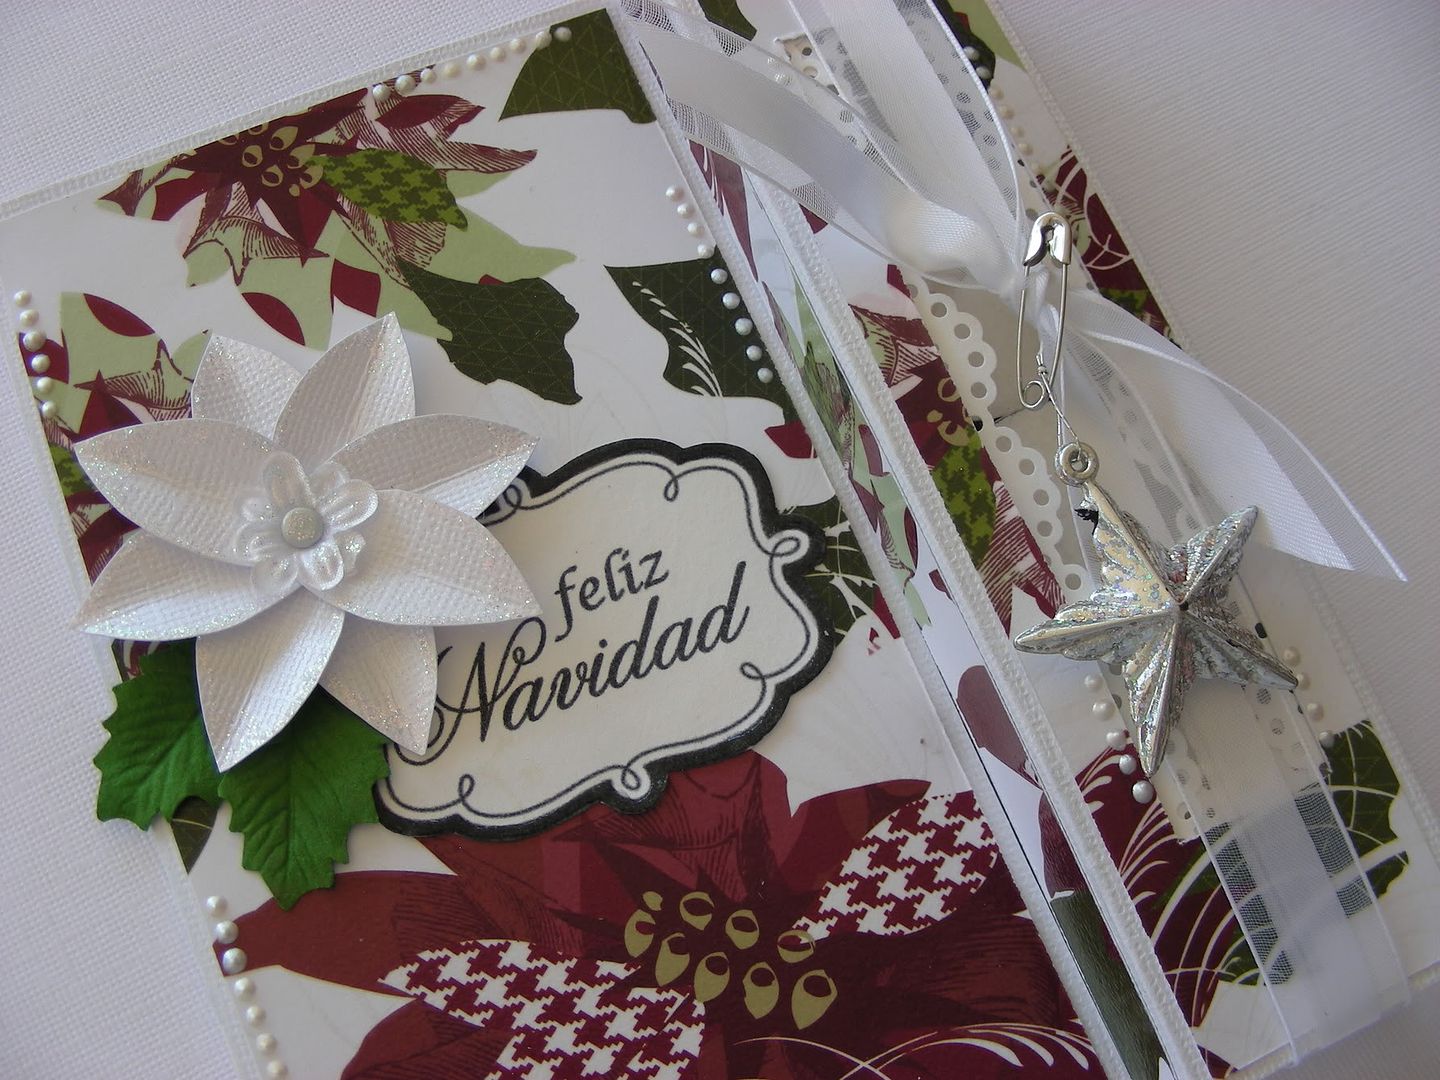
Some close ups of a candlelight card. I used my cuttlebug to emboss the white bling cardstock, the Martha Stewart punch to cut the edge on the blue paper and I blinged up the little bird medallion with glimmer mist and stickles. I also made one of my famous poinsettias. I finished it off with a crisp white ribbon and a little star ornament from Michaels.


This one was actually my first card. I love how it looks!I embossed the bottom with a cuttlebug embossing folder and added some Prima Holly leaves.


I just love the elegant look of this one so I kept it simple and let the paper be the main focus.


This one was one of my last cards and I wanted to mix it up a bit so I tried making a silver/red/green card. I like how it turned out! It hard to see in the pic but most things are glimmer misted and are very shiny in real life!


This was a quick one. I made the wreath some months ago when I first got the Martha Stewart punch and just left it on the side. A little die cut word added to it and the beautiful classic Christmas paper and it was done within minutes!


This one was a fun one! I played with my glimmer mists for the background and came up with this blue/green paper. I also used my Pazzles to cut out this gorgeous Christmas tree. I finished it off by adding snow to its branches using 3D paint.


I just love this little bird! This one was also a simple and fast card!

Thank you for stopping by my blog and taking your time to look at my cards. I appreciate each and everyone of you and your comments! Hope that my cards have inspired your to try candlelight cards (they are fun and addictive!). Have a wonderful Christmas!

Sunday, December 19, 2010

sunday...

In the spirit of Christmas, I made a Christmas Sketch to share with you all. Hope that you enjoy it!


Merry Christmas from my family to yours...

Friday, December 17, 2010

friday...again!

Well, I came home today to awesome news! Kristine has asked me to join Creative Scrappers as a sketch artist and of course that I said yes! So, look out for my sketches in the Creative Scrappers blog starting on February! I'm so exited and can't wait to start designing! Here's the announcement on the Creative Scrappers blog.

friday...

Hi everyone! I'm so glad to be back! My hubby and I took a 4 day cruise to Key West, Florida and Cozumel, Mexico but it ended up not being as fun as we had hoped. Well, to make the story short, my hubby got sick with a stomach virus on our second night and we were quarantined and confined to our tiny room for the rest of the trip. He's doing better now that we are home so hopefully he'll be all good soon.

Well, the real entry for this post is to share with you this layout that I finished last week but with the craziness of packing and getting ready for the cruise I forgot to post here.

Some time ago I found this great Challenge blog called Creative Scrappers and I bookmarked it but forgot about it. Browsing my bookmarks last week I found it again and found this awesome sketch by Trina (Sketch #132) and I fell in love with both the sketch and Camilla's (one of the DTs) take on it.

Here's the sketch:


and my take on it:


and here are some close ups:


Pretty much I used Camilla's layout as a blueprint for mine. I kept the checkered and different pattern papers background, the black and white smaller pictures and the bling and flowers locations. This is also my first layout in over 1.5 months and I'm very happy with it.

Thanks for stopping by and I wish everyone a wonderful weekend!


Sunday, December 12, 2010

sunday...

Well, I have some awesome news today! I've finally been published!


I have two layouts published in the Dec. edition of Scrapbook News and Review online magazine! My friend Wendy also featured my handmade poinsettias tutorial in this edition! I'm so exited!

Now, on to more news...
Tomorrow my hubby and I are leaving on a 4 day cruise to Key West & Mexico and we are so exited and looking forwards to just relaxing!

Have a wonderful week everyone!

Wednesday, December 8, 2010

wednesday...

Hi bloggers! It has been a little bit since I've posted in here so I thought that I would share some older layouts that I did to enter a DT (Allison Davis) but at the last minute I decided against it because of time constraints.

Here's the first double pager sketch:


and my take:


I had a lot of fun with this layout although I must admit that I was very intimidated of it when I first started. The large amount of pictures in the layout scared me since I usually don't add that many to my layouts so I decided to merge a few to form larger pictures. These pictures were taken at Coral Castle, here in Miami, FL during Fall 2010. I love the pictures that we took of this place and the story behind the castle. The red flowers are handmade by me and the title is cut with my pazzles. The brick wall background is actually design in photoshop (by me!) and printed in vellum. I then cut it out and inked the edges. I LOVE how it looks! This layout is very simple but effective (I think so anyway). I actually love the simplicity of it because it lets you focus more on the pics and story.

Here are some close ups:


Here's the second sketch:


and my take:


This one was a tough one. I don't normally do boy layouts and though tit would be nice to try to make a layout without any flowers. Big mistake. It took me almost a week to finish this layout even though its so simple! I kept re arranging the elements and playing with colors and this is what came out and I must admit it is growing on me although I hated it when I finished it and almost tossed it. The pictures are of my brother's 19th birthday earlier this year. For the title (turning), I design it in photoshop, printed it and the cut it. For the 19 I used a cuttlebug die cut (yes, I still have my cuttlebug even though I have a pazzles). The stars are chipboard and handmade by me. I used the thick backing of a paper stack to cut them out and then painted them with acrylic paint. The red ones are a cuttlebug die cut. I hand sew the background and the larger star. Using bubble wrap, I inked it to stamp the background to make it a little more distressed since the orange was too strong. I distressed and inked the background layer and finished it off by glimmer misting everything with burnt red glimmer mist. Oh, I forgot to mention that I used TCR palette #32 for this layout.


Here are some close ups:


Thank you so much for stopping over my blog today and taking your time to look!