Showing posts with label Altered Projects. Show all posts

Friday, January 28, 2022

friday...Heartfelt Creations January Alumni Hop

Welcome to my blog for the Heartfelt Creations January Alumni Blog Hop!
 
 
The hop begins at 8AM EST on Friday, January 28,2022 and runs until 11:55PM EST on Monday, January 31st, 2022.
 
  At that time a randomly chosen comment from a mystery blog will be chosen to win a $25 Heartfelt Creations Gift Card.
 
Heartfelt Creations will be giving away a second $25 gift card chosen randomly from the comments left on their blog. Be sure to check to see if you are one of the lucky winners!
 
The winners will be announced on the Heartfelt Creations blog and Facebook page on Wednesday, February 2nd, 2022. The winner has 72 hours to claim the prize by emailing socialmedia@heartfeltcreations.us. Please write Winner of the January
Alumni Blog Hop in the subject line. 
 
Have fun hopping!

Happy 2022!!!

This month I want to share my altered composition notebook that I made for my Bible Studies. I used the Burst of Spring Paper Collection for the background along with some yummy lace from my stash. I stamped the Petite Pansy Frame Cling Stamp Set twice and die cut it with it's coordinating die and put them together using crafting foam to give them dimension. For the flowers, I stamped all 3 sizes of the Cheery Pansy Cling Stamp Set, colored them using Prismacolor pencils and die cut them using it's coordinating die. I placed the frame and flowers over the center of the composition notebook and added glitter to the petals and prills to the flowers' centers. I also ended up making a bookmark to go with it from the leftovers. The butterfly is from the Floral Butterfly Paper Collection.

Below is a close up of my flowers and frame.

If you are curious, here's what the inside looks like:


Friday, December 31, 2021

friday...Heartfelt Creations December Alumni Hop

Welcome to my blog for the Heartfelt Creations December Alumni Blog Hop!
 
The hop begins at 8AM EST on Friday, December 31, 2021 and runs until 11:55PM EST on Monday, January 3rd, 2022.
 
  At that time a randomly chosen comment from a mystery blog will be chosen to win a $25 Heartfelt Creations Gift Card.
 
Heartfelt Creations will be giving away a second $25 gift card chosen randomly from the comments left on their blog. Be sure to check to see if you are one of the lucky winners!
 
The winners will be announced on the Heartfelt Creations blog and Facebook page on Wednesday, January 3, 2022. The winner has 72 hours to claim the prize by emailing socialmedia@heartfeltcreations.us. Please write Winner of the December Alumni Blog Hop in the subject line. 
 
Have fun hopping!

Can you believe that this year is almost over!? Neither can I!
 
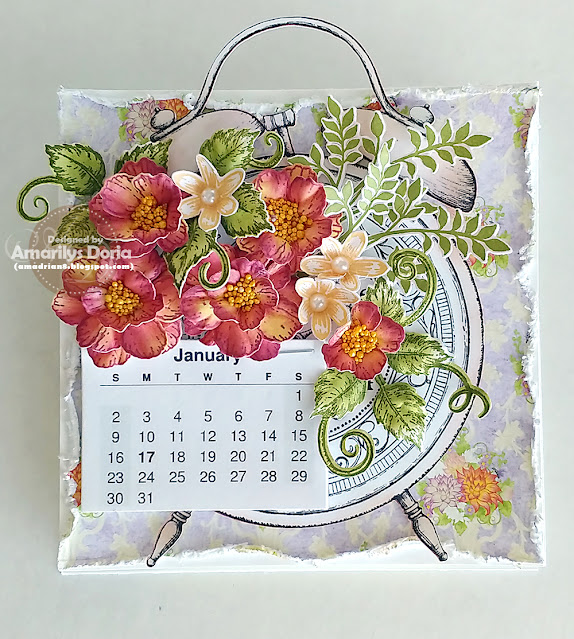
For this month, I made an Easel Calendar for my desk so I can keep track of the date. I used the gorgeous NEW Simple Moments Timepiece Cling Stamp Set and it's matching die! It measures 5"x5" and I used white cardstock for the base. I used the Dazzling Dahlia Paper Collection for the background and distressed the edges before adhering it to the card base.
 
I used the Small Wild Rose Cling Stamp Set and matching die to make the roses, which I colored using inks in red and yellow. I used the leaves from the Leafy Accents Cling Stamp Set and matching dies for as well as the Holly Berry Spray Cling Stamp Set for the greenery. I used the Fragrant Hyacinth Cling Stamp Set flowers and matching die for the small yellow filler flowers. 

For the tiny calendar, I used this Website to print one out and then just cut it, staple it, and added it to the front of the easel card. I also added a Sticky Note pack to hold the easel card up.
 
Here's another view of the Easel Calendar closed.
 
Here's a close up of my Easel Calendar:

Friday, April 26, 2019

friday...Heartfelt Creations April Alumni Hop

Welcome to my blog for the Heartfelt Creations April Alumni Blog Hop!

Image may contain: flower and text

Be sure to leave a comment on all the participating blogs. One participant will be chosen to receive a $25 Gift Certificate. The more you comment the more entries you get into the random draw!

The hop starts at 8AM EST on Friday, April 26th, 2019 EDT and closes Monday, April 29th at 11:55PM EDT. Winner will be announced on the HC Facebook Page on Wednesday May 1st, 2019.
If you win, please send an email to Heartfelt Creations at socialmedia@heartfeltcreations.us and write "Winner of the April Alumni Hop" in the subject line.

The winner of the blog hop will have 72 hours to claim their prize otherwise another name will be draw. 


I made these two simple treat Easter holders for my son's teachers. I started off with a 4" x 11" strip of brown cardstock and scored at 4.5" and 6.5" to make the bottom. I then used the Delicate Border Basics Die in addition to the Classic Border Basics Die to make the top edge.

The white doily is from the Butterfly Kisses Decorative Die. I used the gorgeous Flowering Dogwood Cling Stamp Set and its coordinating die to make the flowers. I used the Flowering Dogwood & Doves Cling Stamp Set for the dove and the Dogwood Chapel Cling Stamp Set for the cross image and sentiment.

Here's a side view of the treat holder:


Here is a close ups:


Thanks for visiting and taking your time to comment on my blog!

Friday, October 26, 2018

friday...Heartfelt Creations October Alumni Hop

Welcome to my blog for the Heartfelt Creations October Alumni Blog Hop!


Be sure to leave a comment on all the participating blogs. One participant will be chosen to receive a $25 Gift Certificate. The more you comment the more entries you get into the random draw! Be sure the check the Winner Announcement on Wednesday, October 31st on the Heartfelt Creation Blog and on the Facebook Page. If you win, please send an email to Heartfelt Creations at socialmedia@heartfeltcreations.us and write "Winner of the October Alumni Hop" in the subject line.

The winner of the blog hop will have 72 hours to claim their prize otherwise another name will be draw. 
Hop ends on Monday, October 29, 2018 at 11.59pm EST.


For this month, I made an altered composition notebook that I'm using as my bible journlaing notebook using one of my favorite collections-Blushing Rose Collection! If you want this collection, however, you better act now because they are in the Limited Edition product list which means that they are only available til early December! Don't wait to get yours!


Here's a close up of the front of the notebook.


This is the first page of the notebook. I made two large pockets in the front and back of the notebook so I can add whatever I need to store together with my bible journaling notebook.


Here's a closeup of the pocket.


Here's a close up of my artwork on the first page of the bible journaling notebook. I used the Butterfly Dreams Border Cling Stamp Set for this page.


With the leftovers, I made a quick magnetic bookmark. It's so pretty and useful!

Thanks for visiting and taking your time to comment on my blog! Have a great week!

Your next stop is: Joann Jamieson-Larkin

Blog Order:

Friday, April 27, 2018

friday...Heartfelt Creations April Alumni Hop

Welcome to my blog for the Heartfelt Creations April Alumni Blog Hop!

Be sure to leave a comment on all the participating blogs. One participant will be chosen to receive a $25 Gift Certificate. The more you comment the more entries you get into the random draw! Be sure the check the Winner Announcement on Wednesday, May 2nd on the Heartfelt Creation Blog and on the Facebook Page. If you win, please send an email to Heartfelt Creations at socialmedia@heartfeltcreations.us and write "Winner of April Alumni Hop" in the subject line.

The winner of the blog hop will have 72 hours to claim their prize otherwise another name will be draw. 
Hop ends on Monday, April 30th, 2018 at 11.59pm EST.

For this month's hop, I'm sharing with you a birthday banner I made for my son's 4th birthday fishy pool birthday party! Yes! I designed my son's party around Heartfelt Creation's Under the Sea Collection and it was a total hit! He absolutely loved it and said he wanted another fishy birthday party the next day again!

Here are some close ups!


Here's his birthday card:

and the inside before I wrote on it.

Finally, here are a few pictures from his birthday party. I made the banner, food labels, and his yearly 8x10 picture frame with his current stats that he keeps in his room!
Thanks for visiting and taking your time to comment on my blog! Have a great week!

Friday, November 24, 2017

friday...Heartfelt Creations November Alumni Hop

Welcome to my blog for the Heartfelt Creations November Alumni Blog Hop!


Be sure to leave a comment on all the participating blogs. One participant will be chosen to receive a $25 Gift Certificate. The more you comment the more entries you get into the random draw! Be sure the check the Winner Announcement on Wednesday, November 29th on the Heartfelt Creation Blog and on the Facebook Page. If you win, please send an email to Heartfelt Creations at socialmedia@heartfeltcreations.us and write "Winner of November Alumni Hop" in the subject line.

The winner of the blog hop will have 72 hours to claim their prize otherwise another name will be draw. 
Hop ends on Monday, November 27th at 11.59pm EST.


I made an advent calendar for my family this month using the Snow Kissed Collection. Our Christmas tree and decorations are blue so this collection was perfect for my advent calendar! I started off with 24 2"x2" brown boxes and I added a 1.75"x1.75" pattern paper squares to all sides but the bottom. I placed them in a shape of a tree and hot glued them together.


I stamped, colored and die cut a bunch of small poinsettias and snowflakes from the same collection. I also printed out the numbers 1-24 and punched them out using a round 1" punch. I assembled all my embellishments and added them to my advent tree.


I finished it off with a large bow on top of the tree and some ribbon flowing freely from it. I just love how it turned out and I can't wait for my family to use it on December 1st!

Heartfelt Creations Products:


Limited Edition:


Other Products:
store-bought brown boxes, blue ribbon, Prismacolor Pencils, Peeled paint Distres Ink, white pearls


Thanks for visiting and taking your time to comment on my blog! Have a great week!

Your next stop is: Gloria 

Blog Hop Order:

Wednesday, January 25, 2017

wednesday...Heartfelt Creations

Happy Wednesday everyone! Today I have a birthday wall hanging Heartfelt Creation's newest collection-Wildwood Cottage Collection! I think it would look adorable on any little girl's bedroom wall!


Supplies:  
Double Dots 100pc. -3D Foam Circles, DDOTS
Designer Dries Clear Adhesive, 159723
Metal Tip for Adhesive Bottles, 352854
Luggage and Tags Die, HCD1-745
Minnie Pearls Prills, ANC803
Fleur Border Basics Die, HCD1-7120
Elegant Border Basics Die, HCD1-7121
Woodsy Wonderland Cling Stamp Set, HCPC-3767
Woodsy Wonderland Die, HCD1-7123
Wildwood Florals Cling Stamp Set, HCPC-3769
Wildwood Cottage Darlings Cling Stamp Set, HCPC-3770
Wildwood Cottage Cling Stamp Set, HCPC-3771
Wildwood Florals Die, HCD1-7125
Wildwood Cottage Darlings Die, HCD1-7126
Wildwood Cottage Die, HCD1-7127
Wildwood Cottage Accents Die, HCD1-7128
Wildwood Cottage Paper Collection, HCDP1-274

Other Materials:
Cuttlebug Die Cutting Machine, StazOn Archival Ink (Jet Black), Prismacolor Pencils (PC901, PC908, PC912, PC924, PC937, PC939, PC945, PC946, PC947, PC1003, dark brown, black), Odorless Mineral Spirits, Rangers Distress Ink (Peeled Paint, Vintage Photo), White Acrylic Gesso, The Crafters Workshop Mini Bricks 6"x6" Template, foam board, ribbon,  embossing tool

Here are some close ups of my wall hanging:


Here is the step by step write-up for this project:
Trim a piece of foam board to 7.5"x7.5" and trim a pattern paper from the Wildwood Cottage Paper Collection to the same size. Die cut the border and the phrase 'Happy Birthday' to make the borders for the top and trim a 2"x7.5" piece of green pattern paper for the bottom. Adhere all of these layers unto the foam board and make two small holes on the opposite sides to thread the ribbon to hang it by. Die cut the cottage and use the brick template to add a thin layer of gesso. Set aside to dry. Once dry, ink the edges with Vintage Photo distress ink and add the brown roof. Stamp the fairy, flowers, leaves, flower pots, wheelbarrow,  butterflies and cottage windows, doors and fence on white cardstock and color them using Prismacolor Pencils. Die cut each piece using their coordinating die and add glitter and set aside to dry. Piece together the cottage and adhere it on the wall hanging. Add the rest of the embellishments as shown.

Thanks for stopping by! Remember to go to the Heartfelt Creations BLOG and check out what the other designers made this week! Have a great rest of the week!

Wednesday, December 21, 2016

wednesday...Heartfelt Creations

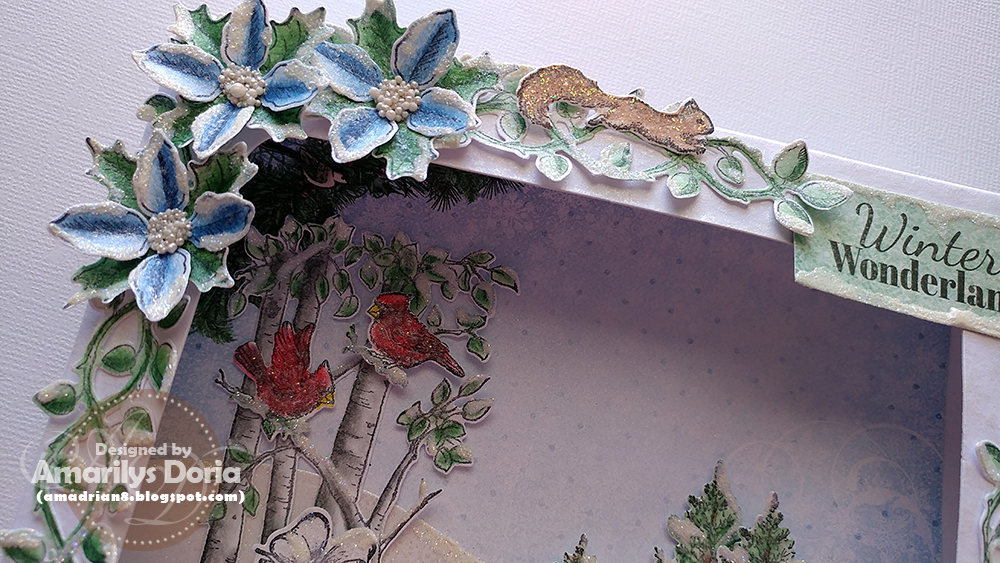
Happy Wednesday and early Merry Christmas my friends! Today I have a Winter shadow box to share with you!

Supplies:
Double Dots 100pc. -3D Foam Circles, DDOTS
Crystal Ultrafine Transparent Glitter, 85-glitter
Minnie Pearls Prills, ANC803
Celebrate the Season Cling Stamp Set, HCPC-3747
Gift Wrapped Presents Cling Stamp Set, HCPC-3748
Celebrate the Season Die, HCD1-7106
Snow Kissed Paper Collection, HCDP1-269
6"x 6" Foldout Cards-White, HCCF1-445-2
Woodsy Treescape Cling Stamp Set, HCPC-3766
Woodsy Wonderland Cling Stamp Set, HCPC-3767
Woodsy Critters Cling Stamp Set, HCPC-3768
Woodsy Landscape Die, HCD1-7122
Woodsy Wonderland Die, HCD1-7123
Woodsy Critters Die, HCD1-7124
Other Materials: 
Cuttlebug Die Cutting Machine, StazOn Archival Ink (Jet Black), Prismacolor Pencils (PC901, PC908, PC924, PC945, PC946, PC947, PC1003, dark brown, black), Odorless Mineral Spirits, Pearls Glimmer Mist, embossing tool, white puffy paint

Here are some close ups:


Here is the step by step write-up for this project:
Put together the 6"x6" white shadow box. Trim a 6.25"x6.25" pattern paper and place it on the background. Trim 3 pieces of glitter cardstock to use as snow in the foreground and adhere these to the flaps inside the shadow box. Stamp the trees and the critters from the Woodsy Wonderland collection and the vines from the Celebrate the Season collection. Color and die cut them using their coordinating die. Stamp some presents, color and die cut them as well. Stamp a few poinsettias, color them using Prismacolor Pencils and die cut them using their coordinating die. Shape them and add Prills to their center. Cut out a tag from the Snow Kissed Paper Collection. Add white puffy paint to your poinsettias, gifts, trees and even the background snow and powder them with glitter while still wet and set aside to dry overnight. Put together the scene by adding the elements to each layer of the shadow box as shown. Once finished, mist everything with Pearls Glimmer Mist.

Thanks for stopping by! Remember to go to the Heartfelt Creations BLOG and check out what the other designers made this week! Have a great rest of the week and a very Merry Christmas!!!