Showing posts with label Contests. Show all posts

Monday, December 9, 2013

monday...Swirlydoos December Kit Altered Gift Card Holder

Happy Monday! Today is my turn again to bring you your assignment on the Swirlydoos Blog for the 12 Days of Christmas Contest!

Your Assignment: Make a gift card holder using non-traditional colors and a border punch! Easy peasy! :)

Here's what I made for your inspiration:

For this gift card holder, I used a Kaisercraft paper from their St Nicholas Collection and a Bo Bunny paper from their Silver & Gold Collection from our December kit as well as the Tim Holtz rub-ons. From my stash I used white (base) and brown cardstock, Heartfelt Creations holly leaf stamps & dies, The Paper Studio Holly A2 Embossing Folder, the Martha Stewart Scallop 3 dot Punch, and gold trim and ribbon.

I do have a step by step tutorial on my blog on how to make this one in particular if you are interested.

Here's a close up:


The inside without a gift card:


The inside with a gift card:


Thank you for stopping by my blog today and don't forget to enter the contest! You have one day only to enter but you get 12 chances during the 12 days of Christmas! :)


Follow Me

Saturday, December 7, 2013

saturday...Swirlydoos December Kit Gift Bag

Hi everyone! I hope that you had fun during the Swirlydoos blog hop! I sure did!

Today I have the next assignment on the Swirlydoos Blog for the 12 Days of Christmas Contest.

The Assignment: Make an altered paper bag gift bag in traditional Christmas colors (red & green). You may also use any neutral colors as well.

and here's my sample:


As promised though, I did a step by step on how to do this one so let's get started!


Step 1. Trim your paper bag to 7" tall. Fold at 4.5" from the bottom, leaving a 2.5" flap. Using your favorite punch, punch the edges.


Step 2. Trim two pieces of cardstock (5"x4.5") and pattern paper (4.75"x4.25") to fit inside over the paper bag's front and back panel.


Step 3. Treat these found pieces by distressing, inking and machine stitching them.


Step 4. Add the front and back panel to the front and back side of the paper bag. Notice that my top flap is punched already.


Step 5. Trim two coordinating cardstock 1. (5"x2.25") 2. (5"x2")and punch the edges as well. Emboss the top cardstock and lightly ink the edges.


Step 6. Adhere the smaller piece over the larger and add a trim over it.


Step 7. Add this piece over the paper bag flap.


Step 8. Add a small trinket to the center of the flap to embellish.


Step 9. Stamp and die cut some holly leaves (Heartfelt Creations) and white wash and add a sentiment to a die cut circle. Gather a red flower as your embellishment. Add all these embellies to the front of your gift bag.

Here's the front of the finished gift bag:


and a quick close up:


Hope you give this a try! Have a great rest of the weekend!

Follow Me

Tuesday, December 3, 2013

tuesday...Swirlydoos 12 Days of Christmas Contest!

I just quickly wanted to share that I'm on the Swirlydoos blog today with the DAY THREE assignment in the 12 Days of Christmas Contest!

Here's a sneak peek of my assignment! For today's assignment (and a full picture of my project), please visit the Swirlydoos Blog!


Remember that you have to make and upload a picture of your project everyday by midnight and we'll be drawing a winner every single day-that's 12 chances to win if you play along everyday!
Good luck! :)


Follow Me

Wednesday, January 25, 2012

wednesday...Heartfelt Creations

Happy Wednesday bloggers! Welcome to another Heartfelt Creations Wednesday post! Today I have a layout to share with you.


Supplies:
Heartfelt Creations:
HCPC 3318 Daisy Patch Flowers Precut Set
HCPC 3397 Bella Rose Vintage Background Stamp Precut Set
HCPC 3406 Botanical Floral 1 Precut Set
HCPC 3407 Botanical Floral 2 Precut Set
HCPC 3435 Feather Grass Flourish Precut Set
HCPC 3439 Flirty Fleurs Precut Set
HCD 703 Daisy Patch Die
HCD 711 Decorative Dutch Iris Die
HCD 713 Decorative Lace Border Die
HCD 717 Layered Scalloped Posy Die
HCD 718 Decorative Chateau Gate Die
Rose Creations Shapeabilities
Cuttlebug Machine 


Other: 

GCD Studios Ella Blue Collection, Tim Holtz Distress Inks (Peeled Paint, Stormy Sky, Vintage Photo), Tattered Angels Glimmer Mist (Pearl), Ranger Liquid Peals (White Opal), Ranger Stickles (Diamond), StazOn Archival Ink (Timber Brown, Jet Black), Prismacolor Pecils, Mona Lisa OMS, Basic Grey White alphas, White Signo pen, Puffy Paint, Marvy Uchida Heat Embossing gun


This layout is inspired by the January SwirlyHues Challenge. I used the sketch that they provided along the color palette and came up with this layout! The picture is of Linda and her husband. Linda is the owner and CEO of Heartfelt Creations and she kindly allowed me to use her beautiful picture.


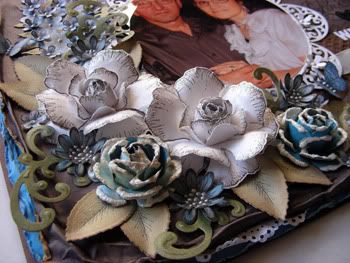
I used Robin's Water Distressing Tutorial for my background papers. I love to water distress on my layouts since it gives them a lot of depth! I also used Lisa Gregory's Puffed Rose Flower Tutorial for my two blue roses.

I had a lot of fun working on this layout and used a lot of techniques on it and I can honestly say that I love how it turned out!


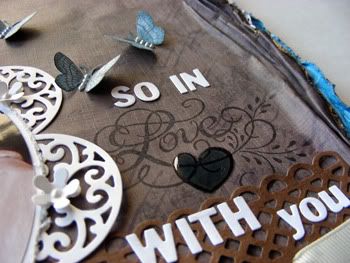
You can barely see it here but I handmade a doily mat for the picture. I'm working on a tutorial that I'll have up for you tomorrow so come back tomorrow to see it! For the title, I combined stamps and letter stickers. I stamped the word LOVE directly onto the background using black ink. I then carefully painted the heart that forms with the swirls in blue and added Diamond Glaze to it to make it stand out. I added the rest of the title in white above and below the stamped image.


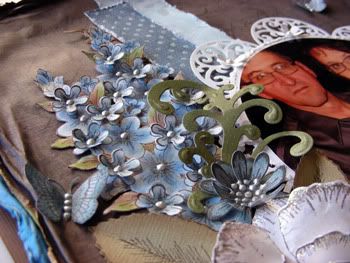
I stamped and colored two Flirty Fleurs Precut Set flowers and added them to the left side of the picture.


I made a few flowers (white roses, blue puffed roses, and small blue sunflowers), stamped and die cut a few leaves and swirls, butterflies and arranged them around the picture. I love all the depth that the flowers give this layout!

Here is the step by step write-up for this layout:
Water distress your sheet of pattern paper and one coordinating cardstock. Adhere onto a brown cardstock base the water distressed blue cardstock and the pattern paper. Ink the raised edges with Vintage Photo distress ink. Die cut two Decorative Lace Borders, cut out the bottom side and place as shown on the left side and in the bottom (string a cream ribbon through this one before adhering). Distress two pieces of pattern paper and layer them as shown on the left side over the die cut border. For the doily photomat, die cut 9 small doilies from the Layered Scalloped Posy Die Set and adhere behind a 5” white circle. Crop your picture into a circle a little under 5”. Adhere to the photo mat doily and place over the layers. Die cut a few white posies and layer them over the doily. Stamp the word LOVE on the right side of the picture with black ink. Color in the heart with Stormy Sky distress ink and add Diamond Glaze over it to give it shine. Add the rest of the title from the Basic Grey White alphas. For the cluster, stamp the Flirty Fleurs Precut Set flower bunch twice, color the image with Prismacolor pencils, blend them with OMS and fuzzy cut them. Make a few extra posies, layer them over the flower bunch (keep a few for the rest of the cluster) and add a drop of liquid pearls to the center. Stamp two of the largest flowers and four of the smallest flowers from the Botanical Floral 1 Precut Set and die cut them with the matching Spellbinders Rose Creations. Glimmer mist them with Pearl glimmer mist and layer them to make your flower. Add them to the cluster and add Diamond Stickles to the edges. For the blue roses, die cut using the Spellbinders Rose Creations dies four of the second largest flowers and layer them to make a rose. Add puffy paint to the edges and let dry. After it dries, lightly heat the edges up with a heat embossing gun. Finish them by adding Diamond stickles to the edges. Stamp a few of the smallest flowers from the Daisy Patch Flowers Precut Set and die cut them with the matching die. Color them with Stormy Sky distress ink and layer two of them together to make the flower. Finish these by adding a few drops of liquid pearls to the center. Stamp a few leaves from the Botanical Floral 2 Precut Set and die cut them with the Spellbinders Rose Creations dies. Ink the edges with Vintage Photo and fold them in half. Die cut and emboss a few swirls from the Decorative Dutch Iris dies and cut them in half. Now, just build your flower cluster as shown and place on the left side of the picture. Stamp, color with Stormy Sky and fuzzy cut a few flowers from the Bella Rose Vintage Background Stamp Precut Set and add around the title and cluster.

Thank you for visiting my blog today and don't forget to stop by the Heartfelt Creations blog and see all the amazing projects that the rest of the DT created this week. Also, come back tomorrow to see the tutorial for the handmade doily!


Tuesday, April 5, 2011

tuesday...AWDML Contest-Basic Grey!

Hi bloggers! I have some exiting news for you today!

A Walk Down Memory Lane is hosting a manufacturer contest for April-Basic Grey "Spring is Here" Contest!!!!!!!!!


Here is the information:
Create a layout using 60% of Basic Grey products - you can use any BG collection and products

* Upload your layout to the Gallery under Spring is Here contest category by midnight on April 30th
* 1 Layout per person
* Submit you creation by posting your creation in the gallery then link it back here
* To upload into the gallery you must register in the gallery first.
* The entry must be new and not entered in other contests or challenges
* Winner will be announced on May 5th
* Winner will receive a GC from AWDML!!!

Hope some of you are able to enter!