Heartfelt Creations is pleased to release the Floral Cross Collection. This collection is as fresh as a blooming yellow lily on a sunny spring day: intricate flowers compliment the typographical, linear, and wooden crosses. There are 6 new PreCut Stamp Sets and one beautiful new exclusive Spellbinders die designed for Heartfelt Creations.
Leave a comment on the HC blog by February 14 to be eligible to win the entire release valued at $125.93. The winner will be announced on February 15 on the HC Blog.
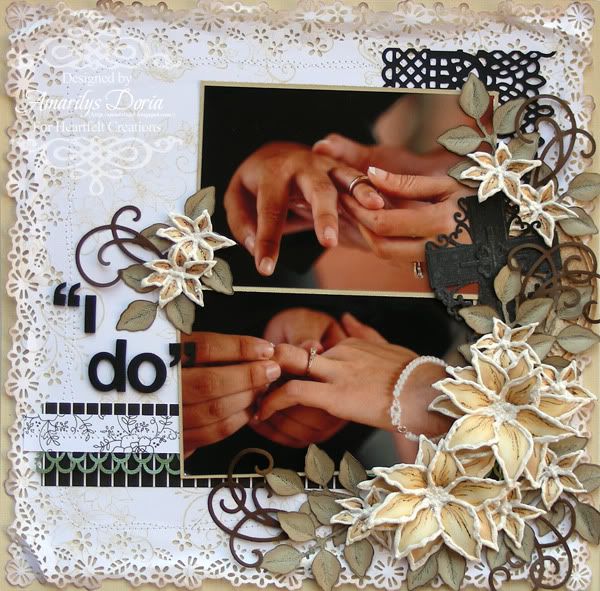
Here's the layout that I made using this collection:
Supplies-
Heartfelt Creations:
HCPC 3405 Leaf Medley Precut Set
HCPC 3435 Feather Grass Flourish Precut Set
HCPC 3450 Cross and Lilies Precut Set
HCPC 3453 Malabar Clematis Precut Set
HCPC 3454 Twining Clematis Precut Set
HCPC 3455 Butterfly and Lilies Precut Set
HCD 712 Belle Rose
HCD 713 Decorative Lace Border
HCD 719 Cross and Lilies Die
Foliage Shapeabilities
317430 Cuttlebug machine
Other: Couture Creations Embossing Folder (Renaissance), Tim Holtz Distress Inks (Antique Linen, Vintage Photo), Tattered Angels Glimmer Mist (Pearl), Ranger Stickles (Cinnamon, Diamond), StazOn Archival Ink (Timber Brown), Prismacolor Pencils (PC1034), Mona Lisa OMS, American Crafts Thickers, Martha Stewart Punch Around the Page (Wild Flowers, Double Loop), Puffy Paint, Marvy Uchida Heat Embossing gun, sewing machine
For this layout, I handmade everything, including the background paper. I also used close up pictures of my hubby and I during our wedding day.
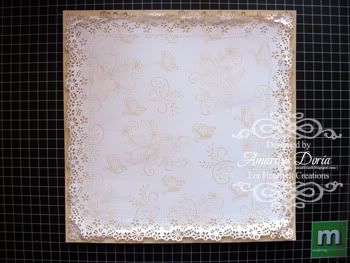
For the background paper, I randomly stamped the medium size swirl from the Feather Grass Flourish Precut Set, the largest flourish from the Twining Clematis Precut Set, and the butterfly stamp from the Butterfly and Lilies Precut Set with the Antique Linen distress ink. I then punched around the border of the finished handmade paper with the Martha Stewart Wild Flowers punch. I added some stitching and voila! My own pattern paper!
Here's a close up of the background paper:
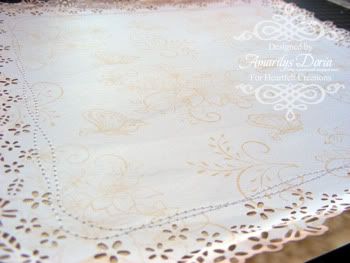
I love making my own pattern papers!
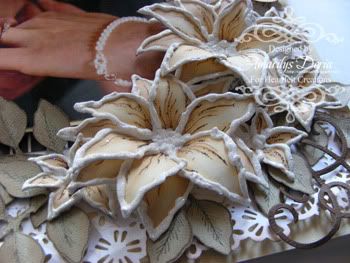
Here's a close up of the flowers. I'm actually working on a tutorial on how to make these flowers. I'll have it up on my blog tomorrow so please come back and check it out!
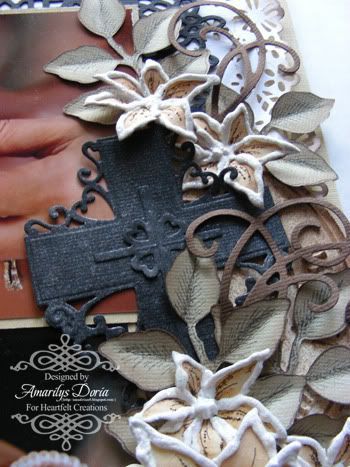
I added a cross to the cluster as well as leaves and brown swirls.
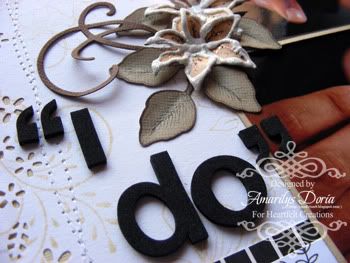
I finished it off by adding a title to the left side of the pictures.
Here is the step by step write-up for this layout:
Thank you for stopping by my blog today. Remember to leave a comment on the Heartfelt Creations blog by February 14 to be eligible to win the entire release valued at $125.93. Also, I'll have a tutorial on how to make these flowers tomorrow right here on my blog! Have a great rest of the week!

HCPC 3405 Leaf Medley Precut Set
HCPC 3435 Feather Grass Flourish Precut Set
HCPC 3450 Cross and Lilies Precut Set
HCPC 3453 Malabar Clematis Precut Set
HCPC 3454 Twining Clematis Precut Set
HCPC 3455 Butterfly and Lilies Precut Set
HCD 712 Belle Rose
HCD 713 Decorative Lace Border
HCD 719 Cross and Lilies Die
Foliage Shapeabilities
317430 Cuttlebug machine
Other: Couture Creations Embossing Folder (Renaissance), Tim Holtz Distress Inks (Antique Linen, Vintage Photo), Tattered Angels Glimmer Mist (Pearl), Ranger Stickles (Cinnamon, Diamond), StazOn Archival Ink (Timber Brown), Prismacolor Pencils (PC1034), Mona Lisa OMS, American Crafts Thickers, Martha Stewart Punch Around the Page (Wild Flowers, Double Loop), Puffy Paint, Marvy Uchida Heat Embossing gun, sewing machine
For this layout, I handmade everything, including the background paper. I also used close up pictures of my hubby and I during our wedding day.

For the background paper, I randomly stamped the medium size swirl from the Feather Grass Flourish Precut Set, the largest flourish from the Twining Clematis Precut Set, and the butterfly stamp from the Butterfly and Lilies Precut Set with the Antique Linen distress ink. I then punched around the border of the finished handmade paper with the Martha Stewart Wild Flowers punch. I added some stitching and voila! My own pattern paper!
Here's a close up of the background paper:

I love making my own pattern papers!

Here's a close up of the flowers. I'm actually working on a tutorial on how to make these flowers. I'll have it up on my blog tomorrow so please come back and check it out!

I added a cross to the cluster as well as leaves and brown swirls.

I finished it off by adding a title to the left side of the pictures.
Here is the step by step write-up for this layout:
Use the medium size swirl from the Feather Grass Flourish
Precut Set, the largest flourish from the Twining Clematis Precut Set, and the
butterfly stamp from the Butterfly and Lilies Precut Set and the Antique Linen
distress ink to make your background by randomly stamping these images onto
white cardstock. Punch around the border of the finished handmade paper with
the Martha Stewart Wild Flowers punch. Ink, lightly distress and machine stitch
around the edges this paper unto a cream colored cardstock. Layers a few
pattern paper strips along with a green punched border (Martha Stewart Double
Loop Punch) along the bottom of the layout as shown. Die cut a black Decorative
Lace Border and adhere to the right side of the layout. Emboss the clock from
the Couture Creations Embossing Folder (Renaissance), ink the raised edges,
hand cut around it and place on the right side of the page. Mat your two
pictures and adhere them to the background as shown. Die cut and emboss the two
crosses from the Cross and Lilies Die set. Glue the small one over the larger
one, glimmer mist them with Pearl glimmer mist and place on the right side of
the pictures. For the flowers, stamp and die cut using the matching die four
large and nine of the next size down of the Malabar Clematis Precut Set. Color
the flowers with Prismacolor pencils and OMS. Add puffy paint to the edges and
let dry. After
they dry, carefully heat the edges up with a heat embossing gun. Finish them by
adding Diamond stickles to the edges and Cinnamon stickles to the petal lines
on the flowers and add to the right side of the layout. Stamp, die cut and
lightly ink the edges of the leaves and adhere around the flower cluster as
shown. Die cut a few Belle Rose leaves, cut them apart and use only the
swirls to randomly place around the cluster. Finish by adding your title to the
left side of the pictures.
Thank you for stopping by my blog today. Remember to leave a comment on the Heartfelt Creations blog by February 14 to be eligible to win the entire release valued at $125.93. Also, I'll have a tutorial on how to make these flowers tomorrow right here on my blog! Have a great rest of the week!


Those flowers are gorgeous!!! Can't wait to see the tutorial! Beautiful layout.
ReplyDeleteWow, this is gorgeous! I look forward to your tutorial!
ReplyDeleteGorgeous work! I love how you did your flowers!
ReplyDeleteWow what an amazing blog just lush and such fabulous work so inspired by your gorgeous creations! Love Chanelle xxx
ReplyDeleteAnd here they are in all their glory on this magnificent layout. This is pure perfection and the ultimate in creativity!
ReplyDeleteAbsolutely gorgeous!! Love your lilies!!
ReplyDelete