
Anyway, back to scrapbooking. Today I want to share with you another layout that I made using the brand new stamp collection and paper pack collection by Heartfelt Creations-The Classic Editions Collection!
Supplies-
Heartfelt Creations:
HCPC 3390 Bella Rose Leaves PreCut Set
HCPC 3453 Malabar Clematis Precut Set
HCPC 3484 Pumpkin Harvest Precut Set
HCD 712 Bella Rose Die
HCD 719 Cross and Lilies Die
HCD 724 Classic Editions
452255 Grand Calibur
DDOTS Double Dots 100pc.
311071 Plumeria Dewdrops
HCDP1 224 Classic Editions Paper Collection
Other:
Tim Holtz Distress Inks (Vintage Photo), StazOn Archival
Ink (Timber Brown), Prismacolor Pencils (PC945, PC947, PC1003, PC1034), Rangers Stickles (Diamond, Lime Green), Rangers
Liquid Pearls (White Ola), DCWV cardstock (cream), Maya Road Mistables
(Espresso Brown), cardboard, white acrylic paint, Pazzles Inspiration machine for title, hemp
cord
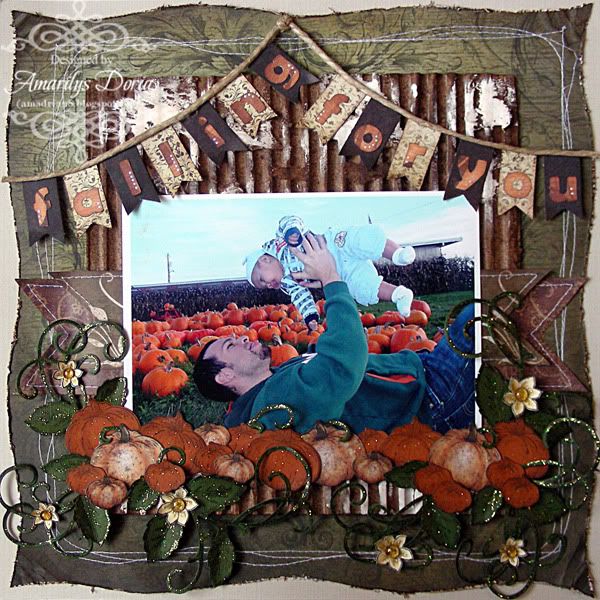
The subject is yet again my cutie pie of a nephew and his daddy this time at the pumpkin patch last year. As my two subjects were males I wanted to tone down on the flowers a but so I decided to use more textures on this layout. I used a piece of corrugated cardboard for my background which I painted and distressed with Distress Ink. I also machine stitched the background and added a big handmade banner to hold my title.
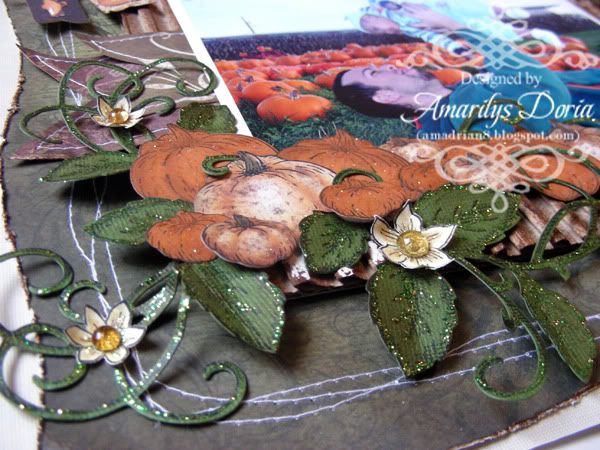
I stamped and punched out a bunch of pumpkins. I pop dotted them for added dimension and added stickles to them. I also added some greenery and a few tiny yellow scattered flowers.
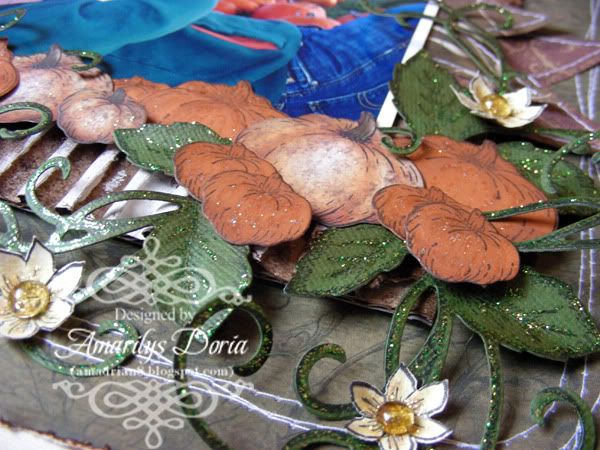
Here's another close up of my pumpkin cluster.
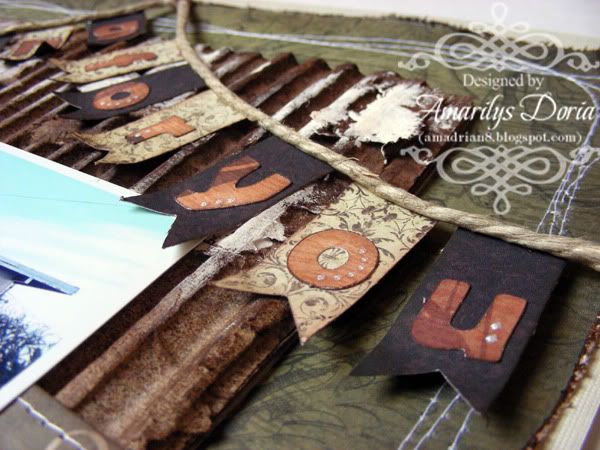
I just loved how this banner turned out! I made the pendants out of the Heartfelt Creations pattern paper so that it would match (I love how everything matches perfectly!) and added the orange letters that I cut with my Pazzles Inspirations machine. I added some hemp cord over the top to tie all the pendants together.
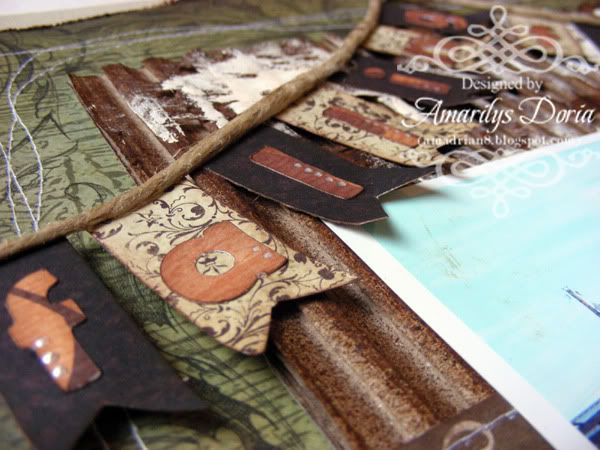
here's another view of the banner and corrugated cardboard background.
Here is the step by step write-up for this layout:
Cut a wavy border on all 4 sides of the pattern paper.
Distress with the edges of a pair of scissors and ink the edges with Vintage
Photo distress ink. Adhere unto cream colored cardstock and machine stitch
around the borders. Cut a piece of 8.5”
square out of a cardboard box. Distress with Vintage Photo distress ink, Maya
Road mistables and white acrylic paint. Add in the center of layout. Cut a V
notch on two strips of 2” and 2.5” of paper to make large pendants. Machine
stitch around the edges and add over the cardstock. Place a 7”x5” photo over
it. Make a banner out of pattern paper and place over top of layout, using hemp
cord to tie all the pendants together. Add your title to the banner.Stamp,
color and die cut a few different sized pumpkins. Fuzzy cut a few pumpkin for the
pattern paper as well. Add pumpkins over the entire bottom side of the photo.
Stamp and die cut about 3 Bella Rose leaves and flourishes. Cut them apart and
add greenery around the pumpkins. Stamp, color and die cut a few small flowers.
Add around the pumkin cluster and add a drew drop as a flower center. Add
stickles, Lime Green to the leaves and Diamond to the pumpkins and
flowers, to finish it off.
Thank you for stopping by my blog today! Remember to go to the Heartfelt Creations BLOG and check out what the other designers made this week with the new release!

Awesome LO Amy! I LOVE the pumpkins and cardboard! Great banner too!
ReplyDelete