
Anyway, here's my layout:

Supplies-
Heartfelt Creations:
HCPC 3415 Petite Poinsettia PreCut SetHCPC 3432 Magnificent Spruce Trees PreCut Set
HCPC 3480 Brookside Manor PreCut Set
HCPC 3491 Holiday Haven PreCut Set
HCD 717 Layered Scalloped Posy Die
HCD 723 Garden Romance Die
452255 Grand Calibur
125156 Layered Poinsettia Shapeabilities
159730 Floral Pee Wee Kit
Other:
BoBunny Powder Mountain Collection, Couture Creations
Embossing Folder (Renaissance), Tim Holtz Distress Inks (Forrest Moss, Vintage
Photo), StazOn Archival Ink (Jet Black), Recollections White Pearls, Rangers
Liquid Pearls (White Opal), puffy paint,
Rangers Heating Tool, Corrugated cardboard, blue ribbon
As you can see, my face looks really red because it was so windy and cold but we enjoyed our hike anyway!. Of course, I used a lot of layers and flowers in this layout.
Here's a quick Step by Step on how I did the snowy poinsettias:
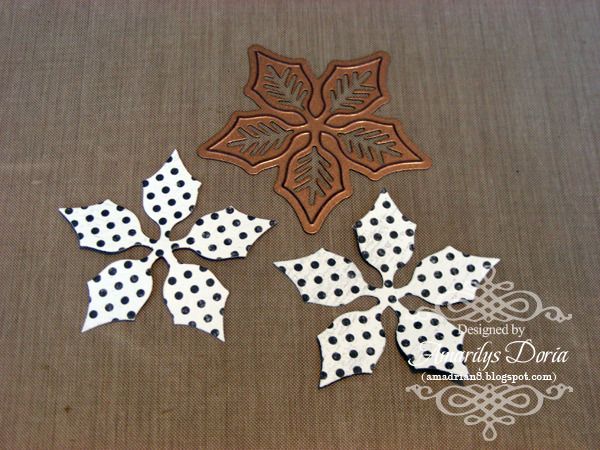
Step 1. Stamp and die cut the poinsettias. You will need two of each size per flower.
(Note: I forgot to stamp my first flower!)
(Note: I forgot to stamp my first flower!)
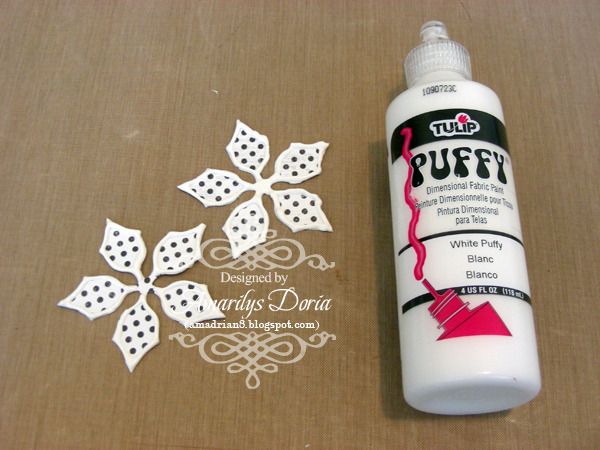
Step 2. Add puffy paint to the edges and let it dry (approximately 1 hr). Once it dries, apply heat using an embossing tool to puff it up. Be careful not to burn it! Add glitter to the edges and let it dry again (approximately 10 mins).
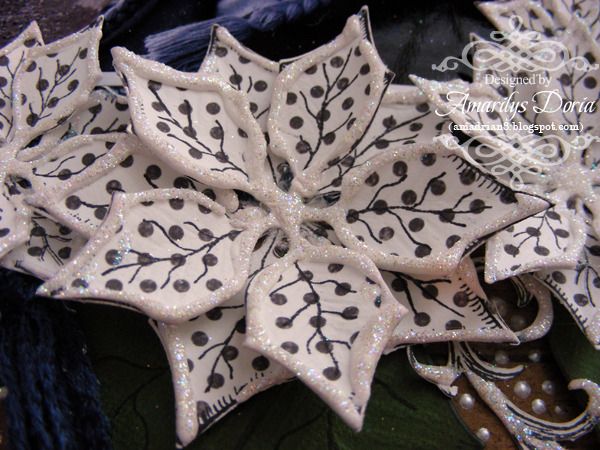
Step 3. here's your finished snowy poinsettia in all its glory!
I hope that you enjoyed this small and quick little tutorial. It's super fast to make but the effects are amazing!
Here are some more close ups of the layout:
Here is the step by step write-up for this project:
Cut out a shaped design out of the center of the light
blue pattern paper. Put away the die cut paper and use the reverse part for
this project. Adhere over the wooden pattern paper. Cut and distress a 6”x7.5”
dark blue pattern paper and distress the edges. Adhere over the right side of
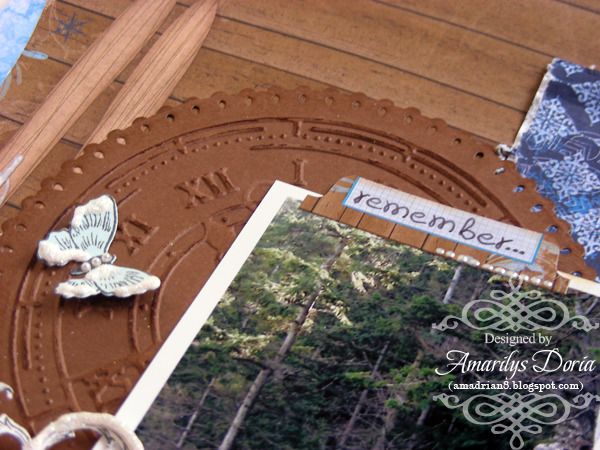
the background paper. Die cut a solid circle from the Layered Scalloped Posy
Die and emboss the Couture Creations Embossing Folder clock on it. Lightly ink
the embossed areas and adhere over the left side for the layout. Add your 4”x6”
picture over it. Adhere a sticker label over the top left hand side of the
photo and hand write your title. Tuck in a 1” strip of corrugated cardboard
under the photo. Ink and add puffy paint and glitter to it before adhering it
to the layout. Add a dark blue snowflake sticker border over it and add liquid
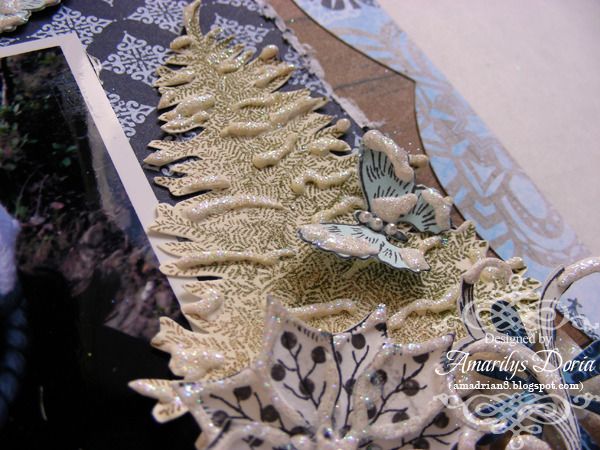
pearl drops in the center of the snowflakes. For the cluster, stamp the large
tree from the Magnificent Spruce Trees PreCut Set on cream colored cardstock.
Fuzzy cut around it and add puffy paint randomly on it to simulate snow. Puff
it up using a heating tool. Be careful not to burn it. Add glitter on it and
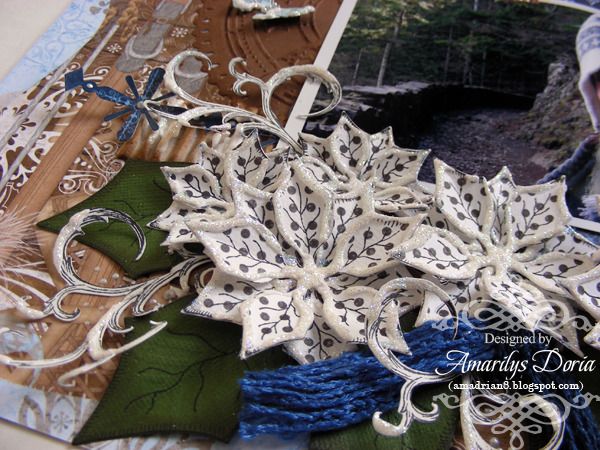
let it dry. For the white poinsettias, stamp and die cut the flower on white
polka dot BoBunny cardstock. You will need two of the same size per flower.
Bend each petal in half and layer two of the same size dies together staggering
the petals. Add puffy paint to the edges and let it dry. Puff it up and add glitter to it. Make a
bunch of these snowy poinsettias and put aside. Stamp and die cut a bunch of leaves from the poinsettia set as well.
Stamp the flourish from the Holiday Haven PreCut Set a few times and fuzzy cut
them. Add puffy paint randomly to it and let it dry. Puff it up with the heating
tool and add glitter. Build your cluster as shown in the layout using the snowy
poinsettias, fuzzy cut flourishes, stamped tree and leaves. Tie a knot with a
blue ribbon and add to cluster as well. Stamp and die cut some butterflies. Add
puffy paint and glitter them up to make snowy butterflies and add randomly to
layout. Add pearls to body of the butterflies Finally, add liquid pearl drops
randomly around the layout.
Thank you for stopping by my blog today! Remember to go to the Heartfelt Creations BLOG and check out what the other designers made this week! You can also see a sneak peek of the new collection debuting next Wednesday!

This is lovely, your flowers are glorious!
ReplyDeleteGorgeous page! I can tell you have great memories of hiking that day because your enthusiasm came through in your words and on the page. I just love the polka dot poinsettias... so fun! I'm picking up some of that puffy paint next trip to AC Moore or Michaels...LOL!
ReplyDeleteAnother fabulous page - great use with the puffy stuff :)
ReplyDeleteAmarilys I love your layout. I really like your poinsettias. All the glitter and puffy paint really remind me of new fallen snow with the moon light shing on it. Where did you get the skis in the background?
ReplyDeleteIs wonderful your work, you are a great artist, congratulations. Kisses from Spain.
ReplyDeletehttp://redecoratelg.blogspot.com.es/
Gorgeous Layout!!!! I love all the details on the flowers. :)
ReplyDeleteStunning page, Amy. Love how you used the puffy paint!! ~ Blessings, Tracey
ReplyDeletehttp://gracescraps.blogspot.com/