
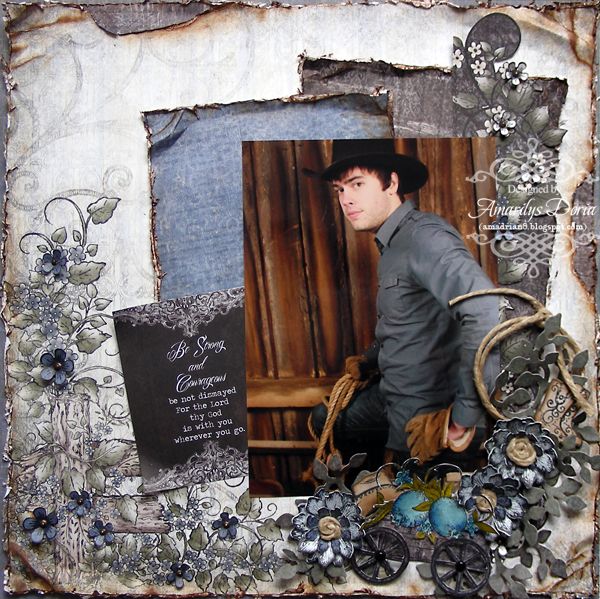
Here's my layout:
Supplies-
Heartfelt Creations:
HCPC 3303 Posy Patch Flowers PreCut SetHCPC 3457 Birch Tree PreCut Set
HCPC 3468 Tattered Blossoms PreCut Set
HCPC 3483 Days Gone By PreCut Set
HCPC 3486 Organic Fillers PreCut Set
HCD 701 Posy Patch Die
HCD 720 Western Broncos Die
HCD 722 Tattered Blossoms Die
HCD 724 Classic Editions Die
HCDP1 229 Countryside Evening Paper Collection
452255 Grand Calibur
Other:
StazOn Archival Ink (Jet Black), Tim Holtz Distress Ink
(Vintage Photo), Rangers Liquid Pearls (Dark Chocolate), Prismacolor Pencils
(PC903, PC933), OMS, Zutter Distrezz-it All tool, Smooch Paint (Luscious Lime),
black mini brads, hemp cord
I worked with the Countryside Evening Paper Collection and it was just perfect for this picture! I distressed all the layers with my Distrezz-it-all and inked the edges with Vintage Photo.
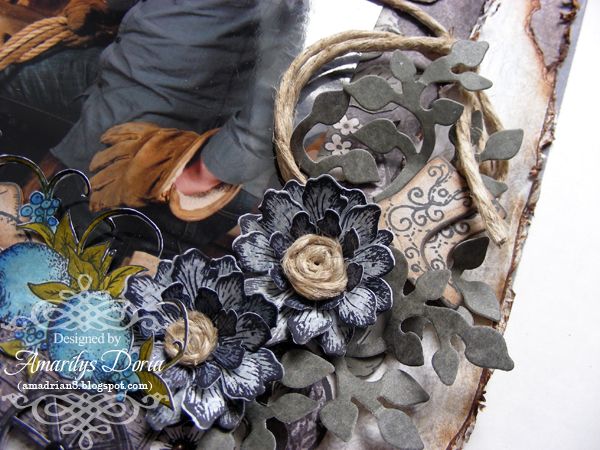
I did use flowers in this masculine layout but these distressed Tattered Blossoms work perfectly as masculine flowers! Of course, I made them in masculine colors too (dark/light blue) and used a bit of hemp cord as the flower center. I also added some handmade chipboard cowboy boots and hat. Finally, I also added some green leaves and a small hemp cord rope to go with the cowboy theme.
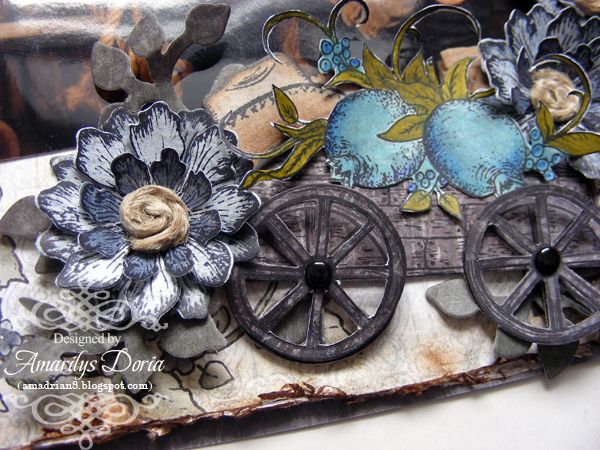
Another look at the sweet masculine flowers. These are so easy to make! They only take two same size flower dies in a lighter color and one smaller size die flower in a darker color. For the center, I just rolled a small piece of hemp cord on my hand and added a glue dot and added it to the flower center. I also made a wagon and pop dotted the wheels for added dimension.
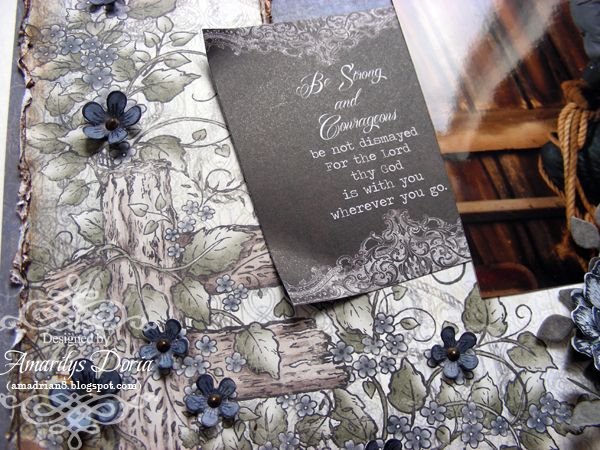
I used this pre-printed quote as my title. I just gave it some depth by bending the corners up a bit.
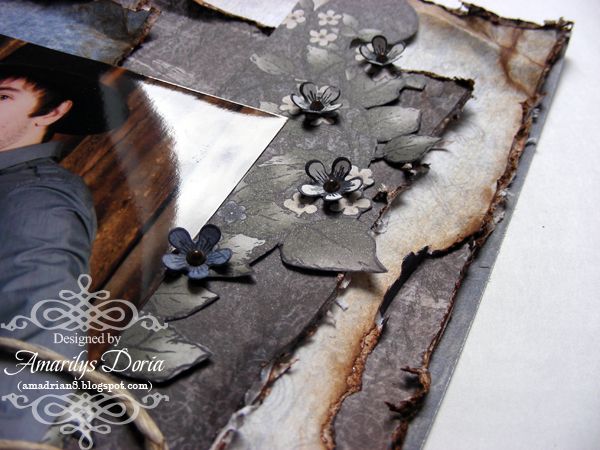
I made a bunch of tiny posies and scattered them around the page for added interest.
Here is the step by step write-up for this project:
Distress the edges of the background pattern paper with
the Distrezz-it-all tool. Make a tear in
the top left side to create peek-a-boo area.
Adhere the background pattern paper unto a blue pattern paper and tuck
in a darker brown strip of paper under the peek a boo area after distressing it
the same way you did for the background. Cut out two pieces of pattern paper
(5”x7”) in blue and brown, distress them with the tool and distress ink, and
adhere to the background paper. Fuzzy cut a flowers and swirls border from
another piece of pattern paper and adhere over the right side of the layout.
Add the 5”x7” photo over these layers. Cut out a quote from the patter paper
and tuck in under the picture. Lift the corners up for added dimension. Die cut
3 green branches and leaves from the Western Broncos Die. For the flowers,
stamp and die cut using the coordinating die different size tattered florals on
dark and light blue pattern paper. Layer the dies together to make a 3D flower.
Get a little piece of hemp cord and roll it with your fingers. Add a glue dot
to it and adhere it as the flower centers. Stamp the wagon twice from the Days
Gone by PreCut Set and die cut it. Fuzzy cut the wheels from one if the die
cuts and add a black brad to them and pop dot them to make them stand out.
Stamp and color the pomegranate swirls from the Organic Fillers PreCut Set and
color them in blue using Prismacolor pencils. Fuzzy cut and adhere over the
wagon. To make your own chipboard pieces, die cut two of the cowboy hat and
four of the cowboy boots from thin chipboard. Layer two of each together to get
them ticker. Stamp the image of each in their corresponding die and lightly
distress the edges with the Tim Holtz distress ink. Roll a piece of hemp rope
around your hand twice and make a knot to secure it. Adhere all these embellies
as a cluster on the bottom right corner of the picture, as shown. Finally,
stamp and die cut a bunch of the smallest two sizes of posies in blue and
white. Add them randomly around the background pattern paper to make it stand
out.

Simply gorgeous!
ReplyDeleteWow, I am loving this, Amy!
ReplyDeleteBeautiful rustic layout!
ReplyDeleteWonderful masculine page!
ReplyDeletetotally gorgeous!!!
ReplyDeleteStunning LO Amy!!! Love this masculine page
ReplyDeleteAnother beautiful layout!! Love flowers!!
ReplyDelete