
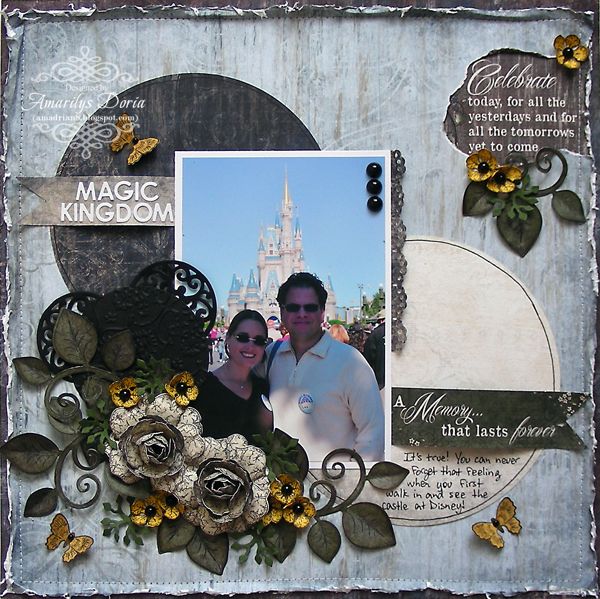
Today, I'd like to share with you a Disney Layout!
Supplies-
Heartfelt
Creations:
HCPC 3480 Brookside Manor PreCut SetHCPC 3500 Open Vintage Floret PreCut Set
HCPC 3532 Beautiful You PreCut Set
HCD 717 Layered Scalloped Posy Die
HCD 723 Garden Romance Die
HCD 724 Classic Editions Die
HCD 727 Vintage Floret Die
HCD 732 Decorative Flower Pot Die
HCD 733 Decorative Lattice Swirl Die
HCDP1 232 Balmy Breeze Paper Collection
452255 Grand Calibur
354806 Standard Circle Large
Other:
StazOn
Archival Ink (Jet Black), Tim Holtz Distress Ink (Forrest Moss), Tim Holtz
Blending tool, Zutter Distrezz-it All tool, Tattered Angels Glimmer Mist
(Sunflower), Martha Stewart Large Circe Cutter, Cuttlebug Embossing Folder
(Textile Texture A2), Basic Grey White Alphas, Want 2 Scrap Pearls (Black),
sewing machine, embossing tool, black sharpie
I used the latest collections' paper packs which are perfect for pretty much everything! I didn't want the traditional Disney colors, specially with a Disney castle picture so i opted for a neutral blue/cream/brown color palette with a pop of yellow!
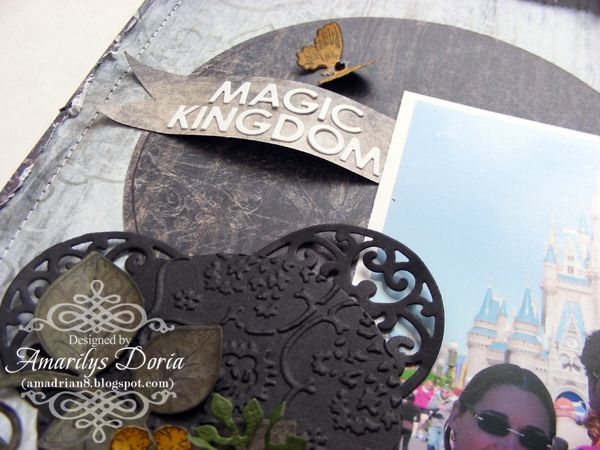
I added my title, which I kept pretty neutral as well, on one of the pendants. I made this Mickey ears out of an embossed Shapeabilities die cut circle and two semi circle doilies from the Layered Scalloped Posy Die. I just love how it looks and the texture it creates!
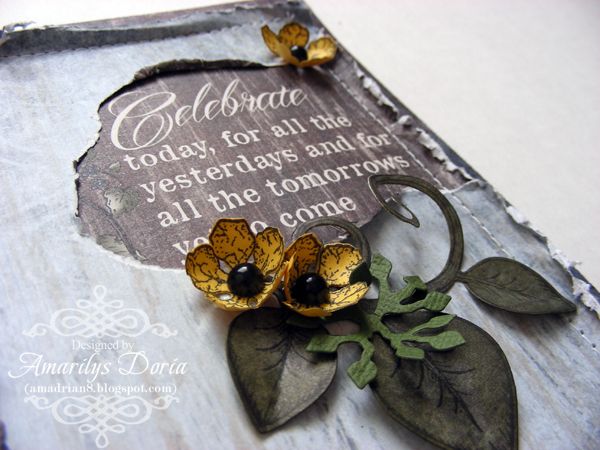
I made a peek a boo area on the top right corner of the layout and added a pre printed sentiment there. To add some color, I added some yellow flowers.
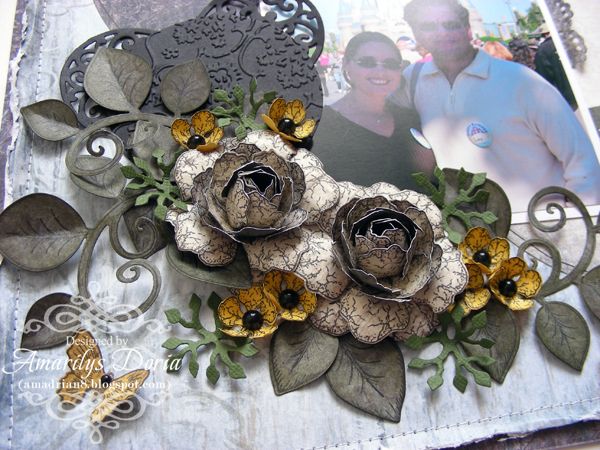
Here's a close up picture of the embellie cluster. You can see the handmade Mickey ears as well as the gorgeous roses in cream and pops of yellow. I also added a lot of greenery and some butterflies.
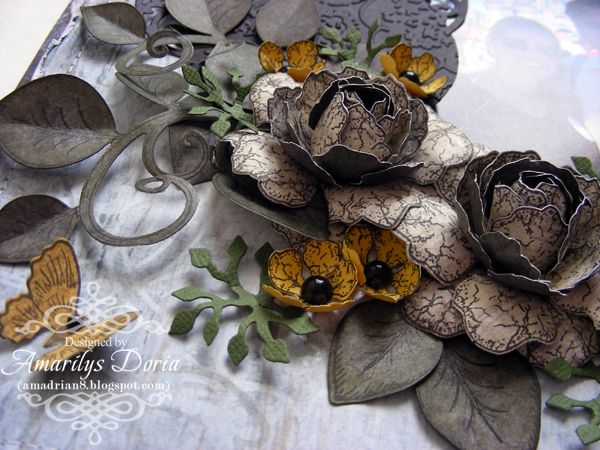
Here's a better look at the blooms. The Open Vintage Floret PreCut Set might be my fav flower stamp/die combo ever!
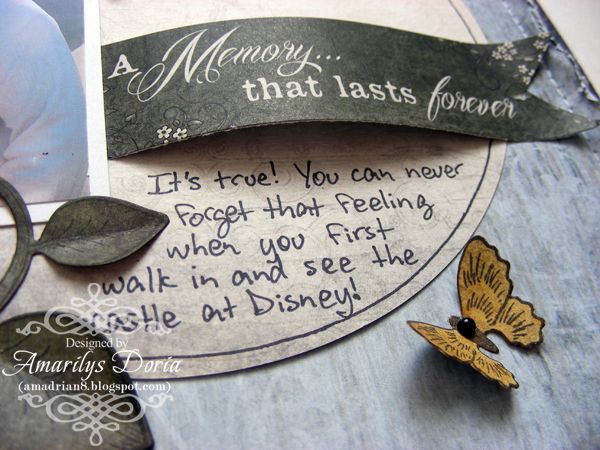
I also added another pendant sentiment on the opposite side of the photo and some journaling right under it.
Here is the step by step write-up for this project:
Distress
a light blue pattern paper using the Distrezz-it-all machine and tear a peek a
boo area on the top right side of the layout. Add a journaling sentiment right
under it. Adhere over a darker background pattern paper. Machine stitch around the
edges of the layout. Cut out two 6” circles from the same pattern paper. Flip
one over and add faux stitching around the edges. Adhere on layout as shown.
Add a matted 4”x6” photo over the center of the page. Die cut a border from the
Decorative Flower Pot Die and tuck in under
photo. Add three black pearls to the top right corner of the photo. Cut a 1”x5”
strip of paper and cut a v notch at the end. Tuck in under top left side of the
photo. Do the same with another sentiment and tuck in under bottom right corner
of photo. Die cut a circle and emboss using your Cuttlebug machine. Die cut two
half mini doilies from the Layered Scalloped Posy Die and tuck in under the
embossed black circle to create Mickey ears. Add over left side of photo. To
make flowers, die cut two large and four smaller flowers from the Open Vintage
Floret PreCut Set. Shape them using a stylus and layer them to form a full
bloom. Make a bunch of the smallest flowers in yellow cardstock as well. Add
black pearls to their centers. Stamp and die cut a few leaves from the Beautiful
You Precut Set. Ink the edges with Forrest Moss distress ink. Die cut a few tiny leaves from the Classic
Editions Die. Adhere the flowers and leaves to form a cluster in the bottom
left corner of the photo. Add some flowers and leaves around the peek a boo
sentiment on the top right side of the layout. Stamp, die cut and glimmer mist
a few butterflies and add them randomly to the layout. Add a small pearl as
their centers. Finally, add your title to the strip of paper on the top left and
journal on the right side of the photo.

now that is just absolutley gorgeous!!!!!!
ReplyDeleteAmarylis, Your layouts are so gorgeous, this one is no different. I love the details and the Mickey Mouse ears are just too clever!
ReplyDeleteYour pages are always amazing! So much attention to detail. Lots to look at!
ReplyDeleteWow...gorgeous flowers and a fab layout!
ReplyDeleteGorgeous layout. Your flowers are beautiful.
ReplyDeleteThis is such a pretty layout!
ReplyDeletehugs,
Gini
So excited for you! You got my vote for sure!
ReplyDeleteWonderful layout! The flowers are amazing!!!
ReplyDelete