
Today is Wednesday which means that I get to share with you my projects for Heartfelt Creations! Today I will be sharing two projects, a layout and a card that I made as a semifinalist for Heartfelt Creations. Let's get started!
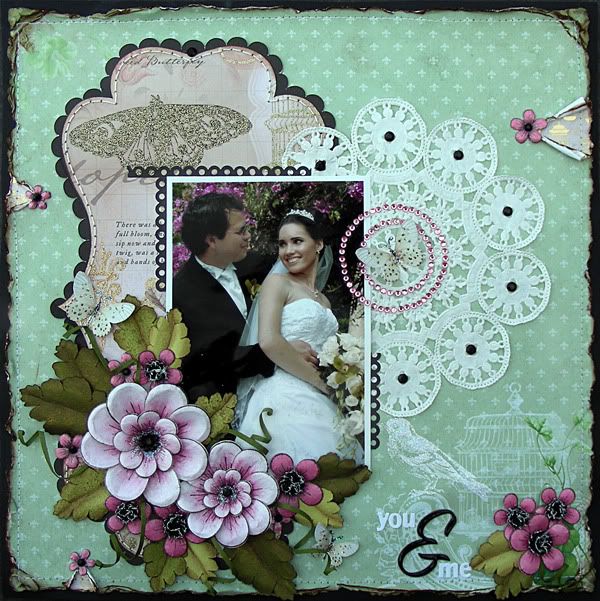
Here is my first layout:
Supplies:
Heartfelt Creations:
HCD 701 Posy Patch Die
Other:
DCWV Mariposa Stack, Kaisercraft rhinestones, Tim Holtz Distress Inks (Vintage Photo), Ranger Stickles (Diamond), Tattered Angels Gimmer Mist (Pearl, Olive Vine, Burnt Red), StazOn Archival Ink (Timber Brown), Inkadikado Chalks, Fiskars Sun punch, Martha Stewart Around the Page punch (Scallop 3 Dot), doily, American Crafts Thickers (Rainboot), Basic Grey Micro Mono Alpha Stickers (white), sewing machine, Pazzles Inspiration (for leaves)
I loved working with the Posy Patch (HCPC 3303) set of stamps by Heartfelt Creations! They are so versatile! I used another wedding picture for this layout which I have been dying to scrap! I used the Mariposa Stack by DCWV for this layout as well since it compliment my pictures so well. I based this layout on my own sketch.

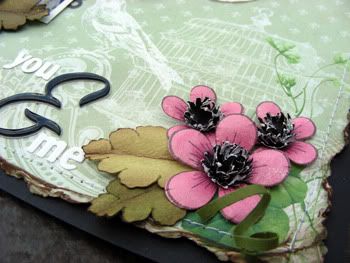
For the flowers, I stamped and diecut using the matching Spellbinders Posy Patch Die (HCD 701) two of each different sizes. I used a pink chalk to color in the centers of each stamped image. I then cut up the flowers, used a stylus to shape the petals how I liked, and re built the flowers with 8 petals each (using the petals from both stamped images). I added black rhinestone to the center and added stickled around it. For the smaller flowers I just stamped, colored with glimmer mist, die cut and added to the layout as fillers. The leaves I designed and cut with my Pazzles Inspiration. Using my trimmer, I cut thin strips of green cardstock, curled them like you would paper ribbon, and added them to the cluster. I just love how this cluster turned out!
Here is another picture of a smaller cluster in the bottom right side of the layout using the unaltered posy flowers.
On the right side under the picture I added a glimmer misted doily.
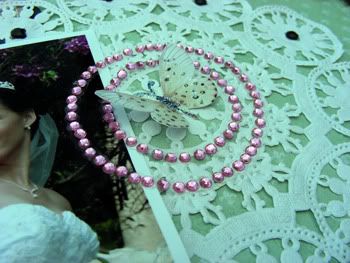
I added two pink rhinestone circles in the center of the doily and a butterfly in the middle. I just love the pop of pink in this side!
Here is the step by step write-up for this layout:
For the background, slightly wet the pattern paper’s edge, wrinkle, dry and ink with brown distress ink. Make random breaks in the paper, curl the edges, and layer a coordinating paper underneath. Machine stitch everything unto a black cardstock for contrast. Cut out a die cut paper and hand stitch around the edge with white thread and place it on the left side of the page like so. Mat you picture on white cardstock. Punch out a few strips of black cardstock using Martha Stewart Scallop 3 Dot, cut the strips apart and keep only the scallop and first dot. Adhere around the photo mat as shown. To help explain how I made the flowers, I gave each stamp from the Posy Patch Flowers Precut Set (HCPC 3303) a number from 1-7 which I will reference, where 1 is the smallest and 7 is the largest. To make the blooms, stamp two #7 and two #4 posies using StaZon Timber Brown ink on white cardstock. Color your flowers using pink chalk, glimmer mist them with clear glimmer mist, let them dry and then die cut them using the coordinating Spellbinder Dies (HCD 701). Ink all the petals with brown ink and cut each petal apart. Using a stylus, cusp the petals as shown to give them dimension. Using only eight petals from the #7 posies, re build the flower. Do the same thing using the #4 posy petals. Use #6 and #3 posies (two of each) to make the other large bloom. Add rhinestones to the center of the flowers and Diamond stickles. My leaves were designed and cut using a Pazzles Inspiration machine but you can use any leaves that Heartfelt Creations offer. Die cut them from green cardstock, ink their edges using a green distress ink, glimmer mist others in Olive Vine, mold them with your fingers and add to your flower cluster. Stamp and die cut a few smaller posies, mist them with Burnt Red glimmer mist and cusp the petals. For their centers, punch out 3-5 suns, layer them inside each other and add to the flowers’ centers. Add black rhinestones to the smallest ones. Use these flowers as fillers in the cluster and add one to each other torn areas of the background paper. Make another cluster on your bottom right area and add a title there as shown. Cut thin strips of green cardstock and curl them like you would paper ribbon and add randomly to the cluster. Add a paper doily behind the picture on the right side of the picture. Add two rhinestones circles to the center of the doily, overlapping the picture, and add a butterfly to the center. Add two more butterflies to the cluster for balance. The picture is of my husband and me on our wedding day. Layout based on my own sketch.
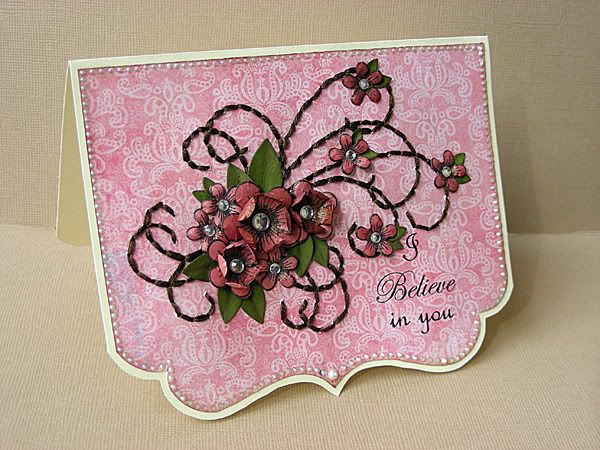
Now, my second project is actually a card:
Supplies:
Heartfelt Creations:
HCD 701 Posy Patch Die
Other:
and a close up of the inside of the card:

My Mind’s Eye Hazel 6”x6” pad, Kaisercraft rhinestones, Ranger Liquid Pearls (White Opal), Tattered Angels Gimmer Mist (Burnt Red), StazOn Archival Ink (Jet Black), Brown Floss
I just love how this card turned out! I used the Posy Patch Swirls (HCPC 3304) stamp as a guide for my stitch work. I stamped directly on my card with black ink, then I came back and poked evenly spaced holes over the image and finally hand stitched the swirl with brown floss. I made the flowers the same way I made the posies in the layout above except that I layered two stamped images for the larger flowers and curled their petals up. I added a rhinestone center in each flower and finished it off by adding some tiny green leaves and a stamped sentiment.
here is a close up of the cluster:
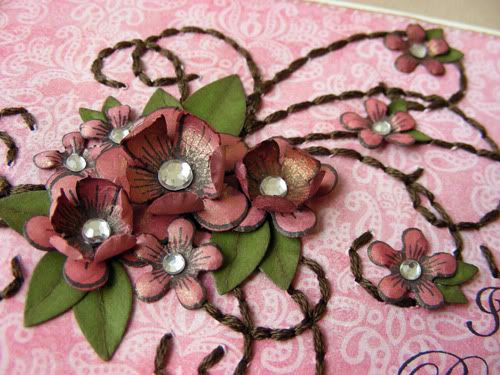
here is a close up of the cluster:
and a close up of the inside of the card:
Here is the step by step write-up for this layout:
Cut a 4.25”x5.5” cream colored card base. Cut out a die cut shape in the bottom of the base. Cut a pattern paper to fit inside the base and add 3D pearl paint dots to the edges. Stamp the largest flower swirls from the Posy Patch Swirls Precut Set (HCPC 3304) directly unto the pattern papers using StaZon Jet Black ink. Using the stamped image, poke evenly spaced holes along the swirls and hand stitch them using brown floss. To help explain how I made the flowers, I gave each stamp from the Posy Patch Flowers Precut Set (HCPC 3303) a number from 1-7 which I will reference, where 1 is the smallest and 7 is the largest. Stamp two #3, four #2 and seven #1 posies on white cardstock from the Posy Patch Flowers Precut Set (HCPC 3303). Mist them with Burnt Red glimmer mist to add color and die cut them using the coordinating Spellbinder Dies (HCD 701). Cusp the petals and place them directly on top of the stamped image. For the largest three flowers, cusp the petals of the second image inwards and place them right on top of the matching flower, alternating the petals. Add rhinestones to all the centers. Make a few small leaves out of cardstock, ink their edges and add them to the cluster as shown. Stamp the sentiment in the bottom right side of the card. On the inside of the card stamp the other flower swirl on the right side.
Thank you for visiting my blog today and don't forget to stop by the Heartfelt Creations blog and see all the amazing projects that the rest of the DT created! There is a also a sneak peek of the next stamp collection on the blog today which you wont want to miss!
***All the Products in BOLD can be purchased from Heartfelt Creations store.

Beautiful layout! LOVE LOVE LOVE the stitching that you did on the card too! Beautiful :)
ReplyDeleteyour flowers are just stunning!
ReplyDeleteThat's a gorgeous page! The flowers are just amazing!! And I love, love, love shaped cards - great job on both.
ReplyDeleteAmarilys, your layout and card are jaw-dropping gorgeous! Love them!!!
ReplyDeleteBeautiful work!!!!
ReplyDeleteThis is a stunning layout. Gorgeous details!!!!
ReplyDeleteThis is a gorgeous page! So much attention to detail. Also love the card. Such beautiful, creative works of art!
ReplyDeleteOustanding work! TFS!
ReplyDeleteHugs ~gerry~
Both creations are totally awesome! Even though I see them on our DT forum, I like to come see the blogs to get all the different views. :o)
ReplyDelete