
On another news, we are finally closing on our first home today at 10:30am! We are super exited about that too and can't wait to have those keys in our hands!
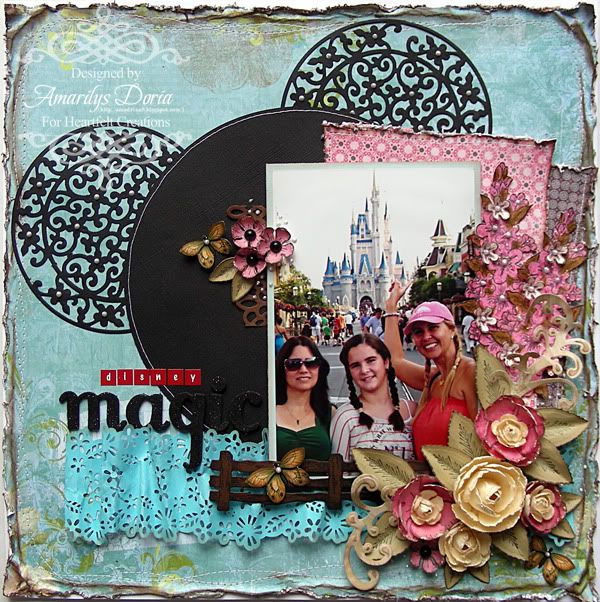
As for now, I'll share my layout with you. I made another 12"x12" layout and chose a Disney photo to scrapbook. I can't believe that during this term as a DT for HC I have never used a Disney picture even though we live 15 mins away and visit Disney on a regular basis! This pic is of my mom, cousin and her daughter (my little cousin) when they visited us late last year. You can see the Disney magic in this pic, which is why I used it :)
Supplies-
Heartfelt Creations:
HCPC 3406 Botanical Floral 1 PreCut Set HCPC 3407 Botanical Floral 2 PreCut Set
HCPC 3439 Flirty Fleurs Precut Set
HCPC 3465 Palisade Farmstead Precut Set
HCD 701 Posy Patch
HCD 711 Decorative Dutch Iris
HCD 713 Decorative Lace Border Die
HCD 717 Layered Scalloped Posy Die Set
HCD 721 Rustic Western Elements Die
472186 Rose Creations Shapeabilities
452255 Grand Calibur
Other:
BoBunny, My Mind’s Eye 6x6 paper pad (Stella & Rose),
Tim Holtz Distress Inks (Antique Linen, Peeled
Paint, Vintage Photo), Ranger Stickles (Diamond), StazOn Archival Ink (Jet
Black, Timber Brown) , Ranger Liquid Pearls (Opal White), Maya Road Mist
(Pomegranate Pink), American Craft Thickers, Ranger Tim Holtz Paper Distresser,
Martha Stewart Punch Around the Page (Wild Flowers), pop dots, sewing machine
I chose a light blue and pink color combo with a few touches of green and cream. I just love how this color combo worked so well for this Disney layout! The first thing you see on this layout though is the huge Mickey ears that I made for behind the photo. I made it using one 7" circle and two doilies from the Layered Scalloped Posy Die Set and positioned them to form the ears at an angle.
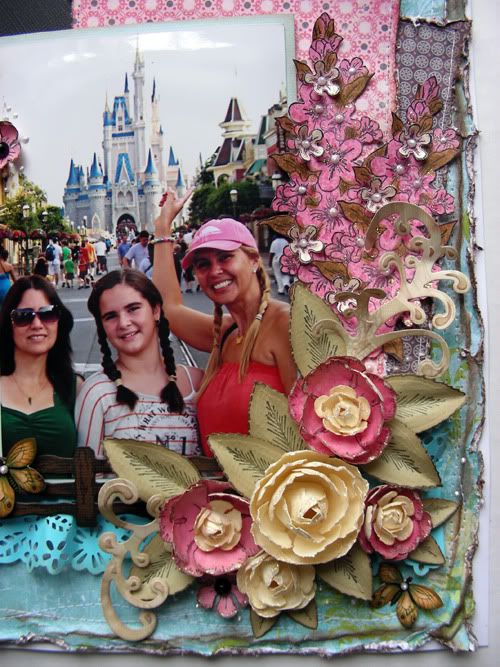
Of course I went ahead and made a bunch of roses in cream and pink to embellish this layout as I had three female subjects in my picture :)
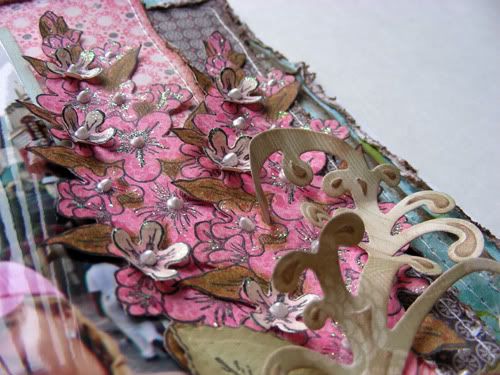
I stamped and fuzzy cut the Flirty Fleurs Precut Set bunch of flowers twice. I colored them with diluted Pomegranate Pink Maya Mist. I then colored the leaves with Peeled Paint distress ink and added liquid pearl drops to the flower's centers.
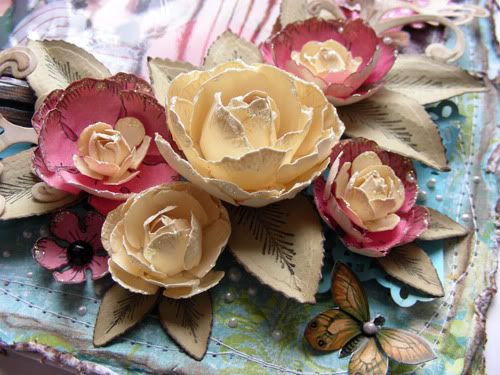
Here's another close up of my roses. I love making these because they are so fast to make and look amazing in any layout!
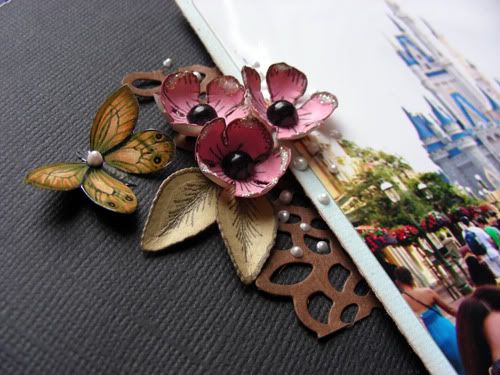
Here's a close up of the small cluster on the left side of the layout. These little details is what makes your layout pop.

Another look at the Mickey ears and flower cluster.

I double punched the Martha Stewart Wild Flowers out of blue cardstock and crinkled it with my fingers to look like lace and added it to the bottom of the layout.
Distress the blue background paper with the Tim Holtz distressing tool, water distressing and Vintage Photo distress ink. Adhere unto a white cardstock and machine stitch the edges. Take two 6x6 matching pattern papers and distress the edges and machine stitch them. Die cut two doily circles using the Layered Scalloped Posy Die Set as well a border from the Decorative Lace Border Die. Cut a 7” circle and machine stitch around the edges. Place the large circle in the center of the page and add the two die cut doilies off centered to create Mickey Ears. Layer the two coordinating pattern papers on the right side. Double punch a strip of blue cardstock and crinkle it with your fingers to look like lace and add it in the bottom of the layout. Mat you photo and pop dot it over the layers as shown. Tuck in a piece of the die cut border on the left side of the photo. Stamp different size flowers from the Botanical Floral 1 and 2 unto a cream colored cardstock using brown archival ink and Antique Linen distress ink. Color a few using diluted Pomegranate Pink Maya Mist. Shape and layer the flowers to make the roses. Stamp and die cut different size leaves. Die cut and emboss a flourish from the Decorative Dutch Iris. Stamp the Flirty Fleurs Precut Set bunch of flowers twice unto cream cardstock, hand cut and color with diluted Pomegranate Pink Maya Mist. Color the leaves with Peeled Paint distress ink. Stamp and die cut the fence from the Palisade Farmstead Precut Set and add it over the bottom of the photo. Add the flowers to the layout, clustering them on the right side and under the photo. Add a few on the left side of the picture over the piece of die cut lace. Add your title on the left side of the photo and finish by adding a few randomly placed butterflies and liquid pearl drops to your layout.
Thank you for stopping by my blog today. Stop by the Heartfelt Creations BLOG today to meet the new designers!

Really beautiful, I love the flowers you did the way you place them in your layout.
ReplyDeleteI love the understated mickey mouse ears background you made with the doileys, very clever!
ReplyDeleteLovely page so creative.
ReplyDeleteMaureen
This is just gorgeous Amarilys. I love those flowers and the fun play on the dies with the "Mickey" ears. That was so clever. Well done!
ReplyDeleteBeautiful page! The flowers are stunning. Looking forward to another term with you on HC!
ReplyDeleteCongratulations Amarilys on another term on the HC DT!! Your work is beautiful! Congrats on your new house too! I am very excited to be on the team and I am looking forward to getting to know all of you ladies. Hugs and blessings!
ReplyDeleteBeautiful layout and of course I love Disney! I love the flowers you created!
ReplyDelete