
Supplies-
Heartfelt Creations:
HCPC 3415 Petite Poinsettia PreCut SetHCPC 3486 Organic Fillers PreCut Set
HCPC 3488 Decorative Metal Fixtures PreCut Set
HCPC 3490 Holiday Mail PreCut Set
HCPC 3491 Holiday Haven PreCut Set
HCPC 3493 Yuletide Sentiments PreCut Set
HCD 717 Layered Scalloped Posy Die
HCD 724 Classic Editions Die
HCD 725 Decorative Metal Fixtures Die
452255 Grand Calibur
125156 Layered Poinsettia Shapeabilities
393386 Labels 4
123910 Holiday Tags Shapeabilities
DDOTS Double Dots 100pc.
HCDP1 225 Frosty Blanket Paper Collection
Other:
Tim Holtz Distress Inks (Vintage Photo, Embossing Powder),
Rangers Embossing gun, American Crafts Embossing Powder (White), StazOn
Archival Ink (Timber Brown, Jet Black), Rangers Stickles (Platinum), Bazzill
Cardstock (black), Signo white pen, black sharpie pen
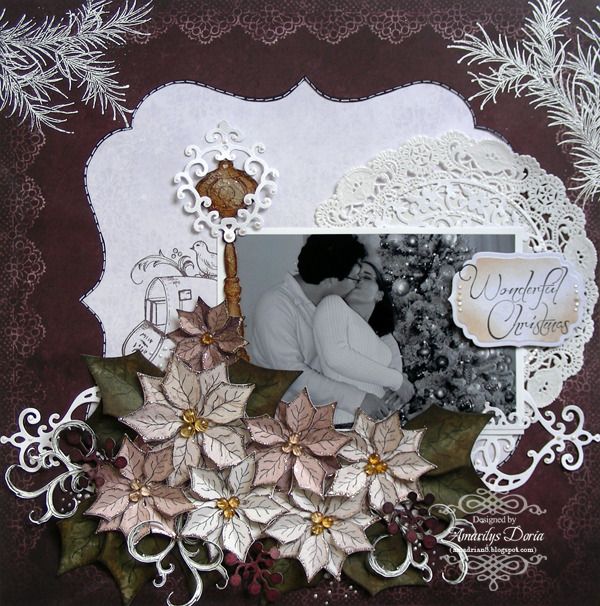
I used one of the pictures from my hubby and I's self-directed Christmas photo shoot here at our home. We had a lot of fun and got some really good pictures.
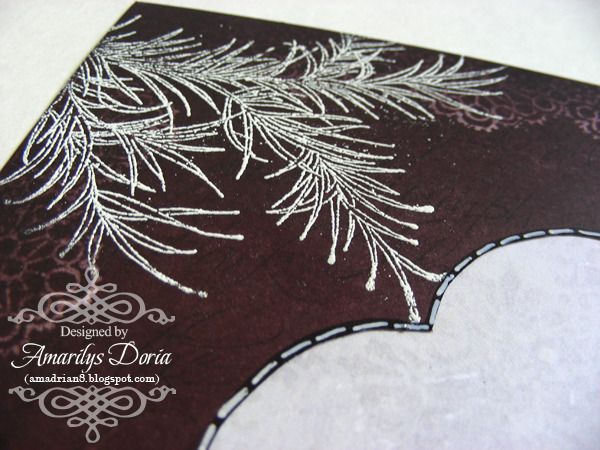
I embossed the branches with white opaque embossing powder in the top right and left corner to give it a snowy feel to this layout.
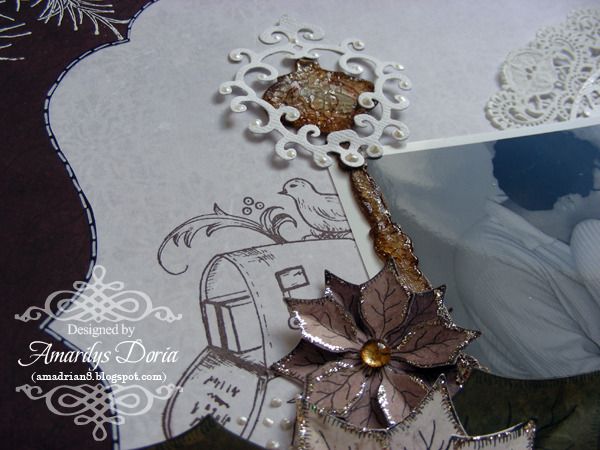
I used my own tutorial to make the chipboard light fixture. I stamped the mailbox scene and layered the photo over it.

I used a real doily and one that I made with Heartfelt Creations dies. I love how layered it looks this way!
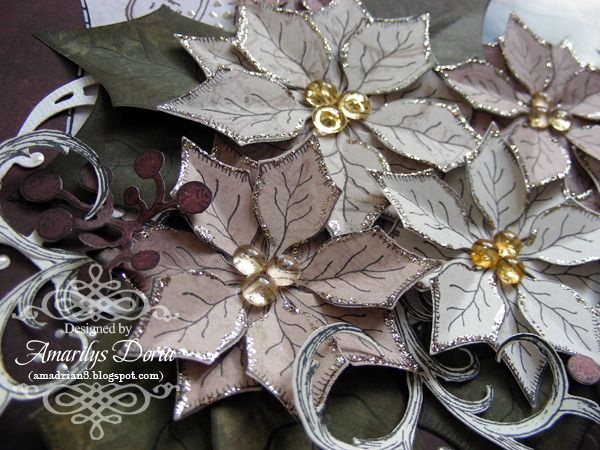
Of course, I made a bunch of poinsettias, leaves and flourishes for the flower cluster!
Cut out a shaped paper out of the center of the burgundy
pattern paper. Put away the dies cut paper and use the reverse part for this
project. Doodle faux stitches on the edges and adhere over a lighter background
paper. Stamp and emboss with white embossing powder the branch from the Holiday
Mail PreCut Set on both top corners of the paper. Stamp the mailbox image in
the left side of the center of the die cut paper. Die cut a doily from the Layered Scalloped Posy Die and layer over 5” doily.
Adhere over the right side of the layout and add your photograph over it,
covering part of the doily and the stamped mailbox image. Make a light fixture
chipboard piece following my own tutorial. Add finished piece over the left side of the
photo. Die cut the matching metal fixture from the Decorative Metal
Fixtures in white and place over the top of the
light fixture. Die cut two decorative dies from the Decorative Metal
Fixtures and add under the right side of the picture and on the lft side. The
flowers will cover the empty space. To make the poinsettias, stamp different
size poinsettias and die cut them. Bend them in half and layer them together,
two at a time. Add dewdrops as centers and Platinum stickles on the edges. Let
them dry. Stamp and die cut a bunch of poinsettia leaves and ink the edges.
Bend them in half as well. Stamp and die cut a few of the berries from the Organic
Fillers Precut Set. Also, stamp and fuzzy cut a few of the flourishes from the Holiday
Haven Precut Set. Cluster the flowers, leaves, berries and flourishes under and
to the left of the photo. For the sentiment, ink your sentiment, cover the
parts that you don’t want to stamp with tape, and press down unto a pattern
paper. Cut and emboss the sentiment with the third smallest die from the Shapeabilities
Labels 4. Pop dot it and adhere over the right side of the picture and over the
doily. To finish, add liquid pearl drops around the clusters and on the
decorative dies.
Thank you for stopping by my blog today! Remember to go to the Heartfelt Creations BLOG and check out what the other designers made this week!
Merry Christmas everyone! :)

You do do amazing pages!
ReplyDeleteIt's stunning!!!
ReplyDeleteJust gorgeous, Amarilys! I love how the light fixture came out! Blessings! Kathy
ReplyDeleteSuper gorgeous page and the photo is a fun one! I love the white embossing of the pine branches on the dark DP!
ReplyDeleteSuch an amazing page, Amy!! Love your gorgeous stamping and embossing. Your poinsettias are fabulous!! ~ Blessings, Tracey
ReplyDeletehttp://gracescraps.blogspot.com/