
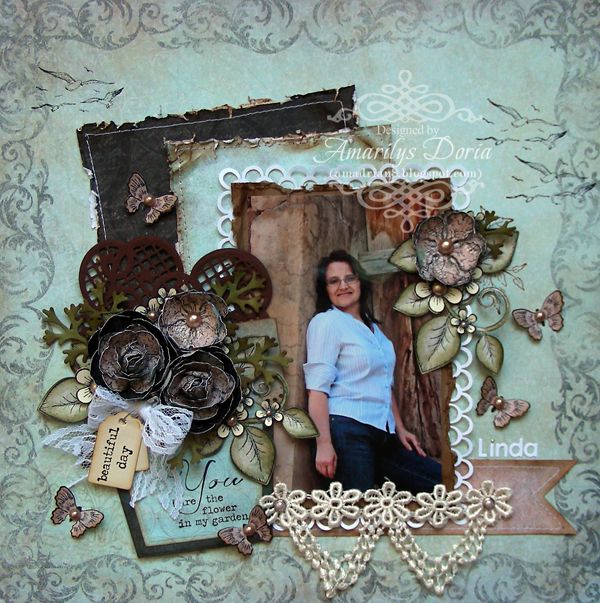
For this layout I also used the brand new Balmy Breeze Collection and let me tell, I can't get enough of this collection!
Supplies-
Heartfelt Creations:
HCPC 3303 Posy Patch Flowers PreCut SetHCPC 3480 Brookside Manor PreCut Set
HCPC 3500 Open Vintage Floret PreCut Set
HCPC 3528 Sand and Sea PreCut Set
HCPC 3530 Waters Edge PreCut Set
HCPC 3532 Beautiful You PreCut Set
HCD 701 Posy Patch Die
HCD 723 Garden Romance Die
HCD 727 Vintage Floret Die
HCD 732 Decorative Flower Pot Die
HCD 733 Decorative Lattice Swirl Die
HCDP1 232 Balmy Breeze Paper Collection
452255 Grand Calibur
472123 Foliage Shapeabilities
Other:
StazOn Archival Ink (Jet Black),
Tim Holtz Distress Ink (Forrest Moss, Vintage Photo), Tim Holtz Blending
tool, Zutter Distrezz-it All tool, Martha Stewart
Double Loops Punch, Want 2 Scrap Pearls (LeCreme), sewing machine,
embossing tool, lace (cream, white), pink pearl brads, safety pin
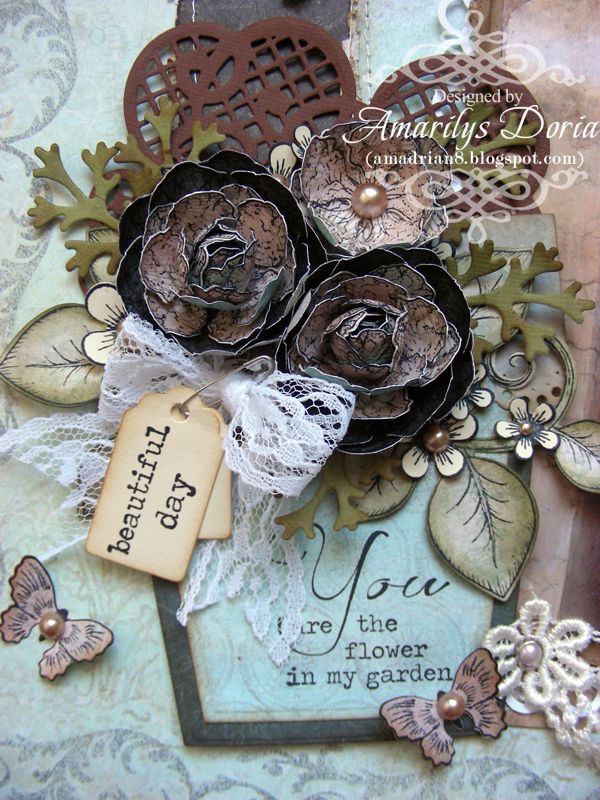
Included in this month's release is this beautiful large flower pot and I just had to make one to embellish my layout! I made a bunch of roses with the Vintage Floret blooms and tucked in some leaves and a bow on my flower pot.
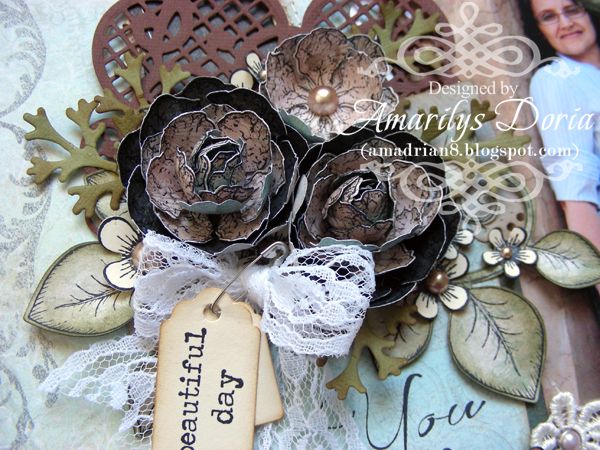
Here's a better view of the roses and embellies on the pot.

Another one of my favs from this set is the new leaves. They are gorgeous! I lightly sponged the edges with TH Forrest Moss distress ink to give it a soft look. I finished my layout by adding a bunch of butterflies randomly around the page.
Here is the step by step write-up for this project:
Cut a dark brown pattern paper to 5.5”x6.5” and a blue paper to 4.5”x5.5” and distress the eedges using the Distrezz-it All tool and distress ink. Cut a strip of 1.5” pink paper and cut a V notch at the end to make a pendant shape. Lightly ink the edges. Machine stitch around the edges of each individual layers of papers. Add all these layers unto a background pattern paper as shown. Punch a white photo mat using Martha Stewart Double Loops Punch. Trim out a brown photo mat for a 4”x6” photo and distress thee edges. Adhere the photo unto the brown photomat and over the white double loop punched mat. Adhere over the center of the layout. Randomly stamp seagulls on the background paper. Using Vintage Photo distress ink, stamp the leaves and branches from the Waters Edge Precut Set on the right side of the photo. To make the flower pot, die cut both flower pots in coordinating colors. Emboss and lightly ink the edges to give them dimension. Add the smaller one over the larger one. Die cut the doily edge and add over the flower pot. Die cut the Decorative Lattice Swirls Die out of brown cardstock and tuck in over the top of the flower pot. Stamp and die cut different size Open Vintage Florets in brown and pink. Form your roses by layering 4 pink flowers for the center and two brown ones for the bottom layers. Make smaller flowers using only two pink layers. Add a pearl as their center. Stamp and die cut using the coordinating die a few leaves. Ink the edges with Forrest Moss distress ink and bend each leaf in half to give them dimension. Stamp and die cut a bunch of smaller size posies and add pearls to their centers. Die cut a few greenery from the Foliage Shapeabilities as well. Add the flower pot to the left side of the photo and arrange the handmade embellishments. Tuck in a bow made out of white lace and add two tags with the stamped sentiment to it using a safety pin. Stamp the larger sentiment to the flower pot itself. Add another cream colored lace to the bottom of the photo using two pink pearl brads. Add a title to the right of the photo. Add another small cluster to the top right side of the photo over the stamped brown leaves and branches. Stamp and die cut a bunch of butterflies and add a pearl as their bodies. Randomly place these butterflies around the layout.
Thank you for stopping by my blog today! Remember to go to the Heartfelt Creations BLOG and check out what the other designers made this week!

You do the most stunning pages! I'll be coming back in the future just to look at them~ :)
ReplyDeletewow!!! This is a gorgeous layout! Love all the details you created with the Heartfelt dies and flowers!
ReplyDeleteLove the layout! So many wonderful elements too!
ReplyDeleteThis is gorgeous! Love all the details.
ReplyDeleteI'm a huge fan! I'm trying everything and learning as I go!! This does look like a fun collection to play with. I have to admit I'm still learning with the HC dies and stamps. Love those crochet pieces and your punching. :-)
ReplyDelete