Thursday, September 30, 2010

thursday...

Today I have a layout to share with you. This page came up together pretty much by itself and I love how it came out!


I was inspired by Color Combo Challenge 161 but added a hint of green to accent the picture. Here's the palette:


I was also inspired by Let's Scrap left side of the 9-29-10 sketch. Here it is:


The pictures were taken last week by my husband when we went for a walk at the park. The smaller pieces of pattern paper are actually digital that I recolored and printed to use in this layout. I handmade the Mountain Lily flowers using my tutorial. The other flower was part of a bouquet from Michaels. The round picture is actually pop dotted to give it dimension and this works wonderfully. I hand stitched the circle using floss. This process took almost an hour but I think it makes the page!

Thanks for stopping by! I'll leave you with some close ups:


Saturday, September 25, 2010

saturday...

I have some awesome news to share with you all! I'll be a guest designer for Sketchy Thursdays (my favorite sketch blog ever!) this October! I'm so exited to be working with Diana, Heidi and the rest of the DT!


Stop by and play along their awesome sketches for a chance to win some great RAKs!

Thursday, September 23, 2010

wednesday...

I'm back today to share with you my newest layout-made only of cardstock!


Maggie over at PIT challenged us to make a layout using only cardstock and stamps, and if we wanted we could also use stickles, glimmer mist and of course ink. To bring it up a notch, Helene challenged us to Pile it ON and combine 3 challenges and a twist in one layout.

Maggie's Challenge: Use cardstock, stamps, and any coloring medium to create a layout.
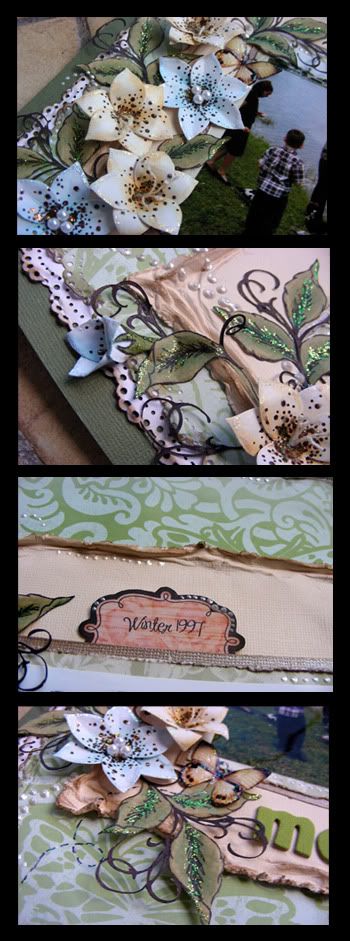
.::OK, the first thing I did was I stamped a light blue cardstock (non textured) with brown ink (the only one I have). I used a butterfly and dragonfly stamps that I have by Inkadinkado (Morphic Bugs). I randomly sprayed walnut ink over it to mask the bright blue cardstock. I placed a die cut flourish over the page and sprayed again, making a few flourish imprints. You can see these around the corners. I then cut out the die cut shaped paper and outlined the border with a black sharpie. I glues the die cut paper on a brown Core-dinations cardstock which I got recently at Joanns. These cardstock are great for embossing because they are dual tones. For example, this one that I used is light brown and dark brown.

The butterfly is a Martha Stewart stamp that I picked up for $2.00 at Walmart on clearance some months ago. I stamped on a cream cardstock, cut it out, and inked the edges with the brown ink. I placed a layer of Modge Podge over the whole thing to give it a shiny look. I finally added some stickles to it to make it stand out. For the two round circles on the top right corner, I stamped a large section with a background stamp (unknown) that my MIL gave me some time back. I then punched out a 1" circle and inked the edges. Using 3D white paint, I highlighted where the light would hit it::.

Here are some close ups of these pieces so you can what I'm talking about.


Helene's Challenge: Pile It ON!
Barbara's Challenge: Use two different punches in your layout
.::I used MS (Martha Stewart)'s Scalloped Dots and Doily punch to make the border under the pictures. I also water distressed them to give them more texture. Finally, I inked the m lightly with brown ink to give them depth::.

Carla's Challenge: Post a picture of something that we did this past summer.
.::We lounged around most of the summer because it's too hot in Miami to do anything outdoors. We are not beach people so we stayed in and watched movies and relaxed at home. I used my kitty's picture to reflect this since no one is lazier than a cat!::.

Helene's Twist: Use the color purple, or eggplant, somewhere in your layout!
.::I used purple for the word lazy in the title. It actually goes surprisingly well with my color scheme!::.

More info: I used this week's sketch at PIT. I also used Gabrielle's Torn Cardstock Paper Flowers Tutorial (linked in my sidebar). I cut the title using my Pazzles and then I added 3D paint to make it stand out. I also cut the film strip using my Pazzles. The leaves and green flourishes were cut using my cuttlebug. I drew in the veins on the leaves with a sharpie.

Thanks for stopping by and I hope that you leave inspired into working on a cardstock only layout!

Sunday, September 19, 2010

sunday...again!

Welcome back! I've had a lot of people asking me how I made these flowers so I decided to make a quick tutorial for you all!

I'm calling them Mountain Lily, since they kind of look like them.

Step 1

You need two 4 tipped flower, similar to this one. I used a cuttlebug die cut that I've had for years. If you don't have a die cutting machine, you can download this shape that I made for you and hand cut it. Remember to resize to the size that you want. Mine die cut is 1.25"x1.25" and the end product is about 1.5".

Step 2

Chalk the center of your die cut shape to desired color. This is optional but it will give your flower more dimension. You can always do the die cut in a light yellow paper and skip this step.

Step 3

Using a sharpie or a marker of your choice, draw different size dots, with the center having a lot than the tips. Leave one side without them since you wont see it anyway.

Step 4

Turn your die cut on over and cup the petals. I use a sharpie and my mouse pad, as you can see. Be careful not to be too rough with the paper because you might break it.

Step 5

Cut a small slit to the center. Glue the colored petal over the white petal.

Step 6

Your die cuts should look like this now and you can see how they are starting to look like flowers.

Step 7

Fold the tips toward the bottom like shown in the picture. This will make the flower look more realistic.

Step 8

Glue them together, making sure that the petals do not end up one over the other. At this point in time, you are pretty much done. You can stop here and add a rhinestone to your bloom or a pretty button or even a smaller flower but I like the stamens on this blooms so I did two more steps for this.

Step 9

I used thicker thread for the stamen. I made a knot at the ends and added four stamens. I made a hole through the flowers and inserted the thread, creating the stamen.

Step 10

These is a close up picture of the flowers on my layout already. I added stickles o the center and highlighted the black dots with stickles too. I use a glue dot to adhere these flowers to my page.

Thank you so much for stopping by and looking through my tutorial. I appreciate it! If you use this tutorial, please give me credit in your post and link your creation here so I can check it out too!
Thanks!

sunday...

Happy Sunday!

I have a few projects that I will be sharing with you today, as well as a brand new tutorial!

The first one is a card that I made for my newest baby cousin's baptism.


I do not have the Bookatrix so I did the next best thing-I used my Pazzles to make the shapes. I also handmade all the paper roses, butterflies and leaves. I embossed the top layer and added 3D paint to accent the poem and title. I love how this cute little card came out and will probably be making some more of them soon!

Here are a few close ups:


Now I have two TCR #23 layouts to show you.
This first one is from last week:


and here's the palette I was working with:


I must admit, orange/blue/green combos scare me but I love how they look together! I didn't have flowers that matched this layout so I ended up making my own (tutorial in previous post). I love the softness of this layout! I found this old picture of my dad, little brother and I (I was 12 yrs old here) feeding the ducks after church.

Here are some close ups of the layout:


The second layout is for this week's TCR #24:


Loved this combo but it was hard because soft colored palettes are very hard for me to work with. I used a picture of my husband's schoolmates and their wives taken earlier this year when we went for dinner at Texas de Brazil (love this restaurant!). Again, I used the same leaves and flowers as in the previous TCR layout. I'm entering this one in Sept. DIY Challenge at sb.com.
Black flowers: Dried Satin Rose By Kenlin
Blue flowers: Water Distressed Bloom By Gabrielle
Leathery paper strips: Masking Tape Background By Lisa Valentine

Here are some close ups of the layout:


I'll be posting a tutorial for my light yellow flowers very soon (I'm still working on it!) so please come back in a bit for the tutorial!

Thanks for stopping by!

Monday, September 13, 2010

monday...again!

Thanks for coming back today!

The last 2 layouts are based on two Sketchy Thursdays sketches, which you all know that I absolutely love!


and here is the sketch:


I added the cluster in the right side of the layout because I needed a journaling spot for this page plus I feel that it balances the layout. The big black plant is a digi stamp that I printed on vellum and handcut. This process took forever but I think it looks great! I had a lot of fun water distressing this layout.

Here's my last layout:


and is based on Sketchy Tursdays weekly sketch:


For this one, I also did the water distressing technique. I cut the title and blue flourish with my Pazzles. The green fishy is a shaped brad (remember those?) taht I had in my stash. I hamdade the blue flower using Wendy's tutorial (linked in a few posts below). The journaling spot is actually a digital one that I re sized and printed out.

Thanks for stopping by and I hope you have a great week!

monday...

Good morning everyone! Today is a new day and the start of the week and I'm feeling good! I got a lot accomplished during this past weekend. I attended two online crops (overachiever?) and found a great digi stamps site. I even posted a new layout on eBay last night! (see last post for details).

Like I said, I found this awesome site that has regular challenges using their awesome digi stamps. This is the card that I made with their free adorable kitten stamp:


I colored the kitten in photoshop and printed him on a white cardstock. The card itself is rather plain but I wanted to keep close to their sketch since I liked it so much. I entered this adorable card in two Crop challenges too.

Although it took forever, I made a two pager over the weekend for Barbara's Double pager Crop challenge.


I used Let's Scrap's current sketch


and Color combo Galore's this week's palette for this layout.

Pictures are from late 2008 when we went as a family to Bayside and spent the day there. It was a lot of fun! The bouquet on the left side is inspired by Lacee's layout "A pocket full of posies" and it was just what I needed to fill that side of the layout. There is hidden journaling under the main picture. I stitched the waves for a more flowy feel to the layout and I think that did the trick.


My next layouts is based on an old Pagemaps and I did the water distressing technique that I've come to love so much. The flowers I received from Jan in a swap and were just perfect for this layout.

Come back later today to see the last two layout. Thanks for stopping by!

Sunday, September 12, 2010

sunday...

HI everyone! Just a quick post about my latest layout for sale on eBay.

It's titled "Blue Eyed Beauty", although I can change the title for you if you like, and it features two hand drawn little girls. It will be perfect for that little one in your life or even for you!


Close up of the left side.


Close up of the right side

...and a few details:


Check it out at here.

Monday, September 6, 2010

monday...

Happy Labor Day Bloggers!


First of all, I want to thank you for stopping by my blog! I have exiting news to share with you today. I'm starting to sell pre-made scrapbook pages on eBay again as well as paper piecings and tear bears. I already have one double layout listed on eBay right now. Below are the details. Click on this link to go and check it out!


Here are both pages side by side. It can be used for either a boy or a girl or both! It will work well for fall pictures of your little one playing on the leaves, or picking pumpkins at a patch. This layout features four of my little tear bears, two boys and two girls all dressed in fall colored clothes. I also drew and hand cut all the vines, leaves and pumpkins. Of course, that big tree uniting the two pages is also handcut, drawn and pieced by me. There are four visible spots for pictures. You can either use a 4x6 picture of you can crop it to 4x4 and will still look fine! All the flowers are attached to double sided tags. One side has pretty pattern paper that you can use to add smaller pictures or a quick note and the other side has lines for you to journal all those special memories. The background is machine stitched for support and embellishment as well as the photo mats.

Here's a close up of the left side:


Here's a close up of the right side:


Finally, here are some close ups of the tear bears and piecings:


Don't forget to check here regularly since I will start posting teaser pictures of the layouts and piecings that I will be listing! Thanks for stopping by!