
Here is my layout:
Supplies-
Heartfelt Creations:
Other:
Jillibean Soup, Basic Grey, Tim Holtz Distress Inks (Vintage Photo, Wild Honey), Ranger Stickles (Diamond), Ranger Liquid Peals-white opal, Tattered Angels Gimmer Mist (Olive Vine, Pearl), StazOn Archival Ink (Timber Brown, Jet Black), Ranger Clear embossing powder, Ranger Vintage Photo Reinker, Ranger Embossing Distress Ink, Tim Holtz Blending tool, Cuttlebug machine, Marvy Uchida 2500 heat embossing tool, Brown Gala Glitz, White Signo pen, white doily, sewing machine, Pazzles Inspiration (for title)
and here is this week's sketch over at Creative Scrappers:

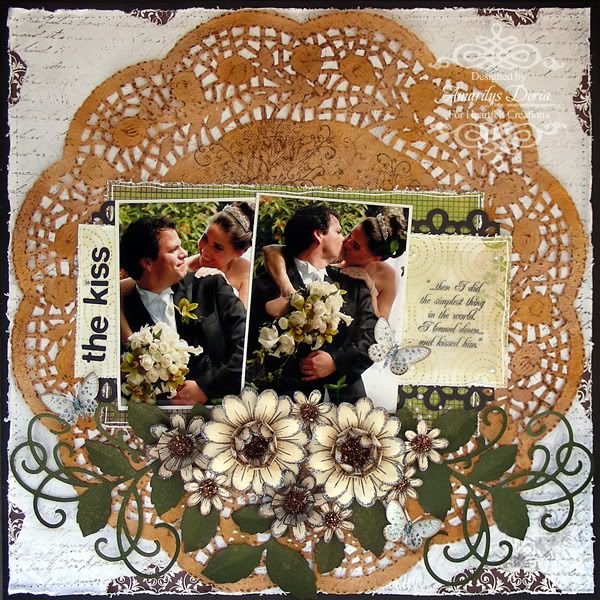
I loved working on this layout because 1) I love this sketch that i made (I might have to use it again very soon!) and 2) I love working with my wedding pictures. For this layout I actually handmade my own pattern paper (see tutorial here).
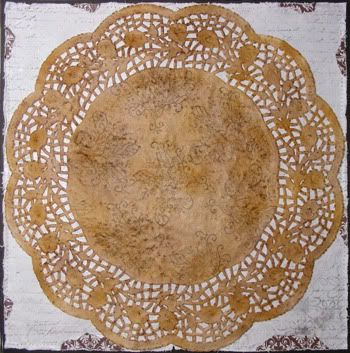
For the background, I started out with a white 12x12 piece of cardstock. I used the Daisy Patch Background Precut Set to clear emboss and the Large Elegant Word Background Precut Set stamp to stamp over the embossing with brown ink. I randomly tore a few areas around the edge of the paper and added a brown pattern paper under the peek a boo areas. I machine stitched everything. The doily was actually white when I started but I wanted more of a worn or old look to it so I mixed a bit or Vintage Photo Reinker and water in a mini mister and misted until I achieved the desired color. I went over it with a blending tool and added some Vintage Photo and Wild Honey distress ink to random areas. Finally, I randomly stamped the Bella Rose Rosebud largest swirly stamp onto the doily to add some pattern. I finished the background by glimmer misting everything with Pearl glimmer mist to add some shine and machine stitching around the edges.
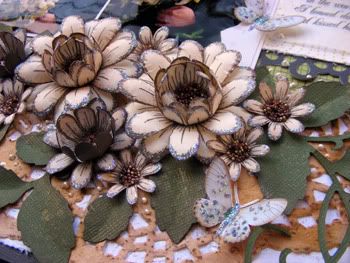
I handmade all the flowers using the Daisy Patch Flower PreCut set stamps. For the flowers, stamp using brown archival ink a few different sized flowers from the Daisy Patch Flower set, cut them using the matching die and cusp all the petals. Build your flowers as shown-2 large flowers in the bottom and 2 smaller ones curled upwards on top. Add Brown Gala Glitz to the flower centers and Diamond stickles to their edges. Finish the cluster by adding some greenery, a few butterflies and randomly placed liquid pearl dots.
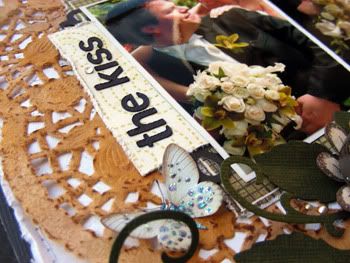
For the title I just cut it with my Pazzles Inspiration and added a small rhinestone to dot the i.
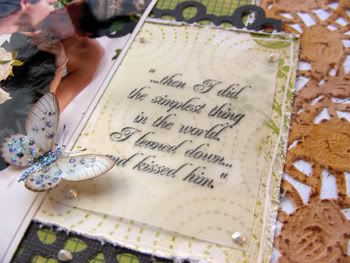
I added a computer generated quote that i printed on vellum. Printing on vellum always takes forever to dry so I added clear embossing powder to right after printing it and embossed it. Looks pretty and I can keep working on the layout right away!
Here is the step by step write-up for this layout:
Clear emboss a white cardstock using the Daisy Patch Background stamp. Stamp the Large Elegant Word Background stamp randomly over it. Trim to fit inside a 12x12 black cardstock. Distress the edges and randomly tear pieces from the sides. Insert small pieces of pattern paper behind the torn white cardstock. Adhere to black cardstock and machine stitch around the edges. In a mini mister, mix water with a little Vintage Photo Reiner, mix and mist a white doily. Randomly stamp the Bella Rose Rosebud largest swirly stamp onto the background. Using a blending tool add some Wild Honey and Vintage Photo ink to the doily. Mat the pictures with white cardstock. Adhere the layers and pictures as shown. For the flowers, stamp using brown archival ink a few different sized flowers from the Daisy Patch Flower set, cut them using the matching die and cusp all the petals. Build your flowers as shown, add Brown Gala Glitz to the flower centers and Diamond stickles to their edges. Cut 3 Belle Rose leaves and glimmer mist them with Olive Vine glimmer mist. Arrange the flower/leaves cluster as shown. Randomly add some butterflies to the cluster. Finish by adding a title to the left side and a quote to the right side of the pictures. Layout based on my own sketch.

This is lovely, I love your flowers!
ReplyDeleteA beautiful page with stunning flowers!
ReplyDeletethat layout and sketch are both GORGEOUS...your flowers are to die for :)
ReplyDeleteGorgeous work!
ReplyDeleteAmarilys this is absolutely stunning. I learned something from you today about putting reinkers and water in a mister. How cool is that!!! Your flowers up close are fabulous. This is amazing.
ReplyDeleteBear Hugs,
Carol
your LO's are stunning! I bet your scrapbooks are AMAZING!
ReplyDeleteIt's a beautiful LO!!!
ReplyDeleteI love all the flowers and colors :))
Thanks for sharing it with us at Creative Scrappers :*